Puppet is an Infrastructure provisioning tool, similar to Ansible,
Chef. We will see how to setup Puppet Master in Ubuntu 18.0.4

Pre-requistes:
Install Puppet master on new Ubuntu with medium instance
port 8140 needs to be opened.
Steps:
First let us see how to install Puppet 6.x on Ubuntu 18.0.4.
This confirms that Puppet Master is installed successfully.
Verify which version of Puppet installed by executing below command:
apt policy puppetserver

2. you need to install the aws-sdk-core and retries gems as root (or superuser):
sudo /opt/puppetlabs/puppet/bin/gem install aws-sdk-core retries
sudo /opt/puppetlabs/puppet/bin/gem install aws-sdk -v 2.0.42

sudo /opt/puppetlabs/bin/puppet module install puppetlabs-aws

That's it. Puppet Master is setup successfully!!!! You can watch the above steps in YouTube as well.

Pre-requistes:
Install Puppet master on new Ubuntu with medium instance
port 8140 needs to be opened.
Steps:
First let us see how to install Puppet 6.x on Ubuntu 18.0.4.
Steps for Puppet Master Installation
1. Modify Puppet Master Hosts file to add hostname of Puppet Master
sudo vi /etc/hosts
1. Modify Puppet Master Hosts file to add hostname of Puppet Master
sudo vi /etc/hosts

2. Download puppet installable
curl -O https://apt.puppetlabs.com/puppet6-release-bionic.deb
sudo dpkg -i puppet6-release-bionic.deb
sudo apt-get update
sudo apt-get install puppetserver -y
sudo dpkg -i puppet6-release-bionic.deb
sudo apt-get update
sudo apt-get install puppetserver -y
sudo ufw allow 8140
sudo systemctl enable puppetserver.service

(the above command is to start the service during starting the Ubuntu instance)
sudo systemctl start puppetserver.service
(The above command is for starting the server and this may take some time)
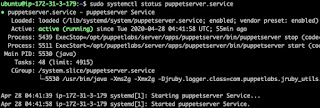
sudo systemctl status puppetserver.service
Now press q to come out of window.
Add puppet master ip address and puppet next to it like shown belowsudo systemctl enable puppetserver.service
(the above command is to start the service during starting the Ubuntu instance)
sudo systemctl start puppetserver.service

(The above command is for starting the server and this may take some time)
sudo systemctl status puppetserver.service
Now press q to come out of window.
This confirms that Puppet Master is installed successfully.
Verify which version of Puppet installed by executing below command:
apt policy puppetserver

2. you need to install the aws-sdk-core and retries gems as root (or superuser):
sudo /opt/puppetlabs/puppet/bin/gem install aws-sdk-core retries
Done installing documentation for retries after 0 seconds
6 gems installed
3. Also install AWS SDK for accessing resources in AWS
sudo /opt/puppetlabs/puppet/bin/gem install aws-sdk -v 2.0.42

Done installing documentation for retries after 0 seconds
4 gems installed
4. Now you can install puppet-labs-aws module
sudo /opt/puppetlabs/bin/puppet module install puppetlabs-aws

That's it. Puppet Master is setup successfully!!!! You can watch the above steps in YouTube as well.


3EAC047DA9
ReplyDeletekiralık hacker
hacker arıyorum
belek
kadriye
serik
This is a clear and thorough guide for setting up Puppet Master on Ubuntu 18.0.4. I followed similar steps recently while automating EC2 provisioning on AWS, and having the AWS SDK and puppetlabs-aws module made managing cloud resources much smoother.
ReplyDeleteB3B37E5DE8
ReplyDeleteTakipçi Satın Al
İzlenme Hilesi
En İyi Aksiyon Filmleri