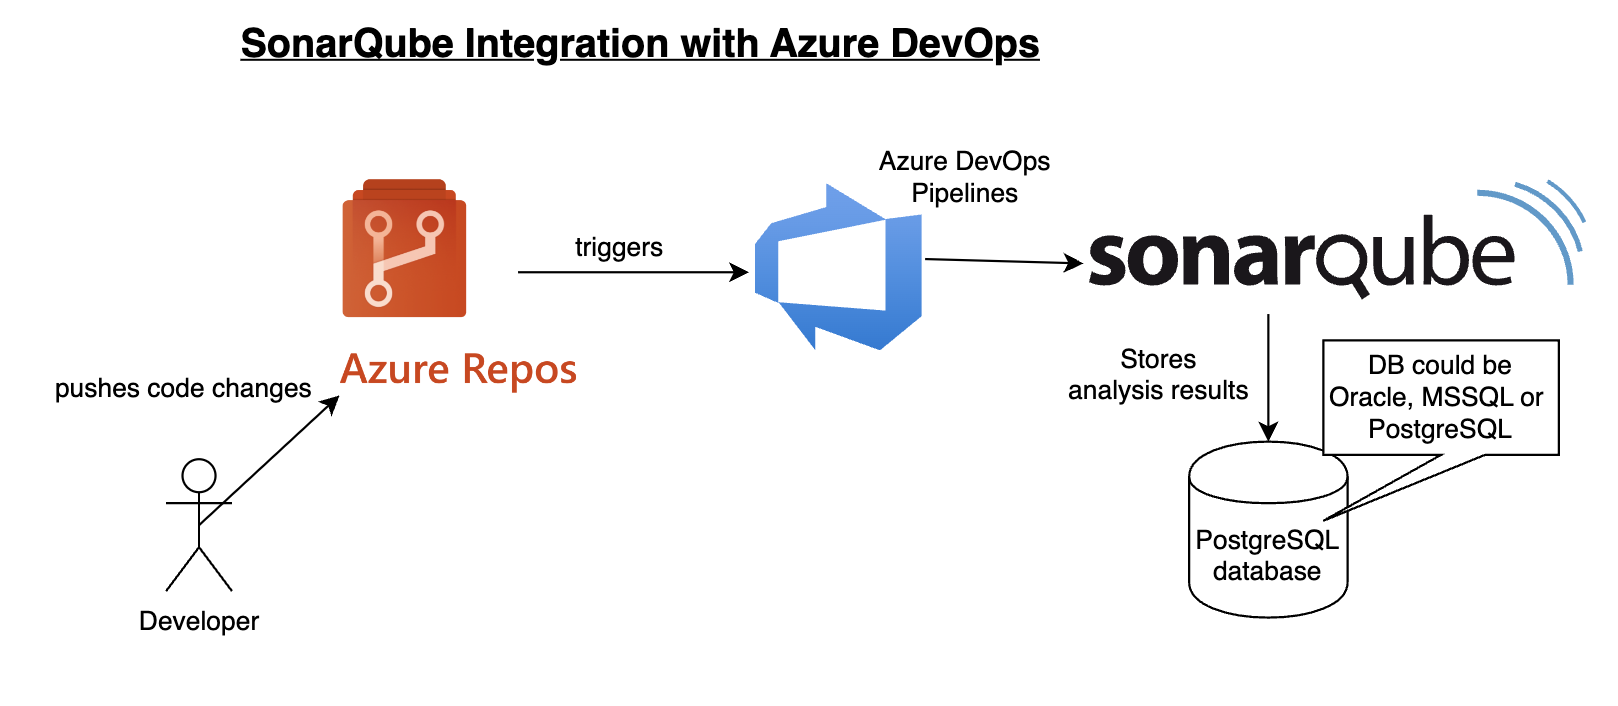
- Make sure SonarQube is up and running
- Make sure Java Project is setup in GitHub
- SonarQube is already integrated with GitHub Actions
- SONAR_HOST_URL and SONAR_TOKEN configured as secrets in GitHub Repo
- Login to SonarQube
- Create Quality Gate in SonarQube
- Add conditions in Quality Gate
- Make quality gate as Default
- Create GitHub Actions CICD workflow yaml
- Add tasks for Maven build and Sonar Scan
- Add tasks for integrating Quality gate
- pass/fail the builds in SonarQube
What is Quality gate?
In SonarQube a quality gate is a set of conditions that must be met in order for a project to be marked as passed.
Create Quality Gate
Login to SonarQube, Click on Quality gate, enter some name

Once you create the quality gate. Click on Add condition.

Select new issues from the drop down and enter 2

Select new bugs from the drop down and enter 1 as error


Setup a Default Gate

The below file have four steps(tasks)
name: CI/CD workflow for Maven Build, Sonar Code scan and Quality gate check
on:
push:
branches:
- main
workflow_dispatch:
jobs:
build:
runs-on: ubuntu-latest
steps:
- name: Checkout code
uses: actions/checkout@v3
- name: Set up JDK 11
uses: actions/setup-java@v2
with:
distribution: 'adopt'
java-version: '11'
- name: Build with Maven
run: mvn install -f MyWebApp/pom.xml
- name: SonarQube Scan
uses: sonarsource/sonarqube-scan-action@master
with:
projectBaseDir: .
args: >
-Dsonar.organization=my-org
-Dsonar.projectKey=my-Java-web-app
env:
SONAR_TOKEN: ${{ secrets.SONAR_TOKEN }}
SONAR_HOST_URL: ${{ secrets.SONAR_HOST_URL }}
# Check the Quality Gate status.
- name: SonarQube Quality Gate check
id: sonarqube-quality-gate-check
uses: sonarsource/sonarqube-quality-gate-action@master
# Force to fail step after specific time.
timeout-minutes: 5
env:
SONAR_TOKEN: ${{ secrets.SONAR_TOKEN }}
SONAR_HOST_URL: ${{ secrets.SONAR_HOST_URL }} #OPTIONAL
# Show the output from the Quality Gate.
# The possible outputs of the `quality-gate-status` variable are `PASSED`, `WARN` or `FAILED`.
- name: "Here is SonarQube Quality Gate Status value.."
run: echo "The Quality Gate status is ${{ steps.sonarqube-quality-gate-check.outputs.quality-gate-status }}"