Tuesday, February 25, 2020

Setup Java and Maven on Ubuntu on Microsoft Azure Cloud - Install Java and Maven on Ubuntu on Azure Cloud

Please follow steps to install Java, Maven on Ubuntu Virtual machine running in Azure Cloud.

Java Setup on Ubuntu
sudo apt-get update

Install Java Open JDK 11 package
sudo apt-get install default-jdk -y

Once install java, enter the below command

Verify Java Version
java -version

Maven Setup

sudo apt install maven -y

you can type mvn --version
you should see the below output.


That's it. You have setup Java and Maven successfully!!

Sunday, February 23, 2020

How to push a code change into a GitHub repository? | push code changes into GitHub using Git bash

Let us see how to push a code change using Git bash or iTerm from Jenkins EC2 instance into GitHub.

After configuring a freestyle job or pipeline using Jenkins for building and deployment, you would like to make a code change to make sure Jenkins have started automated builds/deployments.

Pre-requisites:
Implementation steps:
1. Login to Jenkins EC2 instance first. Make sure you are inside EC2 instance.
2. Type below command to see if you have already cloned your repository.
ls -al

you should see the repo name. once you see the repo name, cd into repo folder

(If you don't see any GitHub Repo folder already cloned, you need to clone from GitHub by executing below command:

git clone git@github.com:user_name/your_repo.git

now go inside repo folder.

3. cd youreponame

change repo_name per your name of the repo you created in GitHub.

Go into below folder by typing the command:
4. Now try to get latest code changes from GitHub into local repo by performing below command:
git pull
5. cd MyWebApp/src/main/webapp
Now you can edit below file to reflect changes in Tomcat
6. sudo vi index.jsp

Change Hello world into below yellow highlighted:
<html>
<body>
<h2>Howdy Folks !!! Welcome to DevOps!</h2>
</body>
</html>

7. press escape, enter :wq!
8. git add index.jsp
9. git commit -m "made change to jsp"
10. git push

Now Login to GitHub and verify the code changes you made are pushed into your repo in GitHub.

Friday, February 21, 2020

How to upload Docker images into Nexus docker Registry | How to Upload Docker images to Nexus Decker Registry

How to upload Docker images into Nexus docker Registry - Upload Docker images to Nexus Decker Registry.

Pre-requisites:

Docker is installed and up and running.
Nexus is up and running and Docker registry is already configured. If you have not configured yet, click here to setup Nexus 3 to configure as Docker Registry.

Steps to configure in Docker to upload Docker images to Nexus
login to EC2 instance where you have installed Docker, try to perform below commands:
Configure Docker service to use insecure registry with http. Create Docker daemon file if it does not exist.

sudo vi /etc/docker/daemon.json
Add entries like below:
Enter Nexus URL along with port number used for Docker registry.


{
    "insecure-registries" : ["nexus_public_dns_name:8085"]
}


Restart Docker daemon after above configuration changes.

sudo systemctl restart docker

sudo systemctl status docker
Make sure Docker was able to restart successfully. Press q to come out of above window.


Login to Docker Registry hosted in Nexus 3

Make sure you are able to login to Docker Registry hosted in Nexus by executing below command:
sudo docker login -u admin nexus_public_dns_name:8085

Now enter the Nexus admin password(it will not show the password when you type which is ok)


Download Dockerized code

git clone https://bitbucket.org/ananthkannan/mydockerrepo; cd mydockerrepo/pythonApp

Create a Docker image and tag the image per Nexus Registry

sudo docker build . -t nexus_public_dns_name:8085/mypythonapp


Push the image into Docker Registry
sudo docker push nexus_public_dns_name:8085/mypythonapp


Verify if Docker image is uploaded into Nexus successfully
Login to Nexus, click on Browse, choose Docker registry

Please watch in YouTube channel for the demo:


How to configure Nexus 3 as Docker private Registry | How to configure Docker private Registry in Nexus 3

Nexus 3 is one of the popular binary repository managers. It can be also used to store Docker images as well besides storing binaries such as WARs, EARs, Jars, DLLs and EXE files.

Let us see how to configure Nexus 3 to host as Docker registry.

Pre-requisites:
Steps to configure Nexus 3 as Docker Registry:

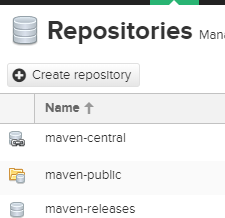
1. Login to Nexus and click on Server Administration link at the top of the window. Click on Repositories.


2. Now click on create repository


3. Choose docker hosted repository


4. Choose the value as mentioned:


5. Click on Create repository.

Configure Realm
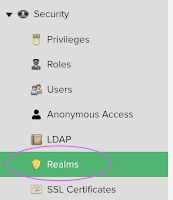
6. Go to Security. Click on Realms

Move Docker Bearer Token realm to right by clicking on >

This settings allows docker repository to have anonymous read enabled.


7. after moving save it.

Wednesday, February 19, 2020

Install Java using Puppet on Agent - Create Puppet Manifest to Install Java on Ubuntu

Puppet is a software configuration management tool, used for managing software stack on servers. Java also can be managed using Puppet.

Here below are the steps for installing Java using Puppet on Ubuntu:

First install Java modules on Puppet Master using sudo command.

Step 1
sudo /opt/puppetlabs/bin/puppet module install puppetlabs-java --version 2.2.0

The above command will install Java module on Puppet Master.

Step 2
After that change the manifest in site.pp file in Puppet Master by executing the below command:

sudo vi /etc/puppetlabs/code/environments/production/manifests/site.pp


node 'target_node_ip_address' {
class { 

    'java':
   distribution => 'jre',
  }
}


Step 3
Now go to Puppet Agent node and apply the changes by executing the below command:

sudo /opt/puppetlabs/bin/puppet agent --test

Monday, February 3, 2020

Install Docker Ubuntu - How to install Docker in Ubuntu 16.0.4? setup Docker on Ubuntu

Please find the steps needed for installing Docker in Ubuntu 16.0.4 instance.

sudo curl -fsSL https://download.docker.com/linux/ubuntu/gpg | sudo apt-key add -
sudo add-apt-repository "deb [arch=amd64] https://download.docker.com/linux/ubuntu $(lsb_release -cs) stable"
sudo apt-get update
sudo apt-cache policy docker-ce
sudo apt-get install -y docker-ce
sudo systemctl status docker

now press q to come out this.
ps -ef | grep docker

docker --version

sudo docker run hello-world

the above command should display the below message..

you should see below message 
Hello from Docker!
This message shows that your installation appears to be working correctly.

Also, create an account(keep all lowercase in your username)  in the below website for storing docker images in public docker registry..