Wednesday, November 27, 2019

How to upload Docker images to Azure Container Registry - Hosting Docker images in Azure Container Registry

Azure Container Registry is a managed, private docker registry service. You can create and maintain Azure container registries to store and manage your private Docker container images.

It is alternative to Docker Hub. Azure Container Registry allows you to build, store, and manage container images and artifacts in a private registry for all types of container deployments.

Let us see how to upload a docker images from your VM into ACR.

Pre-requistes:
Make sure you have docker installed on your VM.
 
Step 1 - Create Azure Container Registry (ACR)

Go to https://portal.azure.com/
Create a Resource, Give container registry as a name

Click on Create

  
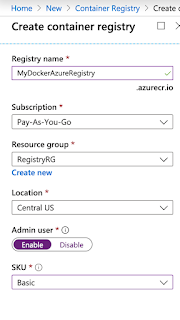
Enter values as mentioned below:
Give registry name, resource group and choose Enable admin user and SKU as Basic 


 Click on Review and then create, now your container registry is been created.

Step 2 - Download sample Python App

Go to your machine where you have docker images stored. perform below command to download sample pythonapp which is already dockerized.
 
git clone https://bitbucket.org/ananthkannan/mydockerrepo/src/master/pythonApp/ 

cd  pythonApp

docker build . -t mypythonapp

type below command:
sudo docker images

this should show docker images you have created locally.

Now go to ACR, click on docker registry you created. Click on access keys under Settings.


Copy value under login server 

Step 3 - Upload your docker images to ACR
Login to Azure Container Registry through command line.
sudo docker login mydockerazureregistry.azurecr.io
Username: mydockerazureregistry

Enter password by copying value below password

Now tag the docker image per as below:
sudo docker tag mypythonapp mydockerazureregistry.azurecr.io/mypythonapp

sudo docker push mydockerazureregistry.azurecr.io/mypythonapp

That's it..Docker image is pushed into ACR. You can see it under Services--> repositories


How to connect to an EC2 instance from local machine after creating EC2 in AWS?

Find the steps to connect to EC2 instance (running in AWS) from your local machine .

Pre-requisites:

1. Keys(for e.g., yourkey.pem) already downloaded in your local machine, preferably in Downloads folder.
2. EC2 is up and running
3. For windows laptop, you need to install Git by downloading from this URL - https://git-scm.com/downloads
4. For apple desktop or laptops, download https://www.iterm2.com/downloads.html

Steps to connect to EC2 instance:

1. Go to AWS console.
2. Click on EC2, click on running instances link


3. Select the checkbox of EC2 you would like to connect to.
4. Click on Action. Copy the url from SSH which looks like below:
For e.g.
ssh -i "mykey.pem" ubuntu@dns_name.compute.amazonaws.com
 

5. Go to your local machine, Open Git bash, navigate to downloads directory like below:
For windows laptop --> cd downloads

steps For iMac only --> cd downloads
chmod 400 yourkey.pem

6. Paste the url from example highlighted above in step # 4.
ssh -i "mykey.pem" ubuntu@dns_name.compute.amazonaws.com
7. say yes when it is asking to connect.
8. now you should be in AWS cloud, screen should tell you something like this:

Last login: Sun Feb 18 19:01:21 2018 from 64.183.186.78
ubuntu@ip-172-31-26-96:~$


Monday, October 7, 2019

How to configure webhooks in GitHub and trigger jobs in Jenkins - webhook example GitHub - How to Integrate GitHub with Jenkins?

Webhooks allows developers to triggers jobs in CI server (such as Jenkins) for every code changes in SCM. In this article, we will learn how to trigger Jenkins jobs instantly for every code change.


Pre-requisites:

Make sure you install GitHub integration plug-in in Jenkins

1. Go to Jenkins, Create a job. If you already have a existing job, click on configure. Go to build triggers section and choose the below option - GitHub hook trigger for GitScm pooling.


2. Now go to GitHub, choose your repository. Click on settings, Webhooks.

3. Click on Add web hook.

4. You need to enter Jenkins URL & add /github-webhook/ in the end
http://jenkins_public_dns_name:8080/github-webhook/

5. Now enter payload URL as Jenkins URL, select just push event, click on active. Click on Add webhook
6. After you created, click on webhooks.

7. Click on recent deliveries and you should get response 200 as below:

8. Now go and make some code changes in your repo in GitHub.

9. If you look in Jenkins, you will see job is getting triggered immediately.


You can watch these steps on my YouTube channel as well, please see below:

Docker Interview Questions - Popular Docker Interview Questions


Docker Interview Questions - Popular Docker Interview Questions

1. What is the difference between Docker image and Docker container?

Docker container is simply an instance of Docker image.
A Docker image is an immutable file, which is a snapshot of container. We create an image with build command. Docker image contains all your application code along with all the dependencies packaged into this snapshot.

When we use run command, an Image will produce a container.

In programming language, an Image is a Class and a Container is an instance of the class.

2.  Can we run multiple apps on one server with Docker?
Yes, theoretically we can run multiples apps on one Docker server. But in practice, it is better to run different components on separate containers.
With this we get cleaner environment and it can be used for multiple uses.

3. How does docker client communicates with Docker daemon?

Docker client or command line interface, communicated with Docker daemon through APIs. 

    4.     How to enable IPV6 in Docker
Edit /etc/docker/daemon.json and set the ipv6 key to true.
{
  "ipv6": true
}
Save the file.
Reload the Docker configuration file by executing the below command:
systemctl reload docker


   5. How to copy files inside Dockerfile?
     Use COPY command
     For e.g.,
COPY app.py /usr/src/app/

6. How do you see running container in Docker?
docker ps command

7. How do you see all the containers?
docker ps -a command will show all the containers..

8. How to create directory inside Dockerfile?
mkdir -p /var/www/app
or  
WORKDIR /var/www/app 

      9. What are the benefits of using Docker?
      Docker is a very powerful tool. Some of the main benefits of using Docker are as follows:
   
       I. Utilize Developer Skills : With Docker we maximize the use of Developer skills. With Docker  there is less need of build or
release engineers. Same Developer can create software and wrap it in one single file.
       II. Standard Application Image : Docker based system allows us to bundle the application software and Operating system files in a
single Application Image that can be deployed independently.

       III. Uniform deployment : With Docker we can create one package of our software and deploy it on different platforms seamlessl y
 
      10. What happens when you stop the container? Will you loose the data?
You won’t lose any data when Docker container exits. Any data that your application writes to the container gets preserved on the disk until you explicitly delete the container. The file system for the container persists even after the container halts.

Friday, September 20, 2019

Create EC2 Instance - How to create EC2 instance in AWS console ?

Please follow the below steps to create an EC2 instance. EC2 instance is virtual server provided by AWS. We will be using this EC2 to install Java, Jenkins, Tomcat, Maven. We will be using this as a CI server.

Steps:

1: Go to AWS console. click on All services, Click on Compute -->  Click on EC2


2. Click on Launch instance. Choose an Amazon machine image (AMI), click next


3. select
Ubuntu Server 16.04 LTS (HVM), SSD Volume Type 


click next

4. choose an instance type as t2.small, 2GB memory. click next

5. Leave values to default in step 3 and step 4. click next


6. enter tag name in step 5. Click to add a Name tag. it can be something like JenkinsEC2. click next:configure Security Group


7. Click create new security group, give name as MyJenkinsSecurityGroup, add custom rule for 8080, 8090 , allow 0.0.0.0/0 as source IP


8. Click on Review and launch


Click on Launch

09. Choose the existing key pair if you have one, otherwise create new one, give some name as my2020EC2Key. Make sure you download the key. Please do not give any space or any character in naming the key.


10. Click on launch instance, Scroll down and click on view instances.


Once instance is created. you can see it running..


How to connect to EC2 using Git bash in Windows or iTerm in Mac? 

http://www.cidevops.com/2018/02/how-to-connect-to-ec2-instance-from.html

1. go to Downloaded location private key in your local machine.
2. Copy the url from Ec2 console by selecting the instance, click on actions, connect.Please use the below link to connect to EC2 from your local machine:

Jenkins setup - Install Java, Jenkins, Maven, Tomcat on Ubuntu EC2 - How to install Java, Jenkins, Maven, Tomcat on Ubuntu EC2

Please follow steps to install Java, Jenkins, Maven, Tomcat on Ubuntu EC2. Jenkins is a java based application, so you need to install Java first. 

Java Setup on Ubuntu

sudo apt-get update

Install Java Open JDK 8 package

sudo apt-get install default-jdk -y


Once install java, enter the below command

Verify Java Version

java -version

openjdk version "1.8.0_191"
OpenJDK Runtime Environment (build 1.8.0_191-8u191-b12-2ubuntu0.16.04.1-b12)
OpenJDK 64-Bit Server VM (build 25.191-b12, mixed mode)

Now lets do Jenkins installation

Jenkins Setup

Add Repository key to the system

wget -q -O - https://pkg.jenkins.io/debian/jenkins-ci.org.key | sudo apt-key add -
Append debian package repo address to the system

echo deb http://pkg.jenkins.io/debian-stable binary/ | sudo tee /etc/apt/sources.list.d/jenkins.list

sudo apt-get update
Install Jenkins
sudo apt-get install jenkins -y


The above screenshot should confirm that Jenkins is successfully installed.

Access Jenkins in web browser

Now Go to AWS console.
  Click on EC2, click on running instances link. Select the checkbox of EC2 you are installing Java and Jenkins.

  Click on Action.
  Copy the value from step 4 that says --> Connect to your instance using its Public DNS


Now go to browser. enter public dns name or public IP address with port no 8080.This is how to select public DNS name:


Unlock Jenkins
You may get screen, enter the below command in Git bash( Ubuntu console)
Get the password from the below file

sudo cat /var/lib/jenkins/secrets/initialAdminPassword

Copy the password and paste in the browser

Click on install suggested plug-ins.
Also create user name and password.
enter everything as admin. at least user name as admin password as admin
Click on Save and Finish. Click on Start to Use.

Maven
sudo apt install maven -y

you can type mvn --version
you should see the below output.


Tomcat Installation

Tomcat is a web server or web container where java web application can be deployed by developers.

sudo apt-get update
sudo apt-get install tomcat8 -y


sudo apt-get install tomcat8-docs tomcat8-examples tomcat8-admin -y


sudo cp -r /usr/share/tomcat8-admin/* /var/lib/tomcat8/webapps/ -v

Click on this link to know how to make changes using Vi editor.


Change port no from 8080 to 8090

sudo vi /var/lib/tomcat8/conf/server.xml


you need to scroll down by clicking down arrow button in this file change the port no from 8080 to 8090 at line starting with <Connector port="8080" protocol="HTTP/1.1"

setup an user in tomcat 

sudo vi /var/lib/tomcat8/conf/tomcat-users.xml
Scroll down all the way to the end of the file,
Add the below lines in second last line above (above </tomcat-users>)
<role rolename="manager-script"/>

<user username="tomcat" password="password" roles="manager-script"/>


Add more memory to JVM
sudo vi /etc/default/tomcat8

Look for the line starting JAVA_OPTS and comment that line by adding #.
Add the below line:
JAVA_OPTS="-Djava.security.egd=file:/dev/./urandom -Djava.awt.headless=true -Xmx512m -XX:MaxPermSize=512m -XX:+UseConcMarkSweepGC"

sudo systemctl restart tomcat8

sudo systemctl status tomcat8


you may get message that says tomcat is active running.
press q for quitting from that window.
Now go to browser, copy public DNS
http://Ec2_public_dns_name:8090
 
You should see a page that says.
It works!!!!

That's it. You have setup Jenkins and Tomcat successfully!!

Please watch here for live demo:

Thursday, September 19, 2019

Setup SSH Keys in BitBucket & Setup Java Web App in BitBucket

We will see how to setup Java Web App using Maven in BitBucket and also how to setup SSH keys in Bitbucket.

Pre-requisites:
If you don't have an bitbucket account, You need to create an account in bitbucket.org.
Implementation steps:

1. after login into bitbucket, click on + and Click on Create Repository


2. enter the repo name as MyBitbucketRepo, make sure it is private, Include read me option - choose yes with template. Click Git as version control system.
3. Click on create repository.
4. now click on your avatar (left bottom of the screen, BitBucket settings-> security--> ssh keys


5. now go to your laptop, open git bash for windows laptop or iTerm (for iMac laptop) and connect to Jenkins EC2 instance using Git bash. How to connect, refer this url - http://www.cidevops.com/2018/02/how-to-connect-to-ec2-instance-from.html
6. Now type  ssh-keygen (and then simply enter four times, do not give any password)


7. copy the content of public key executing below command in Gitbash.

sudo cat ~/.ssh/id_rsa.pub

8. go to click on Add key from step # 3,  and paste the content of public key. give some name as mySSH key. click on Add key.
9. Now click on repo you created in step # 1. Click on Clone and copy the SSH url. Do not select HTTPS Url. The url will be from your repo you created under Clone link. 
10. go back to Gitbash  windows connected to Jenkins EC2, execute the below command. Paste the SSH url you copied above.

git clone <ssh_url_from_bitbucket_repo_you_created>

   11. Now after cloning, type ls -al command
12. It will show a folder with repo name..
13. navigate to repo folder by below command:
    cd mybitbucketrepo
14. use below command to create Java project using Maven. Maven is the build for creating and building java projects.
mvn archetype:generate -DgroupId=com.mkyong -DartifactId=MyWebApp -DarchetypeArtifactId=maven-archetype-webapp -DinteractiveMode=false
15. type ls -al to see the new folder called MyWebApp
   16. type  below command to see the newly created project
git status


17. git add  *

18. Perform below command to commit the changes to local repository first.

git commit -m "my first project check-in to bitbucket"
19. Now perform below command to push from local repository to remote repository.

git push
Please watch here for live demo: