Wednesday, September 14, 2022

How To Setup Jenkins using BootStrap Scripts in AWS EC2 Instance while Launching | How to Run commands on your EC2 instance at launch


What is bootstrap script in aws?

If you want to execute some commands during boot up(launch), you can execute it easily by loading script in user data section during EC2 launch. Bootstrap scripts run only once - when the instance is instantiated for the 1st time.

Please follow the below steps to create an EC2 instance.  We will be installing Java, Maven and Jenkins during boot up.

How to create EC2 instance in AWS console?

What is EC2 instance? 

It is virtual server provided by AWS. We will be using this EC2 to setup Jenkins. Please follow the below steps to create an EC2 instance.

Pre-requisites:

Steps:
1: Login to AWS console by clicking this link -->  https://aws.amazon.com/console/
click on All services, Click on Compute -->  Click on EC2


2. Click on Launch instance


3. Enter Name as Jenkins-EC2 and enter 1 as number of instance


4. Select Ubuntu and choose Ubuntu server 18.0.4 as AMI


5. Enter t2.small as instance type
6. You can choose existing Key
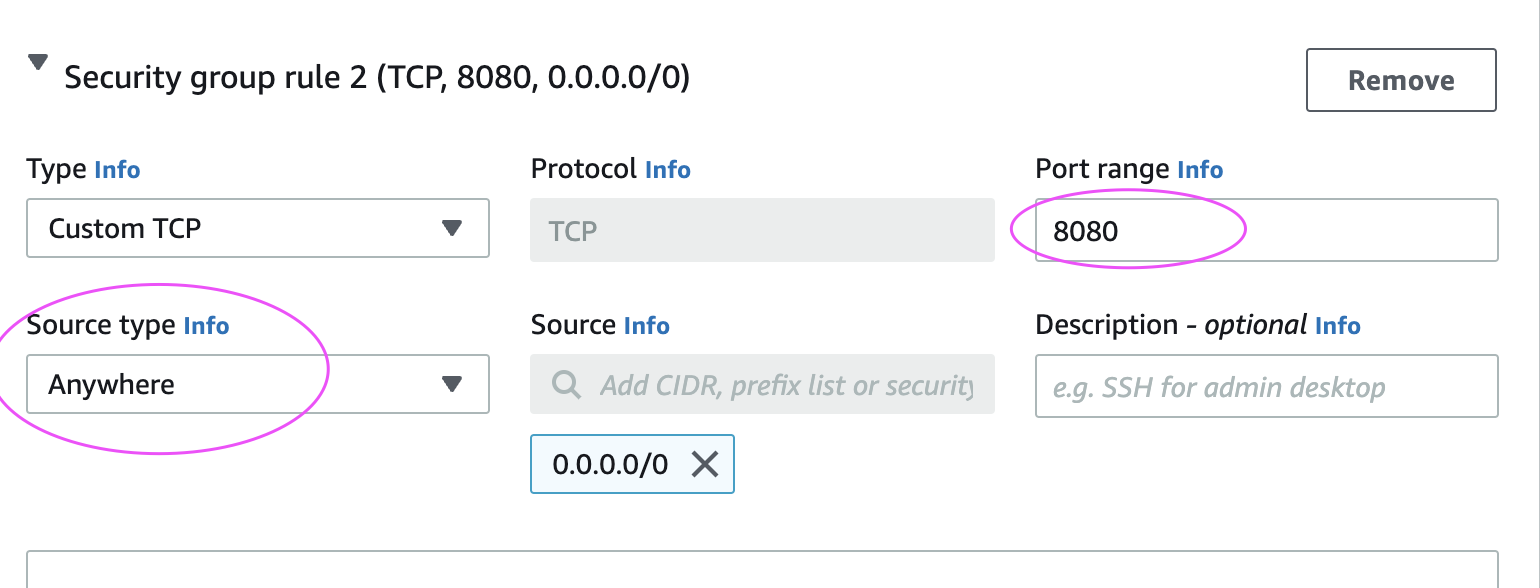
7. Under Network settings, Click Edit


Add port range as 8080 and select AnyWhere as Source Type, that should enter 0.0.0.0/0 as Source

8. Enter 10 GB as storage 

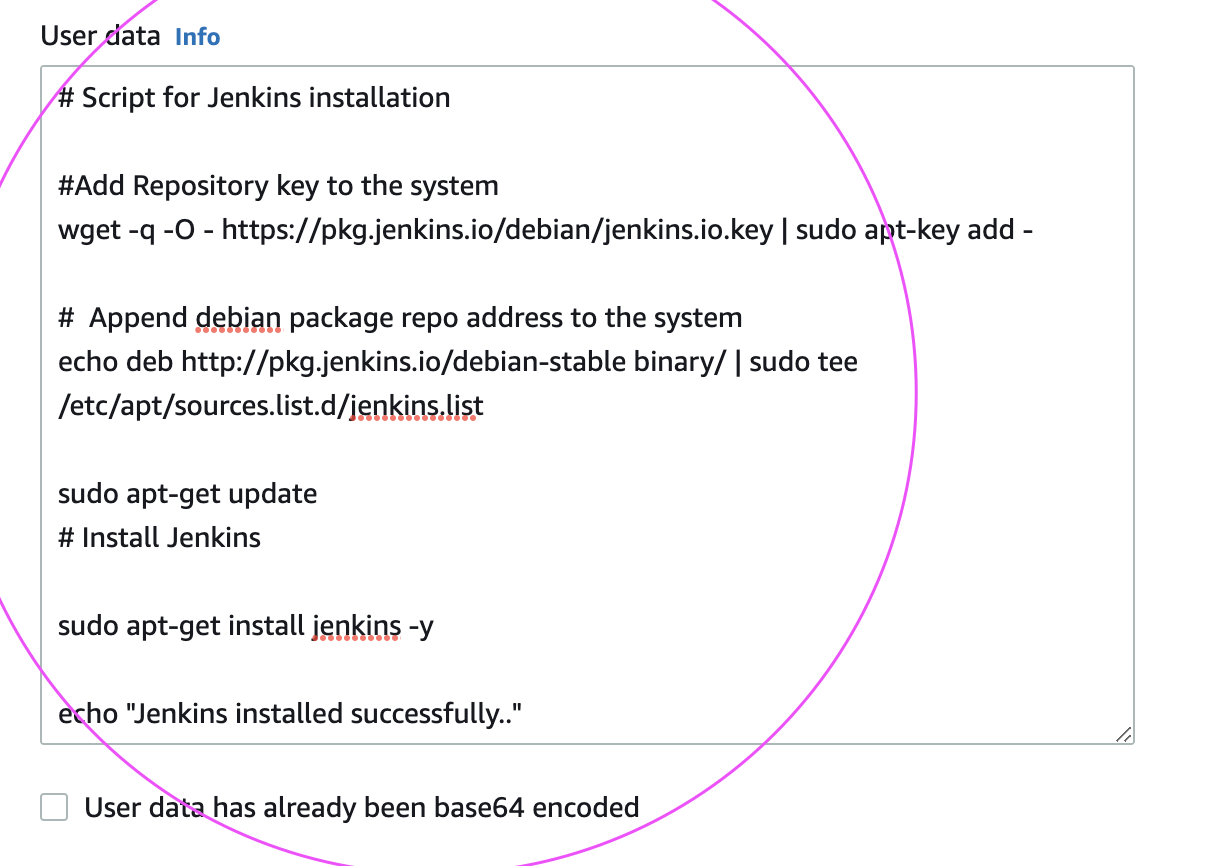
Steps to add bootstrap script during EC2 launch


Click on Advanced Details:

go to User Data section and Copy the script from this link.


9. Click on Launch Instance.

Click on View instances

Now you should be able to view instances in AWS console. 

once EC2 is provisioned, you can login and you will be able to see Java, Maven and Jenkins installed in EC2 instance after launch.

Check the Console Output Logs in EC2 instance

Login to EC2 instance, and type the below command:

tail -f /var/log/cloud-init-output.log

This will give the output of bootstrap execution

Verify if Java got installed.

java -version
mvn --version


Go to the browser and try to access Jenkins in the browser, Jenkins should be coming up.(make sure you open port 8080 in the firewall rules)


Enter Jenkins Admin password:
Execute below command to get Jenkins admin password

sudo cat /var/lib/jenkins/secrets/initialAdminPassword

Enter the password and click on continue

Click on Suggested plug-ins and setup the admin user for Jenkins.

Watch the steps in YouTube channel:


Sunday, September 4, 2022

Deploy Springboot Microservices App into Amazon EKS Cluster using Jenkins Pipeline and Kubectl CLI Plug-in | Containerize Springboot App and Deploy into EKS Cluster using Jenkins Pipeline

We will learn how to automate springboot microservices builds using Jenkins pipeline and Deploy into AWS EKS Cluster with help of Kubernetes CLI plug-in.

We will use Springboot Microservices based Java application. I have already created a repo with source code + Dockerfile. The repo also have Jenkinsfile for automating the following:

- Automating builds using Jenkins
- Automating Docker image creation
- Automating Docker image upload into AWS ECR
- Automating Docker Containers Deployments to Kubernetes Cluster


Watch steps in YouTube channel:

Same Code for this video is here:

Pre-requisites:
1. Amazon EKS Cluster is setup and running. Click here to learn how to create Amazon EKS cluster.
5. Docker, Docker pipeline and Kubernetes CLI plug-ins are installed in Jenkins


6. Install kubectl on your instance

Step # 1 - Create Maven3 variable under Global tool configuration in Jenkins
Make sure you create Maven3 variable under Global tool configuration. 


Step #2 - Create Credentials for connecting to Kubernetes Cluster using kubeconfig
Click on Add Credentials, use Kubernetes configuration from drop down.

use secret file from drop down.


execute the below command to login as jenkins user.
sudo su - jenkins

you should see the nodes running in EKS cluster.

kubectl get nodes


Execute the below command to get kubeconfig info, copy the entire content of the file:
cat /var/lib/jenkins/.kube/config


Open your text editor or notepad, copy and paste the entire content and save in a file.
We will upload this file.

Enter ID as K8S and choose File and upload the file and save.


Enter ID as K8S and choose enter directly and paste the above file content and save.

Step # 3 - Create a pipeline in Jenkins
Create a new pipeline job.


Step # 4 - Copy the pipeline code from below
Make sure you change red highlighted values below as per your settings:
Your docker user id should be updated.
your registry credentials ID from Jenkins from step # 1 should be copied

pipeline {
   tools {
        maven 'Maven3'
    }
    agent any
    environment {
        registry = "account_id.dkr.ecr.us-east-2.amazonaws.com/my-docker-repo"
    }
   
    stages {
        stage('Cloning Git') {
            steps {
                checkout([$class: 'GitSCM', branches: [[name: '*/main']], doGenerateSubmoduleConfigurations: false, extensions: [], submoduleCfg: [], userRemoteConfigs: [[credentialsId: '', url: 'https://github.com/akannan1087/springboot-app']]])     
            }
        }
      stage ('Build') {
          steps {
            sh 'mvn clean install'           
            }
      }
    // Building Docker images
    stage('Building image') {
      steps{
        script {
          dockerImage = docker.build registry 
        }
      }
    }
   
    // Uploading Docker images into AWS ECR
    stage('Pushing to ECR') {
     steps{  
         script {
                sh 'aws ecr get-login-password --region us-east-2 | docker login --username AWS --password-stdin account_id.dkr.ecr.us-east-2.amazonaws.com'
                sh 'docker push account_id.dkr.ecr.us-east-2.amazonaws.com/my-docker-repo:latest'
         }
        }
      }

       stage('K8S Deploy') {
        steps{   
            script {
                withKubeConfig([credentialsId: 'K8S', serverUrl: '']) {
                sh ('kubectl apply -f  eks-deploy-k8s.yaml')
                }
            }
        }
       }
    }
}

Step # 5 - Build the pipeline
Once you create the pipeline and changes values per your configuration, click on Build now:


Step # 6 - Verify deployments to K8S

kubectl get pods


kubectl get deployments

kubectl get services


Steps # 7 - Access SpringBoot App in K8S cluster
Once build is successful, go to browser and enter master or worker node public ip address along with port number mentioned above
http://loadbalancer_ip_address

You should see page like below:


Note:

and make changes in eks-deploy-k8s.yaml to pull Docker image from your AWS ECR repo.

Friday, September 2, 2022

How to download Visual Studio Code on Windows ? | How to download VS Code on Windows?

 Visual Studio Code can be installed on any desktops. Find steps for configuring in Windows Laptop or Desktop.

1. Go to https://code.visualstudio.com/


 Click on Download.

2. After EXE file is download locally. Click on it to install.

3.Click on I Accept the Agreement

4. Click on Next


5. Click on Install


6. Click on Finish to complete the VS code Setup on Windows.


How to download Visual Studio Code on Windows or Mac? | How to download VS Code on Windows or Mac?

Visual Studio Code is popular IDE for developing software commonly used by software engineers, developers and DevOps folks. 

It is open source and lightweight but powerful source code editor which runs on your desktop and is available for Windows, macOS and Linux. It comes with built-in support for JavaScript, TypeScript and Node.js and has a rich ecosystem of extensions for other languages and runtimes (such as C++, C#, Java, Python, PHP, Go, .NET).  

How to Download VS Code on your desktop?

1. Go to https://code.visualstudio.com/download

2. Depending on your desktop operating system(Windows, Mac or Linux), click on the downloadable to install.