Showing posts with label Puppet. Show all posts

Monday, April 27, 2020

puppetserver ca list fatal error when running action 'list'

puppetserver ca list fatal error when running action 'list'

You need to add to puppet master ip address in /etc/hosts file

xxx.xx.xx.xx (IP of the puppet master) puppet

Sunday, April 26, 2020

How to install Puppet 6 on Ubuntu 18.0.4 | Puppet Master install Ubuntu 18.0.4 | Setup Puppet Master on Ubuntu

Puppet is an Infrastructure provisioning tool, similar to Ansible, Chef. We will see how to setup Puppet Master in Ubuntu 18.0.4


Pre-requistes:
Install Puppet master on new Ubuntu with medium instance
port 8140 needs to be opened.

Steps:
First let us see how to install Puppet 6.x on Ubuntu 18.0.4.

Steps for Puppet Master Installation
1. Modify Puppet Master Hosts file to add hostname of Puppet Master
sudo vi /etc/hosts

2. Download puppet installable

curl -O https://apt.puppetlabs.com/puppet6-release-bionic.deb
sudo dpkg -i puppet6-release-bionic.deb
sudo apt-get update
sudo apt-get install puppetserver -y
sudo ufw allow 8140
sudo systemctl enable puppetserver.service


(the above command is to start the service during starting the Ubuntu instance)
sudo systemctl start puppetserver.service           


(The above command is for starting the server and this may take some time)
sudo systemctl status puppetserver.service


Now press q to come out of window.
Add puppet master ip address and puppet next to it like shown below

This confirms that Puppet Master is installed successfully.

Verify which version of Puppet installed by executing below command:
apt policy puppetserver

2. you need to install the aws-sdk-core and retries gems as root (or superuser):
sudo /opt/puppetlabs/puppet/bin/gem install aws-sdk-core retries
Done installing documentation for retries after 0 seconds
6 gems installed
3. Also install AWS SDK for accessing resources in AWS
sudo /opt/puppetlabs/puppet/bin/gem install aws-sdk -v 2.0.42

Done installing documentation for retries after 0 seconds
4 gems installed
4. Now you can install puppet-labs-aws module
sudo /opt/puppetlabs/bin/puppet module install puppetlabs-aws

That's it. Puppet Master is setup successfully!!!! You can watch the above steps in YouTube as well.

Tuesday, April 14, 2020

How to install Puppet on Ubuntu 16.0.4 - How to configure Puppet Master

Puppet is an Infrastructure provisioning tool, similar to Ansible, Chef. We will see how to create EC2 instances in AWS using Puppet in this article.


Pre-requistes:
install puppet master on new Ubuntu with medium instance
port 8140 needs to be opened.

Steps:
First let us how to install Puppet on your Ubuntu machine.

Steps for Puppet Master
 Installation

1. Download puppet installable

curl -O https://apt.puppetlabs.com/puppetlabs-release-pc1-xenial.deb
sudo dpkg -i puppetlabs-release-pc1-xenial.deb
sudo apt-get update
sudo apt-get install puppetserver -y

sudo ufw allow 8140
sudo systemctl enable puppetserver
 

(the above command is to start the service during starting the Ubuntu instance)

sudo systemctl start puppetserver          

(The above command is for starting the server and this may take some time)
sudo systemctl status puppetserver 

       you should see a message like
       puppet systemd[1]: Started puppetserver Service.
    
That's it puppet master is up and running.

Now press q to come out of window.


This confirms that Puppet Master is installed successfully.

2. you need to install the aws-sdk-core and retries gems as root (or superuser):
sudo /opt/puppetlabs/puppet/bin/gem install aws-sdk-core retries
Done installing documentation for retries after 0 seconds
6 gems installed
3. Also install AWS SDK

sudo /opt/puppetlabs/puppet/bin/gem install aws-sdk retries

(The above command may take 3 to 5 mins to get gems installed)


4. Now you can install puppet-labs-aws module 
sudo /opt/puppetlabs/bin/puppet module install puppetlabs-aws

That's it. Puppet Master is setup successfully!!!!

Wednesday, February 19, 2020

Install Java using Puppet on Agent - Create Puppet Manifest to Install Java on Ubuntu

Puppet is a software configuration management tool, used for managing software stack on servers. Java also can be managed using Puppet.

Here below are the steps for installing Java using Puppet on Ubuntu:

First install Java modules on Puppet Master using sudo command.

Step 1
sudo /opt/puppetlabs/bin/puppet module install puppetlabs-java --version 2.2.0

The above command will install Java module on Puppet Master.

Step 2
After that change the manifest in site.pp file in Puppet Master by executing the below command:

sudo vi /etc/puppetlabs/code/environments/production/manifests/site.pp


node 'target_node_ip_address' {
class { 

    'java':
   distribution => 'jre',
  }
}


Step 3
Now go to Puppet Agent node and apply the changes by executing the below command:

sudo /opt/puppetlabs/bin/puppet agent --test

Thursday, April 11, 2019

Ansible Vs Puppet - What is the difference between Ansible and Puppet

This is one of the common DevOps interview questions. What is the difference between Ansible and Puppet? When will you choose Ansible over Puppet?


Ansible Puppet
Introduced 2012 2005
Written in? Python Java & Ruby
Syntax Playbooks(YAML file) Domain specific language
Model Push Pull
Architecture Agent-less Client/server
Deployments Fast, simple deployments Larger, complex deployments
Commercial version Ansible Tower Puppet Enterprise
Scheduling not supported in free version Default time 30 mins in Open Source puppet

Sunday, January 20, 2019

Puppet code to provision an EC2 instance on AWS cloud - How to provision EC2 instance on AWS cloud using Puppet


Here below is the puppet code to provision an EC2 instance on AWS cloud.

create-ec2-instance.pp
 ec2_instance { 'My EC2 instance':
    ensure              => present,
    region              => 'us-east-2',
    image_id            => 'ami-916f59f4',
    instance_type       => 't2.micro',
    security_groups     => ['mySecurityGroup'],
    subnet              => 'subnet-aff937d5',
    key_name            => 'my2019EC2Key',

  }

ec2_securitygroup { 'mySecurityGroup':
  region      => 'us-east-2',
  ensure      => present,
  description => 'Security group for aws advent',
ingress     => [{
    protocol => 'tcp',
    port     => 8080,
    cidr     => '0.0.0.0/0',
  },{
    protocol => 'tcp',
    port     => 80,
    cidr     => '0.0.0.0/0',
  },{
    protocol => 'tcp',
    port     => 22,
    cidr     => '0.0.0.0/0',
 }],
  tags        => {
    tag_name  => 'mySecurityGroup',
},
}

And then execute the below command to create EC2 instance.
  sudo /opt/puppetlabs/bin/puppet apply create-ec2.pp

Make sure you have access keys and secret keys downloaded from AWS.

sudo vi ~/.aws/credentials
[default]
aws_access_key_id = ?
aws_secret_access_key = ?

Tuesday, May 1, 2018

Error: Could not run: Could not find type ec2_instance - Puppet Error

Apply the below fix when you have this error when you try to execute
puppet resource ec2_instance.
 if you get this error: Error: Could not run: Could not find type ec2_instance

You need to force puppetlab AWS module and install:

puppet module install puppetlabs-aws --force

Friday, April 27, 2018

How to provision EC2 instances in AWS using Puppet - Puppet to create EC2 instances in AWS

Puppet is an Infrastructure provisioning tool, similar to Ansible, Chef. We will see how to create EC2 instances in AWS using Puppet in this article.


How to provision an EC2 instance using Puppet?

Pre-requistes:
Make sure you have installed Puppet Master along with required AWS SDK gems

Go to the instance where you have installed Puppet Master.
cd ~

Now you need to create AWS credentials file. Create .aws directory under /home/ubuntu
sudo mkdir ~/.aws

Create the file to add credentials. make sure you give access key and secret keys:

sudo vi ~/.aws/credentials
[default]
aws_access_key_id = ?
aws_secret_access_key = ?

Now execute the below command just to make sure it is showing the information about current instance by executing below command:

sudo /opt/puppetlabs/bin/puppet resource ec2_instance


if you have any error, apply the below fix:
puppet module install puppetlabs-aws --force

Now let us create puppet modules to create new EC2 instance. Go into modules directory.
cd /opt/puppetlabs/puppet/modules/

create directory by 
sudo mkdir aws-examples
cd aws-examples

Go to VPC dashboard by typing VPC


Click on Subnets.

Make sure you give subnet name as subnet Ids. Copy any subnet ID and use it below:


12. Create the below file called create-ec2.pp by executing below command:
sudo vi create-ec2.pp 

and then copy below code, make sure you change region, subnet name and key name based on yours

ec2_instance { 'Target Agent EC2':
    ensure              => present,
    region              => 'us-east-2',
    image_id            => 'ami-916f59f4',
    instance_type       => 't2.small',
    security_groups     => ['mySecurityGroup'],
    subnet              => 'subnet-aff937d5',
    key_name            => 'mykeyName',
  }

ec2_securitygroup { 'mySecurityGroup':
  region      => 'us-east-2',
  ensure      => present,
  description => 'Security group for aws Ec2 instance',
ingress     => [{
    protocol => 'tcp',
    port     => 8080,
    cidr     => '0.0.0.0/0',
  },{
    protocol => 'tcp',
    port     => 80,
    cidr     => '0.0.0.0/0',
  },{
    protocol => 'tcp',
    port     => 22,
    cidr     => '0.0.0.0/0',
 }],
  tags        => {
    tag_name  => 'mySecurityGroup',
},
}

You need to change all the values (high lighted above) per your settings. Make sure you also change the subnet id per your settings. you need to follow the below steps


13. Now execute the below command to create EC2 instance.
sudo /opt/puppetlabs/bin/puppet apply create-ec2.pp

If no errors, login to EC2 console to see the newly created instance.

Note:

If you would like destroy, just change to absent (This STEP is not required for this lab)

sudo vi destroy-ec2.pp
ec2_instance { 'My Target EC2-Agent':
    ensure              => absent,
    region              => 'us-east-2',
    image_id            => 'ami-916f59f4',
    instance_type       => 't2.micro',
    security_groups     => ['mySecurityGroup'],
    subnet              => 'subnet-aff937d5',
    key_name            => 'mykeyName',
  }

sudo /opt/puppetlabs/bin/puppet apply destroy-ec2.pp

the above command will destroy EC2 instance that was created.

Monday, April 9, 2018

How to see already signed requests in Puppet Master?

In order to see list of signed requests in Puppet Master, execute the below command to view the signed certs:

/opt/puppetlabs/bin/puppet cert list --all

Sunday, March 25, 2018

How to make sure if Puppet agent does pull from master after configuration change?

How to make sure if Puppet agent does pull from master after configuration change?
Login to Puppet Agent node
Remove apache first..
1. sudo apt-get remove apache2 -y

2. Make sure apache is not running by going to browser running public dns name. Once verified,
3. edit the below file

sudo vi /etc/puppetlabs/puppet/puppet.conf
#Add below entry
runinterval = 120
4. Now stop the agent
sudo systemctl stop puppet
5. start puppet agent again
sudo systemctl start puppet

Now after 2 mins Apache will be installed on the Agent and you will be able to see the Apache web page in the browser


Friday, March 16, 2018

Install LAMP stack using Puppet on the Node - How to install LAMP stack using Puppet

How to install LAMP (Apache, MySQL, PHP) stack in target node?


Pre-requisites:
Pupper master up and running
Puppet agent is installed on the node.

Login to Puppet Master, follow the below steps:

1. cd /opt/puppetlabs/puppet/modules
2. sudo mkdir lamp
3. cd lamp
4. sudo mkdir manifests
5. cd manifests
6. sudo vi init.pp
6. Copy the below lines in init.pp

class lamp {
# execute 'apt-get update'
exec { 'apt-update':                    # exec resource named 'apt-update'
  command => '/usr/bin/apt-get update'  # command this resource will run
}

# install apache2 package
package { 'apache2':
  require => Exec['apt-update'],        # require 'apt-update' before installing
  ensure => installed,
}

# ensure apache2 service is running
service { 'apache2':
  ensure => running,
}

# install mysql-server package
package { 'mysql-server':
  require => Exec['apt-update'],        # require 'apt-update' before installing
  ensure => installed,
}

# ensure mysql service is running
service { 'mysql':
  ensure => running,
}

# install php7 package
package { 'php7.0-cli':
  require => Exec['apt-update'],        # require 'apt-update' before installing
  ensure => installed,
}

# ensure info.php file exists
file { '/var/www/html/info.php':
  ensure => file,
  content => '<?php  phpinfo(); ?>',    # phpinfo code
  require => Package['apache2'],        # require 'apache2' package before creating
}
}

7. sudo vi /etc/puppetlabs/code/environments/production/manifests/site.pp
Add below line of code where node should be your target node where you already approved the certificate. the highlighted below section needs to be changed:

node 'your_target_puppet_agent_node_private_DNS_name' {
 include lamp
 }

8. Now to login to puppet agent node, execute the below command:
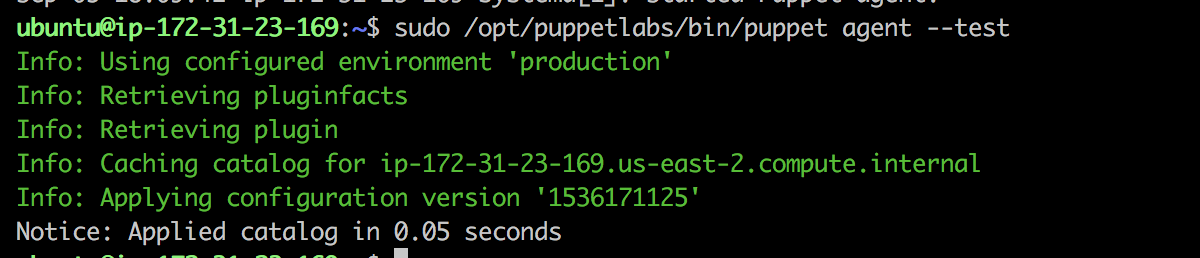
sudo /opt/puppetlabs/bin/puppet agent --test

You should see message like below:

9. Now make sure Apache is running on the target node by entering the target node(Agent's) public IP address on the browser. You should see Apache home page in the browser.
 
You can verify if PHP and MySQL installed in target(Agent) instance.

php --version
mysql --version

Sunday, February 25, 2018

How to change default interval time in Puppet agent?

Let's say you would like to change to 2 minutes instead of 30 minutes which is default time.
sudo vi /etc/puppetlabs/puppet/puppet.conf

runinterval = 120

Thursday, December 7, 2017

How to install Puppet on Ubuntu 16.0.4 | How to configure Puppet Master and manage nodes on Ubuntu 16.0.4 on Amazon EC2?

Puppet uses Client/Server model. The server does all the automation of tasks on nodes/servers that have a client(agent) installed. The work of the Puppet agent is to send facts to the puppet master and request a catalog based on certain interval level(default time 30 mins). Once it receives a catalog, Puppet agent applies it to the node by checking each resource the catalog describes. It makes relevant changes to attain the desired state. The work of the Puppet master is to control configuration information.  Each managed agent node requests its own configuration catalog from the master.

Please find the steps needed for Integrating Puppet master and agent on Ubuntu 16.0.4:

Pre-requisites:

a) One Ubuntu instance for Puppet Master - this instance should have 4 GB RAM. so instance type should be at least medium.
Master ubuntu EC2 should have a security group to ensure that below ports are open in security firewall
        * TCP 8140 - Agents will talk to the master on this port(puppet enterprise)
        * TCP 22 - To login to the server/instance using SSH

b) one Ubuntu instance as node which will have agent installed - This can be micro instance.

1. Steps for Puppet Master

:
curl -O https://apt.puppetlabs.com/puppetlabs-release-pc1-xenial.deb
sudo dpkg -i puppetlabs-release-pc1-xenial.deb
sudo apt-get update
sudo apt-get install puppetserver

sudo ufw allow 8140
sudo systemctl enable puppetserver
          (the above command is to start the service during starting the Ubuntu instance)

sudo systemctl start puppetserver
          (The above command is for starting the server and this may take some time)
sudo systemctl status puppetserver
       you should see a message like
       puppet systemd[1]: Started puppetserver Service.
   
That's it puppet master is up and running.

Now press q to come out of window.


2. Steps for Puppet Agent


Step 2.1 First edit the hosts file on the puppet agent by modifying /etc/hosts
sudo nano /etc/hosts

# Please add Puppet Master server IP address and space and enter puppet
puppet_master_ip_address   puppet


(please do not use public DNS name, use only private IP address)  

Press Ctrl O for saving and then enter
Press Ctrl X for exit after saving
.

Step 2.2 — Installing Puppet Agent on server node that Puppet master will manage
wget https://apt.puppetlabs.com/puppetlabs-release-pc1-xenial.deb 
sudo dpkg -i puppetlabs-release-pc1-xenial.deb
sudo apt-get update
sudo apt-get install puppet-agent -y
sudo systemctl enable puppet
sudo systemctl restart puppet
sudo systemctl status puppet


Now press q to come out of window.

Step 3 - Signing certificates on Puppet Master
The first time you run the Puppet agent, it generates an SSL certificate and sends a signing request to the Puppet master. After the Puppet master signs the agent's certificate, it will be able to communicate with and control the agent node.

First list the unsigned certificates on puppet master EC2 instance

sudo /opt/puppetlabs/bin/puppetserver ca list


The above command will list agent ip address.
  "your_puppet_Agent_Ec2_private_dns_name"  (SHA256) 46:19:79:3F:70:19:0A:FB:DA:3D:C8:74:47:EF:C8:B0:05:8A:06:50:2B:40:B3:B9:26:35:F6:96:17:85:5E:7C


Now sign the Puppet agent IP address.
sudo /opt/puppetlabs/bin/puppetserver ca sign --certname
"your_puppet_Agent_Ec2_private_dns_name"
 
Note: (this is NOT required)
To sign the certificates all, execute the below command.
sudo /opt/puppetlabs/bin/puppetserver ca sign —all

Revoke Certificates (NOT required)
sudo /opt/puppetlabs/bin/puppetserver ca clean hostname

Step 4 - Verifying installation by creating Manifests in Puppet Master


The puppet manifest file is the actual file which contains the configuration details for the agents. This file is centrally stored at Puppet Master.

sudo nano /etc/puppetlabs/code/environments/production/manifests/site.pp

#copy the below yellow lines in the above file
    file {'/tmp/puppet_test.txt':                        # resource type file and filename
    ensure  => present,                      
       # make sure it exists
    mode    => '0644',                       
       # file permissions
  content => "Hello from Puppet master to agent on ${ipaddress_eth0}!\n",  # Print the eth0 IP fact
    }


Press Ctrl O for saving and then enter
Press Ctrl X for exit after saving
.


Step 5 - Apply Manifests in Puppet Agent
apply the changes in puppet agent by executing below command:
sudo /opt/puppetlabs/bin/puppet agent --test


You should see a file being modified in /tmp/puppet_works.txt in agent(node).
You can confirm by typing this command on puppet node 

sudo cat /tmp/puppet_test.txt
Hello from Puppet master to agent on IP_address!!

That's it! you have set up Puppet Master and configured agent on the target node successfully!

Friday, December 1, 2017

Puppet syntax check validator

In order to check the syntax of puppet manifests, use the below command to run the syntax check:

puppet parser validate  manifest_name

e.g.
puppet parser validate  /etc/puppetlabs/code/environments/production/manifests/site.pp