Saturday, April 20, 2024

Fix for Jenkins slowness when Running in AWS EC2 instance | Jenkins Very Slow Upon Starting EC2 Instance after Stopping

Let's say that you have configured Jenkins in AWS EC2 instance and you are using AWS free tier and you are NOT using Elastic IP, so when ever you start EC2 instance after stopping, you would have noticed Jenkins UI is taking a lot of time to come up. You try to access any page in Jenkins, it will be really slow.

What is the root cause of the issue?

Because EC2 configured in AWS free tier account would have new IP after every restart, Jenkins was trying to use old IP address when you are trying to start Jenkins. Due to this issue, Jenkins will be very slow.

Pre-requisites:

  • Jenkins is setup in AWS cloud using free-tier account.

There are two ways you can fix this issue:

First option using command line

Make changes in the xml file by logging into EC2 instance through command line using Git bash or any SSH tool.

Connect to Jenkins EC2 instance using Git bash or iTerm:

Navigate to Jenkins installation directory:

cd /var/lib/jenkins/

Modify jenkins.model.JenkinsLocationConfiguration.xml file by executing below command:

sudo nano jenkins.model.JenkinsLocationConfiguration.xml

Make sure you provide Jenkins current URL in below location and restart Jenkins.

sudo service jenkins restart

Now try accessing Jenkins through UI, it will be really performing well.

Second option us using Jenkins UI

Change public URL under Manage Jenkins->System

Change Jenkins URL to current Jenkins URL:

Click on Apply-> Save.

that's it. You will notice Jenkins is performing well now.

Watch steps in YouTube channel: 

GitHub Actions CICD Pipeline to Deploy Java WebApp into Azure App Service | Integration GitHub Actions with Azure App Service


Pre-requisites:

  • Make sure Java web app is setup in GitHub
  • Azure subscription to create web app
What are we going to do in this lab?
1. Create a Web App in Azure Cloud
2. Configure WebApp to Deploy using gitHub Actions
3. Create workflow yaml
4. Add steps/tasks in the yaml file
5. Run the workflow yaml
6. Check if Java Web App is deployed in Azure App Service

How to Create WebApp in Azure Portal?

1. Login portal.azure.com
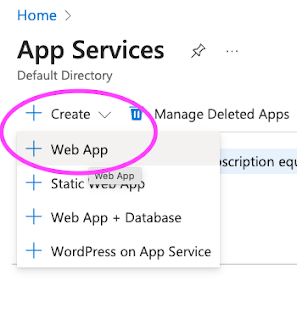
2. Click on App services


3.Click on + Add or click on Create app service


Click on Web App. Choose your Azure subscription, usually Pay as you Go or Free trial subscription
Create a new resource group or you can use existing resource group)


Enter App service name(it should be unique)
Publish as Code
Run time stack as Java 17
Java Web Server stack --> Tomcat 10.0
Operating System as Linux
Region as Central US or where ever you are based at

Enter LinuxPlan name
Choose pricing plan

Now go to Deployment tab:
Enable basic authentication
and enable Continuous Deployment 


Click on GitHub account, Authorize.
Authorize AzureappService
now select organization, repo, branch


You can also click on preview file to get pipeline YAML code 

Click on Review and Create


Create Web App
Now make sure AzureAppService_PublishProfile secret is automatically created in GitHub repo you selected.


Create GitHub Actions CICD workflow yaml:

name: Build and deploy WAR app to Azure Web App
on:
  push:
    branches:
      - main
  workflow_dispatch:
jobs:
  build:
    runs-on: ubuntu-latest
    steps:
      - uses: actions/checkout@v4
      - name: Set up Java version
        uses: actions/setup-java@v2
        with:
          java-version: '11'
          distribution: 'adopt'
      - name: Build with Maven
        run: mvn clean install -f MyWebApp/pom.xml
      - name: Upload artifact for deployment job
        uses: actions/upload-artifact@v3
        with:
          name: MyWebApp
          path: '${{ github.workspace }}'
  deploy:
    runs-on: ubuntu-latest
    needs: build
    environment:
      name: 'Production'
      url: ${{ steps.deploy-to-webapp.outputs.webapp-url }}
    steps:
      - name: Download artifact from build job
        uses: actions/download-artifact@v3
        with:
          name: MyWebApp
      - name: Deploy to Azure Web App
        id: deploy-to-webapp
        uses: azure/webapps-deploy@v2
        with:
          app-name: 'spingbootwebapp'
          slot-name: 'Production'
          publish-profile: ${{ secrets.AZUREAPPSERVICE_PUBLISHPROFILE_76B948D486E54ED7B06775D572207D40 }}
          package: '*.war'


Check the output after running the pipeline:


Verify if WebApp has been deployed into Azure App Service by browsing Web App url.

https://mysuperjavaapp.azurewebsites.net/MyWebApp/

Watch here all the steps in YouTube channel:

Saturday, April 6, 2024

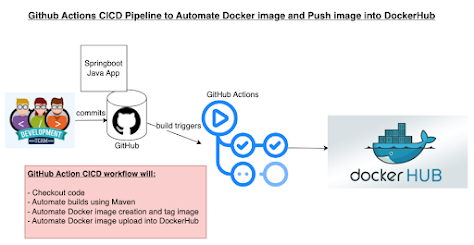
GitHub Actions Pipeline to Create Docker Image and Push Docker Image into DockerHub | GitHub Actions Integration with DockerHub

 Please find steps for integrating DockerHub with GitHub Actions:


Implementation steps:

  • Create access token in DockerHub
  • Add access token, docker hub user name as secrets in GitHub Actions
  • Create GitHub Actions workflow yaml in your repo
  • Add tasks for Maven build, docker image creation, tagging and docker push 
  • Run the workflow/build in GitHub hosted runner(e.g. Ubuntu)
  • Verify docker image have been uploaded into DockerHub

Pre-requisites:

Steps below to create access token in DockerHub:

Click on new access token:
    Copy on Generate


Add Docker Hub user name and token as Secrets in GitHub Actions

Go to your GitHub Repo --> Settings --> 

Click on Secrets and Variables under Security in left nav 
Click new Repository Secret


Enter DOCKERHUB_USERNAME as secret name and 
Enter your docker hub user name


Enter DOCKERHUB_TOKEN as secret name and 
Enter your token as secret


Create GitHub Actions CICD workflow yaml:

Go to GitHub repo where your Java project is, create a new file:

.github/workflows/cicd.yml


The below file have four steps(tasks) 
    - Checkout
    - Install Java on runner
    - Build using Maven
    - Build docker image and tag it
    - Upload docker image into DockerHub

Copy below YAML code:

name: cicd-workflow to create docker image and upload into Dockerhub
on:
  push:
    branches: [ "master" ]
jobs:
  job1:
    runs-on: ubuntu-latest
    steps:
    - uses: actions/checkout@v3
    - name: Set up JDK 17
      uses: actions/setup-java@v2
      with:
        distribution: 'adopt'
        java-version: '17'
    - name: Build with Maven
      run: mvn clean install
    - name: Login to Docker Hub
      uses: docker/login-action@v3
      with:
        username: ${{ secrets.DOCKERHUB_USERNAME }}
        password: ${{ secrets.DOCKERHUB_TOKEN }}
    - name: Build and push Docker image
      env:
        IMAGE_TAG: ${{ github.sha }}
      run: |
        docker build -t ${{ secrets.DOCKERHUB_USERNAME }}/myspringbootapp:${IMAGE_TAG} .
        docker push ${{ secrets.DOCKERHUB_USERNAME }}/myspringbootapp:${IMAGE_TAG}


Commit the file.

As soon as you commit, build will run immediately in GitHub Actions. 
Now you can see the output of build in Actions tab.


Login to DockerHub to verify if docker image have been uploaded successfully.


Watch steps in YouTube channel: