How to create EC2 instance in AWS console using new UI experience?
What is EC2 instance?
It is virtual server provided by AWS. We will be using this EC2 to setup both Jenkins and Tomcat. Please follow the below steps to create an EC2 instance.
click on All services, Click on Compute --> Click on EC2
2. Click on Launch instance
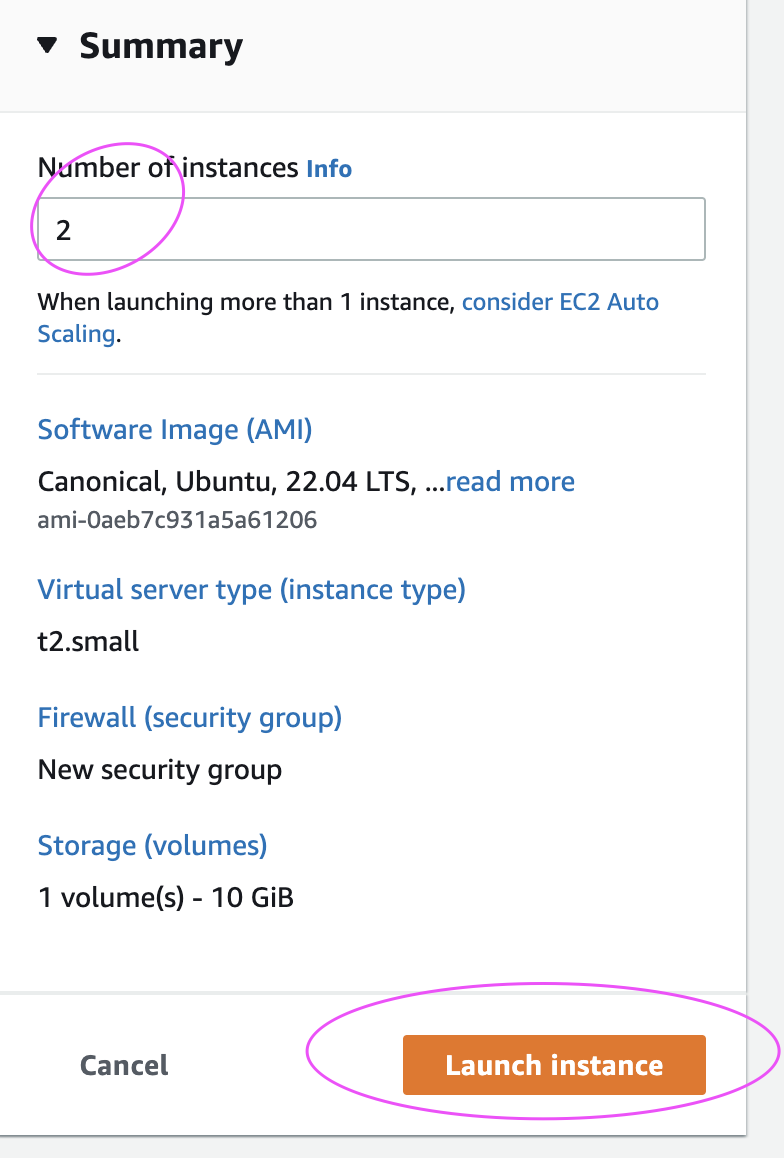
3. Enter Name as EC2 and enter 2 as number of instances
4. Select Ubuntu and choose Ubuntu server 18.0.4 as AMI
5. Enter t2.small as instance type
6. Click on Create new Key Pair
7. Choose the existing key pair if you have one, otherwise create new one, give some name as myJenkinsKey. Make sure you download the key in your local machine.Please do NOT give space or any character while naming the key.
8. Under Network settings, Click Edit
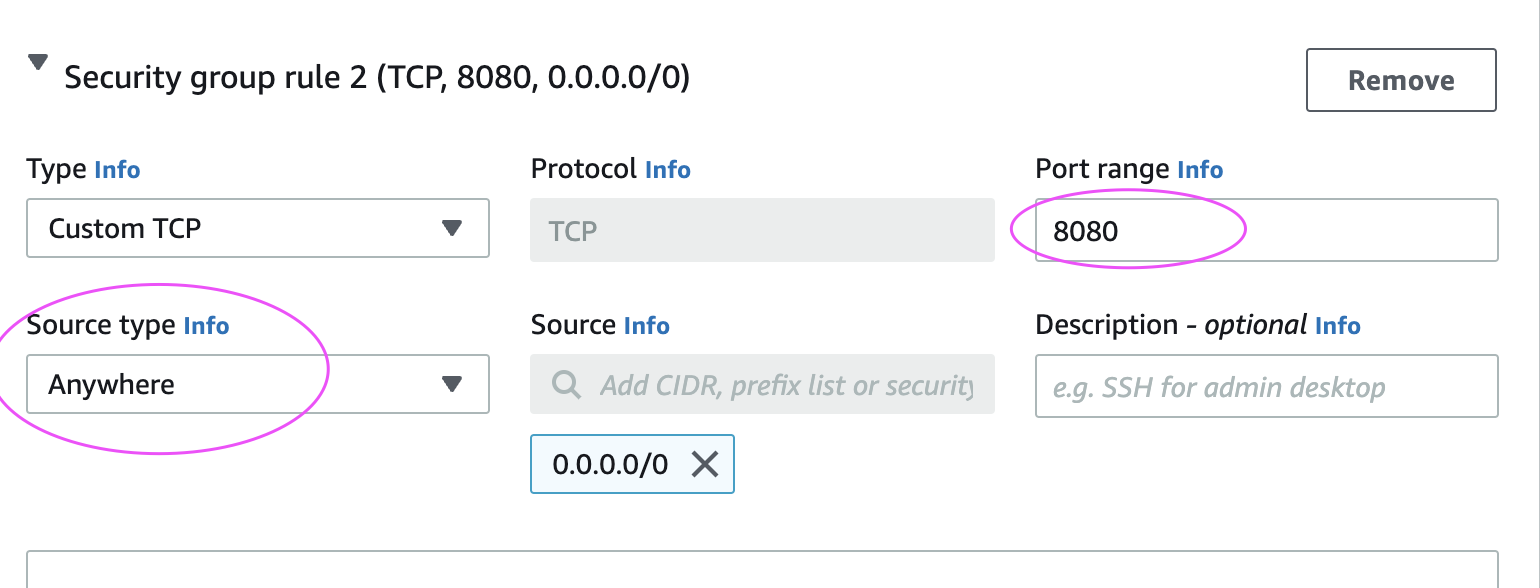
Add port range as 8080 and select AnyWhere as Source Type, that should enter 0.0.0.0/0 as Source
9. Enter 10 GB as storage
And then make sure in Summary, values appear as below:
10. Click on Launch Instance.
Click on View instances
Now you should be able to view instances in AWS console.
Connect to EC2 instance from local machine: Please click the below link to understand the steps for connecting to EC2 instance from your local machine - windows or Apple laptop.
Amazon EKS is a fully managed container orchestration service. EKS allows you to quickly deploy a production ready Kubernetes cluster in AWS, deploy and manage containerized applications more easily with a fully managed Kubernetes service.
EKS takes care of master node/control plane. We need to create worker nodes.
EKS cluster can be created in following different ways
1. AWS console
2. AWS CLI
3. eksctl command
4. using Terraform
We will create EKS cluster using eksctl command line tool.
Please watch the steps in YouTube channel:
Pre-requistes:
This Lab is using Jenkins EC2 instance. Jenkins EC2 instance needs to have following configured:
Install AWS CLI– Command line tools for working with AWS services, including Amazon EKS.
Install eksctl– A command line tool for working with EKS clusters that automates many individual tasks.
Install kubectl – A command line tool for working with Kubernetes clusters.
Create IAM Role with Administrator Access
You need to create an IAM role with AdministratorAccess policy. Go to AWS console, IAM, click on Roles. create a role
Select AWS services, Click EC2, Click on Next permissions.
Now search for AdministratorAccess policy and click
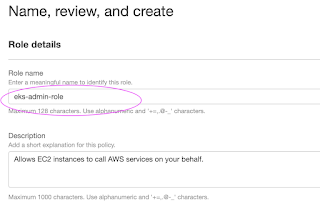
Skip on create tag. Now give a role name and create it.
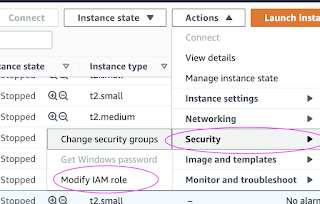
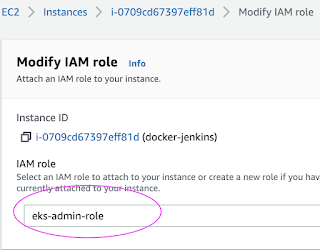
Assign the role to EC2 instance Go to AWS console, click on EC2, select EC2 instance, Choose Security. Click on Modify IAM Role
Choose the role you have created from the dropdown. Select the role and click on Apply.
Switch to Jenkins user
sudo su - jenkins
Create EKS Cluster with two worker nodes using eksctl
the above command should create a EKS cluster in AWS, it might take 15 to 20 mins. The eksctl tool uses CloudFormation under the hood, creating one stack for the EKS master control plane and another stack for the worker nodes.
Once EKS cluster is created, kubeconfig file be created under /var/lib/jenkins/.kube folder.
you can view the kubeconfig file by entering the below command:
cat /var/lib/jenkins/.kube/config
Connect to EKS cluster using kubectl commands
To view the list of worker nodes as part of EKS cluster.
kubectl get nodes
kubectl get ns
Deploy Nginx on a Kubernetes Cluster Let us run some apps to make sure they are deployed to Kubernetes cluster. The below command will create deployment:
We will learn how to automate Docker builds using Jenkins pipeline. We will
use PHP based application. I have already created a repo with source
code
+ Dockerfile. We will see how to create Docker image and upload into
Nexus Docker registry successfully.
Pre-requisites:
1. Jenkins is up and running
2. Docker installed on Jenkins instance. Click here to for integrating Docker and Jenkins
3. Docker and Docker pipelines plug-in are installed
4. Nexus is up and running and docker registry is configured. Click here to know how to do that.
5. port 80 is opened up in firewall rules to access phpApp running inside Docker container
Create an entry in Manage Credentials for connecting to Nexus
Go to Jenkins --> Manage Jenkins--> Click on Manage Credentials.
Enter Nexus user name and password with ID as nexus
Click on Save.
Step # 1 - Create a pipeline in Jenkins, name can be anything
Step # 2 - Copy the pipeline code from below
Make sure you change red highlighted values below:
Your account_d should be updated and repo should be updated.
We will learn how to automate Docker builds using Jenkins. We will use
Python based application. I have already created a repo with source code
+ Dockerfile. We will see how to create Docker image and upload into AWS ECR successfully. We will not be using AWS access keys to upload image into ECR, we will be using IAM role and attach to Jenkins instance to access ECR.
1. Jenkins is up and running
2. Docker installed on Jenkins instance. Click here to for integrating Docker and Jenkins
3. Docker and Docker pipelines plug-in are installed
4. Repo created in ECR, Click here to know how to do that.
5. Make sure port 8096 is opened up in firewall rules.
6. Create an IAM role with AmazonEC2ContainerRegistryFullAccess policy, attach role to Jenkins EC2 instance
7. Make sure AWS cli is installed in Jenkins instance.
Step # 1 - Create a pipeline in Jenkins, name can be anything
Step # 2 - Copy the pipeline code from below
Make sure you change red highlighted values below:
Your account_d should be updated and repo should be updated.
pipeline { agent any environment { registry = "acct_id.dkr.ecr.us-east-1.amazonaws.com/your_ecr_repo" }
Elastic IP address is static IP address provided by AWS, you should
avoid using public ip address as it changes every stop/start of EC2
instance. How to create Elastic IP address:
Go to AWS console, Click on EC2, Elastic IPs.
Click on Allocate Elastic IP address
Now it should create Elastic IP address.
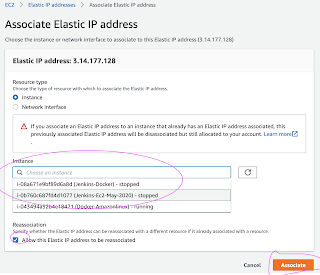
Click
on Actions, Associate Elastic IP address and choose your instance from
Instances textbox and pick up the Private ip address automatically.
That's it! Elastic IP(static) address have been assigned to your EC2 instance.
Kubernetes is an open source container
platform that eliminates many of the manual processes involved in
deploying and scaling containerized applications. We will learn how to setup Kubernetes Cluster in Ubuntu 18.0.4.
You can setup Kubernetes Cluster in many ways. One of the ways is to use
Kubeadm.
Kubeadm is a tool built to provide kubeadm init and kubeadm join as best-practice “fast paths” for creating Kubernetes clusters.
Pre-Requistes:
1. Ubuntu instance with 4 GM RAM - Master Node - (with port open to all traffic
2. Ubuntu instance with at least 2 GM RAM - Worker Node - (with ports open to all traffic)
Kubernetes Setup using Kubeadm
###Start - Execute the below commands in both Master/worker nodes##########
Login to both instances execute the below commands: sudo apt-get update -y && sudo apt-get install apt-transport-https -y
cat <<EOF >/etc/apt/sources.list.d/kubernetes.list deb https://apt.kubernetes.io/ kubernetes-xenial main EOF sudo apt-get update
#Disable swap memory swapoff -a sudo sed -i '/ swap / s/^\(.*\)$/#\1/g' /etc/fstab Enable IP tables
#We need to enable IT tables for pod to pod communication.
the above command should display both Master and worker nodes.
It means Kubernetes Cluster - both Master and worker nodes are setup successfully and up and running!!!
Deploy Nginx on a Kubernetes Cluster
Let
us run some apps to make sure they are deployed to Kuberneter cluster.
We will do this in master node. The below command will create
deployment:
kubectl create deployment nginx --image=nginx
View Deployments
kubectl get deployments
Create as a service
kubectl create service nodeport nginx --tcp=80:80
kubectl get svc
run the above command to see a summary of the service and the ports exposed.
Now go Master or worker node, enter public dns and access it with port exposed