Saturday, July 16, 2022

How to import existing Azure resources into Terraform Management? | Using Terraform to import existing resources on Azure

Let's say that you have created any resources in Azure Cloud by some other means(manually or using azure CLI) before you started using Terraform. You can import them under Terraform management instead of destroying and re-creating them from scratch. The terraform import command can be used to import existing resources. 

This command currently can import only one resource at a time. This means you can't yet point Terraform import to an entire collection of resources such as azure resource group and import all the resources under that group.

To achieve this import exercise, we will do the following:

1. Create resource group, app service manually in Azure cloud (yes, by not using terraform)

2. Create terraform file and write code to create the resource. 

3. Run terraform apply to see the error complaining resource exists

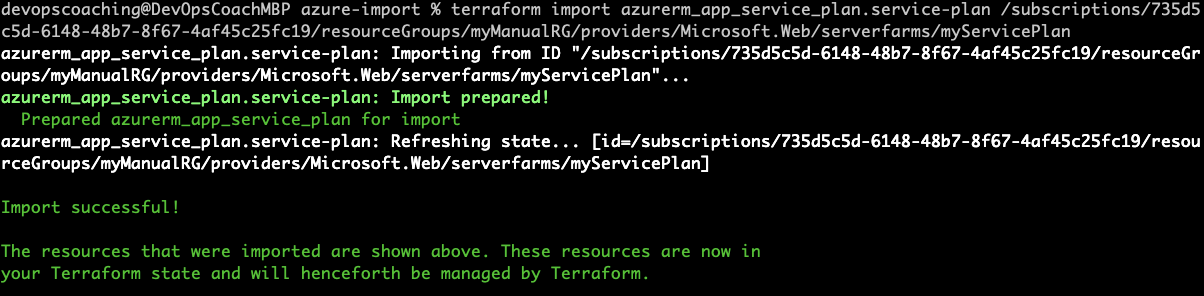
4. run terraform import

5. Verify in the state file that resource is imported into Terraform state.

6. Perform terraform destroy to clean up the imported resources

Watch the steps in YouTube channel:


Pre-requistes:

1. Install Terraform on your machine

2. Azure account setup

3. VS Code or any IDE


Let's create the resource manually in Azure Cloud first

Login to Azure portal - https://portal.azure.com/#home

Create App service manually in portal 


Create terraform file 

To import any resource, create a tf file first write a resource block for it in your configuration, establishing the name by which it will be known to Terraform:


terraform {
  required_providers {
    azurerm = {
      source  = "hashicorp/azurerm"
      version = ">=2.99.0"
    }
  }
}
# Configure the Microsoft Azure Provider
provider "azurerm" {
  features {}
}
# Add this block code if you want to import existing Resource group
resource "azurerm_resource_group" "rg" {
  name     = "myManualRG"
  location = "southcentralus"
  tags = {
    owner       = "ak"
    orgnization = "MyOrg"
  }
}
resource "azurerm_service_plan" "service-plan" {
  name                = "myServicePlan"
  location = azurerm_resource_group.rg.location
  resource_group_name = azurerm_resource_group.rg.name
  os_type             = "Linux"
  sku_name            = "S1"
  tags = {
          environment = "dev"
  }
}
# Create JAVA app service
resource "azurerm_linux_web_app" "app-service" {
  name = "MyAwesomeSuperWebApp"
  location = azurerm_resource_group.rg.location
  resource_group_name = azurerm_resource_group.rg.name
  service_plan_id = azurerm_service_plan.service-plan.id
  site_config {
    minimum_tls_version = "1.0"
    application_stack {
      java_server         = "TOMCAT"
      java_version        = "java11"
      java_server_version = 9.5
    }
  }
tags = {
    environment = "dev"
  }
}


Now run terraform apply command


terraform import can be run to import the resource under Terraform management.

Import Resource Group created manually in Azure Cloud into Terraform Management:

terraform import azurerm_resource_group.rg /subscriptions/XXXXX/resourceGroups/myManualRG


Terraform State View
Execute --> terraform state list
The above command will show the below output.
azurerm_resource_group.rg


This command will list the resources that are part of Terraform state.

Import App service plan created manually in Azure Cloud into Terraform Management:

terraform import azurerm_app_service_plan.service-plan /subscriptions/XXXXXX/resourceGroups/myManualRG/providers/Microsoft.Web/serverfarms/myServicePlan

Terraform State View
Execute --> terraform state list
The above command will show the below output.
azurerm_app_service_plan.service-plan
azurerm_resource_group.rg

Import App Service created manually in Azure Cloud into Terraform Management:
terraform import azurerm_app_service.app-service /subscriptions/XXXX/resourceGroups/myManualRG/providers/Microsoft.Web/sites/myPythonWebApp

Terraform State View
Execute --> terraform state list


The above command will show the below output.

azurerm_app_service.app-service
azurerm_app_service_plan.service-plan
azurerm_resource_group.rg

finally clean up the resources 
Execute --> terraform destroy
enter yes


This will clean up all three resources we have imported from Azure cloud.

Wednesday, July 6, 2022

How to Deploy Springboot App into AKS cluster using Azure Pipelines | Deploy Docker Containers into AKS cluster using Azure Rlease Pipelines | Deploy Microservices into AKS cluster using Azure Pipelines

We are going to learn how to deploy Springboot Microservices Docker containers into Azure Kubernetes Cluster(AKS) using Azure pipelines. I have created a sample Springboot App setup in GitHub. Click here to access code base in GitHub.


Watch the steps in YouTube Channel:

Pre-requisites:

1. AKS cluster needs to be up running. You can create AKS cluster using any of one of the below options:

2. ACR is also setup in Azure cloud. 
3.  Have Azure DevOps project dashboard in 
4. Dockerfile created along with the application source code for springboot App.
6. Modify K8S manifest file per acr, image name for AKS Deployment


Implementation Steps:

Step 1 - Create Azure Build pipeline for building Docker images and uploading into ACR
Step 2 - Create Azure Release pipeline for deploying Springboot Docker containers into AKS
 
Step 1 - How to create a Azure Build Pipeline

1. Login into your Azure DevOps dashboard
2. Click on Pipelines.

3. Click on New Pipeline

4. Click on use the classic editor
Enter your repo name and branch name where you have stored your source code along with Dockerfile:


Click on Continue. Now choose the template by typing Docker, Select Docker container and Apply.
 

Now pipeline is created with two tasks already. We need to more tasks:
Let's add Maven build task for building the JAR file.
Click on + icon and type Maven
And then enter maven goal as package


Let's modify Build an image task.


Select Push an image task

Add a task for Copying YAML file, enter the Kubernetes deployment YAML file - 

Add Publish artifact task


Now click Save + Queue and run to start Building the pipeline


Once the build is completed, you should be able to see the Docker images under 
Services --> Repositories


Step 2 - How to Create Release pipeline for deploying Docker containers into AKS Cluster 

Go to Pipelines --> Click on Releases --> New Release pipeline

Click on Stage 1 and choose a template by selecting
Deploy to a Kubernetes cluster and click on Apply


Change the stage name to Deploy to AKS


Now click on Add an artifact


Select the Build pipeline and click on the latest version

Now click on Deploy to AKS stage
Add Replace token task

Click on + to add task, type token and choose replace token task. 


Now click on replace token task and Clik on root directory, click on ... dots
 select the drop directory from below:


and enter Target file as  aks-deploy-from-acr.yaml


Click on kubectl apply


Now Click on New to enter AKS cluster connection info


Choose the Azure subscription and enter Microsoft user credentials.


Select AKS cluster from the drop down, choose default namespace


Choose command as apply and select the yaml file from the dropdown from Configuration file 


Now click on Save,
Click on Create a release

and then click Create to run the deployment


Click on Stage to see the logs

Now you will see the following tasks are in green to confirm Deployment was successful.


Let's check if deployment created any pods

kubectl get deployments


kubectl get pods


kubectl get svc

Now try to access spring boot application running inside AKS cluster by using external IP and port number


Go to the browser enter http://external IP