Saturday, May 26, 2018

Migrate Java App from Bitbucket to Azure Cloud - How to migrate Java application to Azure Cloud from Bitbucket using VSTS

Let's say you have a Java application that is setup already in Bitbucket. Your organization have decided to migrate to Azure Cloud. Let us see how we can migrate the application to Azure:

Pre-requistes:
1. Java application set up in Bitbucket.
2. VSTS project setup.

Let us create WebApp in Azure Portal First. WebApp is a App service provide by Azure for hosting your web application. It supports .NET, Java, PHP,  Python and NodeJS. We will be deploying our Java Web App which is available in bitbucket repo.

Create App service on Azure portal
Now to login portal.azure.com
click on App services

Click on + Add
Click on Web App.
Create
Enter App service name(it should be unique)
Create a new resource group(for first time if you create an app service, otherwise you can use existing group name)

Select azure free subscription

Leave the rest default click save/create

This will take bit time to create the app service.
Now click on app service tab on left. You will see the newly created app service.
Select it, go to application settings. Choose Java 8 instead of .Net
And also web container as Tomcat.


Save and try to access the app service url by going to overview section of app service.

You should see the app service home page.

Steps to migrate java applications from Bitbucket to Azure Cloud using VSTS:

1. Login to VSTS. Click on your project.
2. Go to build and release
3. Click on builds
4. Click on New.
5. Select Bitbucket Cloud as Source. Select service connection.
6. Select use Username and password to authorize.
7. Click on three dots ... repository
8. Now choose a template by entering Java in the search textbook. Choose Azure WebApp for Java.
9. Click on Apply. VSTS already have Java Azure WebApp template.

10. Now Click on Maven pom.xml and make sure you have right goal - clean install
11. Leave the value as it is for Copy Files to staging folder

12. Publish Artifact: Drop 

13. Click on Stop azure web app
Enter Azure subscription.

Select Free trial subscription from the drop down.
14. Click on authorize(remove popup blocker)
15. do the same steps for Deploy Azure App and Start Azure App.
16. After done, click on Save and Queue.

Now you will see that VSTS would have started build.

After successful build, you can check the output by accessing below URL:

http://myAzureWebAppUrl/MyWebApp

Thursday, May 17, 2018

Jenkins Slack Integration - Jenkins push notifications to Slack Channel - How to integrate Jenkins and Slack - Slack Jenkins Integration

How to integrate Slack with Jenkins and Send push notifications from Jenkins to Slack? You need to install slack notifications plug-in in Jenkins.


Pre-requisites:
Install Slack notifications plug-in

Steps to integrate Slack with Jenkins:

1. Go to www.slack.com and signup with your email, create your workspace.
2. Create a channel in Slack. Give any name.
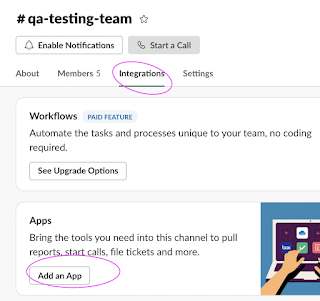
3. Go to Channel --> Click on channel name --> Click Integrations --> Click Add an app


4. enter Jenkins CI and choose that.


5. Click on Add configuration
6. Add Jenkins CI configuration and select the channel from the drop down.


7. once you added, you will see the below page:


8. Now navigate to Jenkins, Manage Jenkins --> Configure System. Under Global Slack notifier settings. Enter the Team Subdomain value as workspace. Also provide channel name based on what you created. Also provide the token info as well


Token info can be entered by click on Add credentials, Choose secret text drop down and enter token in password text box.

 
9. Now to your Job in Jenkins, Click on Configure.  Click on add post build action. select desired settings. 

10. Click on Apply, and Save

11. Click on Build Now, Now you will see results in Slack channel.


You can watch the steps in my YouTube channel as well:


Jenkins admin password unlock - Forgotten Jenkins Admin Password - How to unlock password


Here below are the steps for resetting Jenkins admin password:

1. Edit the Jenkins config.xml under /var/lib/jenkins to disable securityFlag by executing below command:
sudo vi /var/lib/jenkins/config.xml


2. Find this <useSecurity>true</useSecurity> and change it to <useSecurity>false</useSecurity>
3. Restart jenkins by below command:
sudo service jenkins restart
4. Access Jenkins now, click on Manage Jenkins, click on configure Global security
5. click on Enable security 
6. Click on Jenkins Own user database, click on allow users to sign up


6. click on apply and save

7. Now click on sign up and create a new user and password.


Sunday, May 13, 2018

Install Jenkins using Ansible Playbook on Ubuntu | Install Jenkins using Ansible Playbooks

Find below Ansible playbook for installing Jenkins on a Ubuntu machine.

Pre-requisites:
Java needs to be installed already on machine before setting up Jenkins. please Click here for Java Playbook. Here below is the playbook for installing Jenkins using Ansible in Ubuntu EC2:

sudo vi installJenkins.yml
Copy the below yellow highlighted in the above file: 

---
 - hosts: My_Group
  
   tasks:
    - name: ensure the jenkins apt repository key is installed
      apt_key: url=https://pkg.jenkins.io/debian/jenkins.io-2023.key state=present
      become: yes

    - name: ensure the repository is configured
      apt_repository: repo='deb https://pkg.jenkins.io/debian-stable binary/' state=present
      become: yes

    - name: ensure jenkins is installed
      apt: name=jenkins update_cache=yes
      become: yes

    - name: ensure jenkins is running
      service: name=jenkins state=started


sudo vi /etc/ansible/hosts
make sure you add below entry with target node IP changed (in red color).
[My_Group]  
xx.xx.xx.xx ansible_ssh_user=ubuntu ansible_ssh_private_key_file=~/.ssh/id_rsa  ansible_python_interpreter=/usr/bin/python3


Execute the below command:
ansible-playbook installJenkins.yml

This should install Jenkins on the target node and should install Jenkins.

Now enter public ip address or public dns name with port no 8080 of target server by in the browser to see Jenkins up and running.

http://target_node_public_dns_name:8080

Thursday, May 3, 2018

How to setup Kubernetes Cluster on Ubuntu | Create Kubernetes Clusters on Ubuntu

Kubernetes is an open source container orchestration platform initially developed by Google. Kubernetes poses high scalability, easier container management and helps to reduce the delay in communication in containers (Docker). It is used to orchestrate and manage docker containers in cluster environment.

Let us see how to install Kubernetes on Ubuntu on Amazon EC2.

Pre-requisites

  • At least 2 Ubuntu machines: one for master and one for worker
  • open port 6443 in firewall rules
Install Docker first

sudo apt-get update && sudo apt-get install -y apt-transport-https
sudo apt-get install -y docker.io
Install necessary dependencies for Kubernetes to run and also all the nodes that will join Kubernetes cluster.

Step 1 Installing Kubernetes
sudo su -
sudo curl -s https://packages.cloud.google.com/apt/doc/apt-key.gpg | apt-key add -
 Next add a repository by creating the file /etc/apt/sources.list.d/kubernetes.list and enter the following content:
cat <<EOF >/etc/apt/sources.list.d/kubernetes.list
deb https://apt.kubernetes.io/ kubernetes-xenial main
EOF 

After saving the file, do the below command: 
sudo apt-get update

Install Kubernetes with the following commands:
sudo apt-get install -y kubelet kubeadm kubectl kubernetes-cni

kubeadm version

Step 2 Initialize your master

With everything installed, go to the machine that will serve as the Kubernetes master and issue the command:

sudo kubeadm init

Your Kubernetes master has initialized successfully!

Before you join a node, you need to issue the following commands (as a regular user)
mkdir -p $HOME/.kube
sudo cp -i /etc/kubernetes/admin.conf $HOME/.kube/config
sudo chown $(id -u):$(id -g) $HOME/.kube/config

You can now join any number of machines by running the following on each node as root:

kubeadm join 172.31.29.135:6443 --token rgsh66.wtfp0z8tt8u9t0ye --discovery-token-ca-cert-hash sha256:d7e7f5485cf3e43b7f2231213ec587739506c396536621624f87a9d6aadb2800

Get all nodes by executing in master

kubectl get nodes

You must deploy a pod network before anything will actually function properly. 
Do the install of Flannel pod network.
 This can be done with two commands (run on the master):

kubectl apply -f https://raw.githubusercontent.com/coreos/flannel/v0.9.1/Documentation/kube-flannel.yml

serviceaccount "flannel" created

configmap "kube-flannel-cfg" created

kubectl apply -f https://raw.githubusercontent.com/coreos/flannel/v0.9.1/Documentation/k8s-manifests/kube-flannel-rbac.yml

clusterrole.rbac.authorization.k8s.io "flannel" configured
clusterrolebinding.rbac.authorization.k8s.io "flannel" configured

sudo kubectl get pods --all-namespaces

This will display if pod network has been deployed successfully.

kubectl cluster-info

this command will display 

Kubernetes master is running at https://172.31.9.117:6443
KubeDNS is running at https://172.31.9.117:6443/api/v1/namespaces/kube-system/services/kube-dns:dns/proxy

Joining a node

First do the same installation (all step #1 commands) on this node.

With everything in place, you are ready to join the node to the master. To do this, go to the node's terminal and issue the command:
sudo kubeadm join --token TOKEN MASTER_IP:6443 --discovery-token-ca-cert-hash

Where TOKEN is the token you were presented after initializing the master and MASTER_IP is the IP address of the master.

Once the node has joined, go back to the master and issue the below command:
sudo kubectl get nodes 
to see the node has successfully joined.
NAME               STATUS    ROLES     AGE       VERSION
ip-172-31-25-31    Ready     master    19m       v1.10.3
ip-172-31-39-149   Ready     <none>    8m        v1.10.3

Deploying a service

At this point, you are ready to deploy a service on your Kubernetes cluster. To deploy an NGINX service (and expose the service on port 80), run the following commands (from the master):
 
sudo kubectl run --image=nginx nginx-app --port=80
sudo kubectl expose deployment nginx-app --port=80 --name=nginx-http

Kubernetes cluster is setup

You now have a basic Kubernetes cluster, consisting of a master and a single node.

Tuesday, May 1, 2018

Error: Could not run: Could not find type ec2_instance - Puppet Error

Apply the below fix when you have this error when you try to execute
puppet resource ec2_instance.
 if you get this error: Error: Could not run: Could not find type ec2_instance

You need to force puppetlab AWS module and install:

puppet module install puppetlabs-aws --force