Azure Container Registry is a managed, private docker registry service. You can create and maintain Azure
container registries to store and manage your private Docker container
images.
It is alternative to Docker Hub. Azure Container Registry allows you to build, store, and manage container images and artifacts in a private registry for all types of container deployments.
Let us see how to upload a docker images from your VM into ACR.
It is alternative to Docker Hub. Azure Container Registry allows you to build, store, and manage container images and artifacts in a private registry for all types of container deployments.
Let us see how to upload a docker images from your VM into ACR.
Pre-requistes:
Make sure you have docker installed on your VM.
Step 1 - Create Azure Container Registry (ACR)
Go to https://portal.azure.com/
Create a Resource, Give container registry as a name
Click on Create

Go to https://portal.azure.com/
Create a Resource, Give container registry as a name
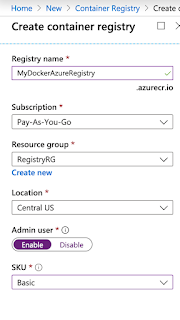
Enter values as mentioned below:
Give registry name, resource group and choose Enable admin user and SKU as Basic

Click on Review and then create, now your container registry is been created.
Step 2 - Download sample Python App
Go to your machine where you have docker images stored. perform below command to download sample pythonapp which is already dockerized.
git clone https://bitbucket.org/ananthkannan/mydockerrepo/src/master/pythonApp/
cd pythonApp
docker build . -t mypythonapp
type below command:
sudo docker images
this should show docker images you have created locally.
Now go to ACR, click on docker registry you created. Click on access keys under Settings.
Copy value under login server
Step 3 - Upload your docker images to ACR
Login to Azure Container Registry through command line.
sudo docker login mydockerazureregistry.azurecr.io
Username: mydockerazureregistry
Enter password by copying value below password
Now tag the docker image per as below:
sudo docker tag mypythonapp mydockerazureregistry.azurecr.io/mypythonapp
sudo docker push mydockerazureregistry.azurecr.io/mypythonapp
That's it..Docker image is pushed into ACR. You can see it under Services--> repositories


