Showing posts with label IAC. Show all posts

Tuesday, January 23, 2024

Create Ansible Role to create a new EC2 instance | Ansible Role for provisioning infrastructure in AWS | Refactor Ansible playbook into Ansible Role

We will learn how to create Ansible Role for provisioning a new EC2 instance in AWS cloud. We will pick a playbook which has all the logic and we will refactor into reusable ansible role.


What is Ansible Role?
Ansible also lets you organize tasks in a directory structure called a Role. Using Ansible roles you can break down complex playbooks into smaller and manageable chunks. Ansible role enables reuse and share our Ansible code efficiently.

How to create Ansible Role?

Using ansible galaxy command, we can create Ansible role. This will create the below directory with all the files. 

directory structure of Ansible role
aws-infra-role/
├── README.md
├── create.yml
├── defaults
│   └── main.yml
├── handlers
│   └── main.yml
├── meta
│   └── main.yml
├── tasks
│   ├── create-ec2.yml
│   └── create-sg.yml
├── tests
│   ├── inventory
│   └── test.yml
└── vars
    └── main.yml

Directory structure explained
tasks - contains the main list of tasks to be executed by the role.
handlers - handlers are typically used to start, reload, restart, and stop services.
defaults - default variables for the role.
vars - other variables for the role. Vars has the higher priority than defaults.
meta - defines some data / information about this role (author, dependency, versions, examples, etc,.)

tests - test cases if you have any.

Pre-requisites:
Steps to create EC2 instance using Ansible Role:

Login to EC2 instance using Git bash or ITerm/putty where you installed Ansible. Execute the below command:

Create an Inventory file first

sudo mkdir /etc/ansible

Edit Ansible hosts or inventory file
sudo vi /etc/ansible/hosts

Add the below two lines in the end of the file:
[localhost]
local


cd ~
mkdir roles  
cd roles

Create Ansible Role

ansible-galaxy role init aws-infra-role


We will convert this playbook into ansible role.
So all the variables will go inside vars folder.

vars
    └── main.yml

sudo vi aws-infra-role/vars/main.yml
(copy below content)
keypair: myNov2023Key
instance_type: t2.small
image: ami-007855ac798b5175e
wait: yes
group: webserver
region: us-east-1
security_group: my-jenkins-security-grp1

Save the file and come out of it.

So all the tasks will go inside tasks folder. let's create security group first.

sudo vi aws-infra-role/tasks/create-sg.yml
---
  - include_vars: "vars/main.yml"
    tags: create

# tasks file for security group
  - name: configuring security group for the instance
    ec2_group:
        name: "{{ security_group }}"
        description: my-ajenkin-security_groAup
        region: "{{ region }}"
        rules:
            - proto: tcp
              from_port: 22
              to_port: 22
              cidr_ip: 0.0.0.0/0
            - proto: tcp
              from_port: 80
              to_port: 80
              cidr_ip: 0.0.0.0/0
            - proto: tcp
              from_port: 8080
              to_port: 8080
              cidr_ip: 0.0.0.0/0
        rules_egress:
            - proto: all
              cidr_ip: 0.0.0.0/0

Let's create a task for ec2 instance creation.

sudo vi aws-infra-role/tasks/create-ec2.yml

---
  - include_vars: "vars/main.yml"
    tags: create
  - name: creating ec2 instance
    ec2_instance:
        security_group: "{{ security_group }}"
        name: test-stan
        key_name: "{{ keypair }}"
        instance_type: "{{ instance_type}}"
        image_id: "{{ image }}"
        region: "{{ region }}"
        wait_timeout: 2   


Let's create a task for creating s3 bucket.

sudo vi aws-infra-role/tasks/create-s3.yml                                                                                                     ---
  - include_vars: "vars/main.yml"
    tags: create
  - name: creating s3

    s3_bucket:
      name: myansibles3bucket1234
      state: present
      region: "{{ region }}"
      versioning: yes
      tags:
        name: myansiblebucket
        type: example
    register: s3_url

  - name: Display s3 url
    debug: var=s3_url       

Let's create Ansible main playbook.
sudo vi aws-infra-role/main.yml
---
# This Playbook creates infra in aws cloud

- hosts: local
  connection: local
  gather_facts: False
  tags: ec2_create

  tasks:
  - include: tasks/create-sg.yml
  - include: tasks/create-ec2.yml
  - include: tasks/create-s3.yml 

now execute the ansible playbook by
ansible-playbook aws-infra-role/main.yml


If everything is good, you should see the new instance, S3 bucket created on AWS console. make sure you are able to connect to that instance.

That's it!! That is how you create a new EC2 instance using Ansible role in AWS cloud. 
Please watch steps in YouTube channel:

Thursday, August 24, 2023

Install Ansible on Red Hat Linux | How to setup Ansible on Red Hat Linux VM | Ansible install on Azure Linux Virtual Machine | Ansible Azure Integration

How to setup Ansible on Red Hat Linux VM and Integrate with Azure Cloud?

Ansible is #1 configuration management tool. It can also be used for infrastructure provisioning as well. or You can use Ansible in combination of Terraform which can take care of infra automation and Ansible can do configuration management. We will be setting up Ansible on Red Hat VM in Azure cloud And create some resources in Azure Cloud by using Ansible playbooks.


Ansible Architecture:
 

The best way to install Ansible in Linux is to use PIP, a package manager for Python.

Pre-requisites:
How to setup Ansible on Red Hat Linux VM

Watch Steps in YouTube channel:

Change host name to AnsibleMgmtNode
sudo hostnamectl set-hostname 
AnsibleMgmtNode

Update Repository
sudo yum update -y

Install Python-pip3
sudo yum install python3-pip -y

Upgrade pip3 sudo pip3 install --upgrade pip


# Install Ansible pip3 install "ansible==2.9.17"


check Ansible version
ansible --version


# Install Ansible azure_rm module for interacting with Azure.
pip3 install ansible[azure]

Authenticate with Azure


To configure Azure credentials, you need the following information:

  • Your Azure subscription ID and tenant ID
  • The service principal application ID and secret

Create an Azure Service Principal

Login to Azure first
az login
Enter Microsoft credentials

Run the following commands to create an Azure Service Principal:

az ad sp create-for-rbac --name <service-principal-name> \ 
--role Contributor \ 
--scopes /subscriptions/<subscription_id>
Save the above output in a file as you will not be able retrieve later.
Configure the Ansible credentials using one of the following techniques:

Option 1: Create Ansible credentials file

In this section, you create a local credentials file to provide credentials to Ansible. For security reasons, credential files should only be used in development environments.

mkdir ~/.azure 

vi ~/.azure/credentials


Insert the following lines into the file. Replace the placeholders with the service principal values.
[default] subscription_id=<subscription_id> client_id=<service_principal_app_id> secret=<service_principal_password> tenant=<service_principal_tenant_id>

Option 2: Define Ansible environment variables

On the host virtual machine, export the service principal values to configure your Ansible credentials.

export AZURE_SUBSCRIPTION_ID=<subscription_id> export AZURE_CLIENT_ID=<service_principal_app_id> export AZURE_SECRET=<service_principal_password> export AZURE_TENANT=<service_principal_tenant_id>

Test Ansible installation

You now have a virtual machine with Ansible installed and configured!

This section shows how to create a test resource group within your new Ansible configuration. If you don't need to do that, you can skip this section.

Option 1: Use an ad-hoc ansible command

Run the following ad-hoc Ansible command to create a resource group:

ansible localhost -m azure_rm_resourcegroup -a "name=my-rg123 location=eastus"

Option 2: Write and run an Ansible playbook

Create a simple playbook to create resource group in Azure.

sudo vi create-rg.yml

---

- hosts: localhost

  connection: local

  tasks:

    - name: Creating resource group

      azure_rm_resourcegroup:

        name: "myResourceGroup"

        location: "eastus"

Execute the playbook using ansible-playbook command.

ansible-playbook create-rg.yml

Now Login to Azure cloud to see if the resource group have been created.


Clean up Resources

Save the following code as delete-rg.yml

sudo vi delete-rg.yml

--- - hosts: localhost tasks: - name: Deleting resource group - "{{ name }}" azure_rm_resourcegroup: name: "{{ name }}" state: absent register: rg - debug: var: rg

ansible-playbook delete-rg.yml --extra-vars "name=myResourceGroup"

check in Azure cloud to see if the resource group have been deleted.

Thursday, February 9, 2023

How to create Azure Resources using Terraform in Azure Cloud | Automate Infrastructure setup using Terraform in Azure Cloud | Create Azure WebApp using Terraform

Azure Web App service lets us quickly build, deploy, and scale enterprise-grade web, mobile, and API apps running on any platform. It supports .NET, .NET core, Java, PHP,  Python, Ruby and NodeJS. It is a fully managed Platform as a Serice (PaaS) where developers can deploy mobile, API apps or web applications in Azure Cloud in matter of seconds.

We will provision WebApp in Azure cloud using Terraform.

Terraform is an open-source tool for provisioning and managing cloud infrastructure. Terraform can provision resources on any cloud platform. 

Terraform allows you to create infrastructure in configuration files(tf files) that describe the topology of cloud resources. These resources include virtual machines, storage accounts, and networking interfaces. The Terraform CLI provides a simple mechanism to deploy and version the configuration files to Azure.

Pre-requisites:

Azure CLI needs to be installed.

Terraform needs to be installed.

How to Authenticate with Azure?

Terraform can authenticate with Azure in many ways, in this example we will use Azure CLI to authenticate with Azure and then we will create resources using Terraform.

Logging into the Azure CLI

Login to the Azure CLI using:

az login

The above command will open the browser and will ask your Microsoft account details. Once you logged in, you can see the account info by executing below command:

az account list

Now create a directory to store Terraform files.

mkdir azure-terraform

cd azure-terraform

Let's create a terraform file to use azure provider. To configure Terraform to use the Default Subscription defined in the Azure CLI, use the below cod.

sudo vi azure.tf

terraform {
  required_providers {
    azurerm = {
      source  = "hashicorp/azurerm"
      version = "=3.42.0"
    }
  }
}

# Configure the Microsoft Azure Provider
provider "azurerm" {
  features {}
}

Now initialize the working directory

Perform the below command:

terraform init

Once directory is initialized, you can start writing code for setting up the infrastructure. 

Create WebApp(App Service) using Terraform script

sudo vi create-app-svc.tf

# Create a resource group
resource "azurerm_resource_group" "dev-rg" {
  name     = "dev-environment-rg"
  location = "Central US"
}

# Create app service plan
resource "azurerm_service_plan" "service-plan" {
  name = "simple-service-plan"
  location = azurerm_resource_group.dev-rg.location
  resource_group_name = azurerm_resource_group.dev-rg.name
  os_type = "Linux"
  sku_name = "S1"
  tags = {
    environment = "dev"
  }
}

# Create Web App service for hosting Java Web App in Tomcat server
resource "azurerm_linux_web_app" "app-service" {
  name = "mysuperjavawebapp2"
  location = azurerm_resource_group.dev-rg.location
  resource_group_name = azurerm_resource_group.dev-rg.name
  service_plan_id = azurerm_service_plan.service-plan.id

        site_config {
        always_on          = true
          application_stack {
             java_server         = "TOMCAT"
             java_server_version = "8.5"
             java_version        = "11"
         }
        }
tags = {
    environment = "dev"
  }
}

Now Perform the below command to validate terraform files.

terraform validate

perform plan command to see how many resources will be created.

terraform plan

terraform apply --auto-approve

 
Now Login into Azure Cloud to see all the resources created.
 

To clean up the resources created from Terraform

terraform destroy --auto-approve

Wednesday, January 4, 2023

How to run Ansible playbook from Jenkins pipeline job | Automate EC2 provisioning in AWS using Jenkins and Ansible Playbook | Create new EC2 instance in AWS cloud using Ansible Playbook and Jenkins Pipeline

We will learn how to create new EC2 instance using Ansible playbook and automate using Jenkins Pipeline. 


Watch Steps in YouTube Channel:

Pre-requisites:

  • Ansible is installed and Boto is also installed on Jenkins instance
  • Ansible plug-in is installed in Jenkins. 
  • Make sure you create an IAM role with AmazonEC2FullAccess policy and attach the role to Jenkins EC2 instance.
  • Playbook for creating new EC2 instance needs to be created but you can refer my GitHub Repo
Steps:

Create Ansible playbook for provisioning EC2 instance

(Sample playbook is available in my GitHub Repo, you can use that as a reference)

Create Jenkins Pipeline 
pipeline {
    agent any

    stages {
        
        stage ("checkout") {
            steps {
                        checkout([$class: 'GitSCM', branches: [[name: '*/master']], extensions: [],                                                     userRemoteConfigs: [[url: 'https://github.com/akannan1087/myAnsibleInfraRepo']]])         
            }
        }
        stage('execute') {
            steps {
                //to suppress warnings when you execute playbook    
                sh "pip install --upgrade requests==2.20.1"
                // execute ansible playbook
                ansiblePlaybook playbook: 'create-EC2.yml'
            }
        }
    }
}

Execute Pipeline


Pipeline Console output


Monday, January 3, 2022

Jenkins Terraform Integration | How do you integrate Terraform with Jenkins | Automate Infrastructure setup using Terraform and Jenkins | Remote Store in S3 Bucket

We will be learning how to provision resources in AWS cloud using Terraform and Jenkins. We will also learn how to store terraform state info remotely in AWS S3 bucket.

We will create S3 bucket for storing terraform state info and Dynamo DB table for locking capability. 

We will try to create an EC2 instance and S3 Bucket using Terraform and Jenkins in AWS cloud. Look at the diagram that describes the whole flow. 

Watch these steps in action in YouTube channel:


Pre-requisites:
  • Create S3 bucket for storing TF state
  • Create dynamo DB table for providing lock capability
  • Jenkins is up and running
  • Terraform is installed in Jenkins
  • Terraform files already created in your SCM
  • Make sure you have necessary IAM role created with right policy and attached to Jenkins EC2 instance. see below for the steps to create IAM role.
I have provided my public repo as an example which you can use.

Step # 1 - Create S3 Bucket:
Login to AWS, S3. Click on create S3 bucket.

Give unique name to the bucket, name needs to be unique.

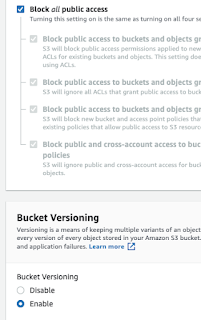
Block all public access, enable bucket versioning as well.

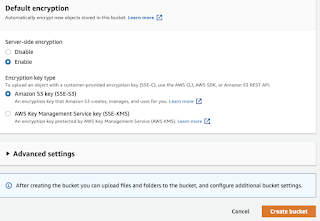
Enable encryption.


Step # 2 - Create DynamoDB Table
Create a new table with LockID as partition Key


Step - 3 Create IAM role to provision EC2 instance in AWS 


Select AWS service, EC2, Click on Next Permissions


Type EC2 and choose AmazonEC2FullAccess as policy and type S3 and add AmazonS3FullAccess, type Dynamo

Attach three policies


Click on Next tags, Next Review
give some role name and click on Create role.


Step 4 - Assign IAM role to EC2 instance

Go back to Jenkins EC2 instance, click on EC2 instance, Security, Modify IAM role


Type your IAM role name my-ec2-terraform-role and Save to attach that role to EC2 instance.


Step 5 - Create a new Jenkins Pipeline

Give a name to the pipeline you are creating.


Step 6 - Add parameters to the pipeline

Click checkbox - This project is parameterized, choose Choice Parameter


Enter name as action
type apply and enter and type destroy as choices as it is shown below(it should be in two lines)


Go to Pipeline section

Add below pipeline code and modify per your GitHub repo configuration.

pipeline {
    agent any

    stages {
        stage('Checkout') {
            steps {
            checkout scm
            }
        }
        
        stage ("terraform init") {
            steps {
                sh ('terraform init -reconfigure') 
            }
        }
        stage ("terraform plan") {
            steps {
                sh ('terraform plan') 
            }
        }
                
        stage ("terraform Action") {
            steps {
                echo "Terraform action is --> ${action}"
                sh ('terraform ${action} --auto-approve') 
           }
        }
    }
}
Click on Build with Parameters and choose apply to build the infrastructure or choose destroy if you like to destroy the infrastructure you have built. 


Click on Build With Parameters,
choose apply from the dropdown
Now you should see the console output if you choose apply.


Pipeline will look like below:


Login to AWS console


Login to S3 Bucket, you should see terraform state info is also added


How to Destroy all the resources created using Terraform?

run the Jenkins Pipeline with destroy option. This should destroy all the resources you have created using Terraform.