-
Create a systemd directory for the docker service:
sudo mkdir -p /etc/systemd/system/docker.service.d -
Create a file called
/etc/systemd/system/docker.service.d/http-proxy.confthat adds theHTTP_PROXYenvironment variable:
Or, if you are behind an HTTPS proxy server, create a file called[Service] Environment="HTTP_PROXY=http://proxy.example.com:80/"/etc/systemd/system/docker.service.d/https-proxy.confthat adds theHTTPS_PROXYenvironment variable:
[Service] Environment="HTTPS_PROXY=https://proxy.example.com:443/" -
If you have internal Docker registries that you need to contact without
proxying you can specify them via the
NO_PROXYenvironment variable:
Or, if you are behind an HTTPS proxy server:[Service] Environment="HTTP_PROXY=http://proxy.example.com:80/" "NO_PROXY=localhost,127.0.0.1,docker-registry.somecorporation.com"
[Service] Environment="HTTPS_PROXY=https://proxy.example.com:443/" "NO_PROXY=localhost,127.0.0.1,docker-registry.somecorporation.com" -
Flush changes:
$ sudo systemctl daemon-reload -
Restart Docker:
$ sudo systemctl restart docker -
Verify that the configuration has been loaded:
Or, if you are behind an HTTPS proxy server:$ systemctl show --property=Environment docker Environment=HTTP_PROXY=http://proxy.example.com:80/
$ systemctl show --property=Environment docker
Environment=HTTPS_PROXY=https://proxy.example.com:443/
Thursday, June 28, 2018
How to configure proxy settings for Docker daemon in RedHat Linux?
If you are behind corporate firewall and would like to use Docker so it can connect to outside world, do the below settings Docker systemd service file.
Friday, June 15, 2018
How to Install Docker on RedHat Enterprise Linux 7.5 - Install docker on Linux RHEL -
Find steps for installing Docker 18.03.1 Community Edition on RHEL 7.5:
yum install -y yum-utils
sudo yum install wget
wget http://dl.fedoraproject.org/pub/epel/epel-release-latest-7.noarch.rpm
sudo rpm -ivh epel-release-latest-7.noarch.rpm
sudo yum install -y http://mirror.centos.org/centos/7/extras/x86_64/Packages/container-selinux-2.55-1.el7.noarch.rpm
Setup Docker community repository on RedHat
sudo yum-config-manager --add-repo https://download.docker.com/linux/centos/docker-ce.repo
Install Docker CE
sudo yum install -y docker-ce
Start Docker daemon
sudo systemctl restart docker
Friday, June 8, 2018
Install Jenkins on Linux | Install Jenkins Red Hat Enterprise Linux 7.5 - How to setup Jenkins on Red Hat Linux
How to Install Jenkins on Red Hat Enterprise Linux?
Please find below steps:
You need to setup Java first.
Please find below steps:
You need to setup Java first.
sudo yum install wget -y
Java Installation
sudo yum install java-1.8.0-openjdk-devel -y
Add Jenkins repository to yum repository
sudo wget -O /etc/yum.repos.d/jenkins.repo http://pkg.jenkins.io/redhat-stable/jenkins.repo
sudo rpm --import http://pkg.jenkins.io/redhat-stable/jenkins.io.key
Install Jenkins
sudo yum install jenkins -y
Start Jenkins
sudo systemctl start jenkins
sudo systemctl enable jenkins
Get Jenkins Admin Password
sudo cat /var/lib/jenkins/secrets/initialAdminPassword
Copy the output of the above command.
Now go to browser and access the Jenkins page.
http://dns_name:8080
Your page will look something like this. Now paste the password into the below Administrator password text box.
 Press Continue..Click on install suggested plug-ins..
sudo yum install jenkins -y
Start Jenkins
sudo systemctl start jenkins
sudo systemctl enable jenkins
Get Jenkins Admin Password
sudo cat /var/lib/jenkins/secrets/initialAdminPassword
Copy the output of the above command.
Now go to browser and access the Jenkins page.
http://dns_name:8080
Your page will look something like this. Now paste the password into the below Administrator password text box.

Thursday, June 7, 2018
Install Ansible on RedHat linux - Install Ansible on RHEL 7.5 - How to install Ansible on RedHat Enterprise Linux 7.5 - Install Ansible on RedHat linux
How to Install Ansible on RedHat linux Enterprise ?
Let us see how to install Ansible on RedHat Enterprise Linux machine.
Download EPEL for Enterprise Linux
sudo yum install https://dl.fedoraproject.org/pub/epel/epel-release-latest-7.noarch.rpm
Also enable the optional and extras repositories since EPEL packages may depend on packages from these repositories:
sudo subscription-manager repos --enable "rhel-*-optional-rpms" --enable "rhel-*-extras-rpms"
Update repository
sudo yum update
Install Ansible
sudo yum install ansible
ansible --version
Wednesday, June 6, 2018
TerraForm Installation Steps on RedHat Enterprise Linux (RHEL) 7.5 - How to install Terraform on RedHat Enterprise Linux 7.5 ?
Please find steps for installing Terraform on RedHat Enterprise Linux (RHEL) 7.5. You can install this on any of your existing RedHat Enterprise Linux EC2 instance.
Terraform
is used for provisioning resources and infrastructure on Cloud. You don't need to
create manually any resource on cloud.
Please find steps for installing Terraform on Linux:
sudo yum update
sudo mkdir -p /opt/terraform
cd /opt/terraform/
sudo yum install wget
Download Terraform
sudo wget https://releases.hashicorp.com/terraform/0.11.7/terraform_0.11.7_linux_amd64.zip
Extract Terraform
sudo yum install unzip -y
sudo unzip terraform_0.11.7_linux_amd64.zip
Add Path to Profile
add Terraform installed path to PATH by modifying below file:
sudo vi /etc/profile

go to end of the file, add the below line:
export PATH=$PATH:/opt/terraform
source /etc/profile
Verify Installation
now type below command to see Terraform is installed or not:
terraform --version
Terraform v0.11.7
Friday, June 1, 2018
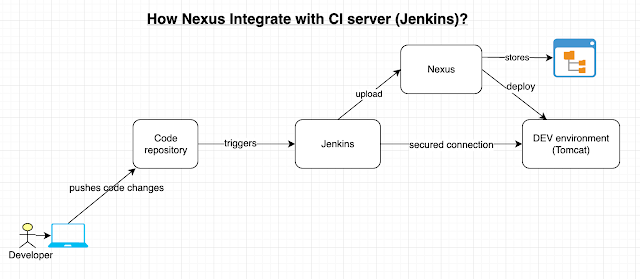
Jenkins Nexus Integration - How to Integrate SonaType Nexus with Jenkins - Upload artifacts from Jenkins to Nexus repository
You need to install Nexus artifact uploader plug-in to integrate Nexus with Jenkins. Let us see how to integrate Jenkins with Nexus and able to upload war/ear/jar/exe/DLLs.

Pre-requisites:
Install Nexus Artifact Uploader plugin in Jenkins.

Steps:
1. Once you installed the above plug-ins, click existing FreeStyle job configuration or create a new job.
2. Under source code management. enter GitHub or Bitbucket repo url and git credentials.
3. Go to build section, add Maven targets. with goals clean install. Also click advance, give path of POM.xml


4. click on Add build step, choose Nexus artifact uploader.

5. Enter information per below screen shot.
Make sure you enter version as 1.0-SNAPSHOT and repository as maven-snapshots. You can take the information from your WebApp/pom.xml from Bitbucket Repo

6. Click on Apply, Save.

7. Now login to Nexus repo, Click on Components, Click on maven-snapshots

8. you shall see the WAR being uploaded here.
 Note:
Note:
Click here for Jenkins pipeline code for Nexus Upload.
Click below to watch the YouTube video:
Install Nexus Artifact Uploader plugin in Jenkins.

Steps:
1. Once you installed the above plug-ins, click existing FreeStyle job configuration or create a new job.
2. Under source code management. enter GitHub or Bitbucket repo url and git credentials.
3. Go to build section, add Maven targets. with goals clean install. Also click advance, give path of POM.xml


4. click on Add build step, choose Nexus artifact uploader.

5. Enter information per below screen shot.
Make sure you enter version as 1.0-SNAPSHOT and repository as maven-snapshots. You can take the information from your WebApp/pom.xml from Bitbucket Repo

6. Click on Apply, Save.

7. Now login to Nexus repo, Click on Components, Click on maven-snapshots

8. you shall see the WAR being uploaded here.

Click here for Jenkins pipeline code for Nexus Upload.
Click below to watch the YouTube video:
Subscribe to:
Posts (Atom)
-
 Let's learn how to connect to an EC2 instance running in AWS from your local machine. Your local machine can be Windows laptop or MacBoo...
 -
 We get these questions a lot from the teams we are coaching at my customer's work place How to create microservices? How to break...
 -
 Amazon Elastic Container Registry (ECR) is a fully managed container registry service provided by Amazon Web Services (AWS). It allows user...