Friday, April 27, 2018

How to provision EC2 instances in AWS using Puppet - Puppet to create EC2 instances in AWS

Puppet is an Infrastructure provisioning tool, similar to Ansible, Chef. We will see how to create EC2 instances in AWS using Puppet in this article.


How to provision an EC2 instance using Puppet?

Pre-requistes:
Make sure you have installed Puppet Master along with required AWS SDK gems

Go to the instance where you have installed Puppet Master.
cd ~

Now you need to create AWS credentials file. Create .aws directory under /home/ubuntu
sudo mkdir ~/.aws

Create the file to add credentials. make sure you give access key and secret keys:

sudo vi ~/.aws/credentials
[default]
aws_access_key_id = ?
aws_secret_access_key = ?

Now execute the below command just to make sure it is showing the information about current instance by executing below command:

sudo /opt/puppetlabs/bin/puppet resource ec2_instance


if you have any error, apply the below fix:
puppet module install puppetlabs-aws --force

Now let us create puppet modules to create new EC2 instance. Go into modules directory.
cd /opt/puppetlabs/puppet/modules/

create directory by 
sudo mkdir aws-examples
cd aws-examples

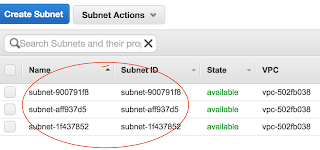
Go to VPC dashboard by typing VPC


Click on Subnets.

Make sure you give subnet name as subnet Ids. Copy any subnet ID and use it below:


12. Create the below file called create-ec2.pp by executing below command:
sudo vi create-ec2.pp 

and then copy below code, make sure you change region, subnet name and key name based on yours

ec2_instance { 'Target Agent EC2':
    ensure              => present,
    region              => 'us-east-2',
    image_id            => 'ami-916f59f4',
    instance_type       => 't2.small',
    security_groups     => ['mySecurityGroup'],
    subnet              => 'subnet-aff937d5',
    key_name            => 'mykeyName',
  }

ec2_securitygroup { 'mySecurityGroup':
  region      => 'us-east-2',
  ensure      => present,
  description => 'Security group for aws Ec2 instance',
ingress     => [{
    protocol => 'tcp',
    port     => 8080,
    cidr     => '0.0.0.0/0',
  },{
    protocol => 'tcp',
    port     => 80,
    cidr     => '0.0.0.0/0',
  },{
    protocol => 'tcp',
    port     => 22,
    cidr     => '0.0.0.0/0',
 }],
  tags        => {
    tag_name  => 'mySecurityGroup',
},
}

You need to change all the values (high lighted above) per your settings. Make sure you also change the subnet id per your settings. you need to follow the below steps


13. Now execute the below command to create EC2 instance.
sudo /opt/puppetlabs/bin/puppet apply create-ec2.pp

If no errors, login to EC2 console to see the newly created instance.

Note:

If you would like destroy, just change to absent (This STEP is not required for this lab)

sudo vi destroy-ec2.pp
ec2_instance { 'My Target EC2-Agent':
    ensure              => absent,
    region              => 'us-east-2',
    image_id            => 'ami-916f59f4',
    instance_type       => 't2.micro',
    security_groups     => ['mySecurityGroup'],
    subnet              => 'subnet-aff937d5',
    key_name            => 'mykeyName',
  }

sudo /opt/puppetlabs/bin/puppet apply destroy-ec2.pp

the above command will destroy EC2 instance that was created.

Wednesday, April 25, 2018

How to automate Docker image creation by using Jenkins Pipeline

Every time developer makes changes to the code, you would want to Jenkins to automate Docker images creation and pushing into Docker registry. Let us see how to do this.

Pre-requisites:

Jenkins up and running
Docker plug-in installed in Jenkins

Port - 4243 open in AWS security firewall for EC2
port - 8085 - Container will be listening to

Steps:

1. Change the default configuration of docker and make below chnages.

sudo vi /lib/systemd/system/docker.service
Modify the below line like highligthed yellow:
ExecStart=/usr/bin/dockerd -H fd:// -H tcp://0.0.0.0:4243


2. Also make the below change as well
sudo vi /etc/init.d/docker
DOCKER_OPTS="-H tcp://0.0.0.0:4243"


3. Add jenkins user to Docker group.
sudo usermod -a -G docker jenkins

4. sudo service jenkins restart

5. sudo systemctl daemon-reload
6. sudo service docker stop
7. sudo service docker start
8. click Jenkins,  Credentials, Global and Add credentials
enter username and password of Docker Cloud registry and save.
9. Create a pipeline.
10. Enable Poll SCM or Webhooks
11. Copy paste the below code for Pipeline code

node {
   
    def image
    stage ('checkout') {
     // copy the code after generating from Snippet Generator by entering your Git URL and password
    }
   
    stage ('Build') {
       sh "mvn -U clean install -f MyWebApp/pom.xml"
       }
   
    stage ('Code Quality') {
       sh "mvn -U -f MyWebApp/pom.xml sonar:sonar"
       }

    stage ('Docker image build and push') {
    // Build and push image with Jenkins' docker-plugin
    withDockerServer([uri: "tcp://localhost:4243"]) {
      withDockerRegistry([credentialsId: "<credentials_id>", url: "https://index.docker.io/v1/"]) {
        // we give the image the same version as the .war package
        image = docker.build("<docker_cloud_user_id>/mywebapp", "MyWebApp")
        image.push()
      }  
    }
}

  stage('Run Docker Container') {
        image.run("-p 8085:8085 --rm --name myfirstApp")
    }
}

Wednesday, April 18, 2018

There is insufficient memory for the Java Runtime Environment to continue - SonarQube memory error

When you setup SonarQube, you may get the below memory issues like  below:
# There is insufficient memory for the Java Runtime Environment to continue.

# Native memory allocation (mmap) failed to map 37531648 bytes for committing reserved memory.

Please apply below fix highlighted in yellow for any memory issus in SonarQube.

The fix should be applied in sonar.properties file. you need to add below lines in appropriate places.

1. Login to SonarQube using GitBash or ITerm
2. open the below file and make the changes highligted in yellow color.
sudo vi /opt/sonarqube/conf/sonar.properties

#--------------------------------------------------------------------------------------------------

# WEB SERVER
# Web server is executed in a dedicated Java process. By default heap
size is 512Mb.

# Use the following property to customize JVM options.

#    Recommendations:
# 

sonar.web.javaOpts=-Xmx512m -Xms256m -XX:+HeapDumpOnOutOfMemoryError 

#--------------------------------------------------------------------------------------------------

# COMPUTE ENGINE
# The Compute Engine is responsible for processing background tasks.

# Compute Engine is executed in a dedicated Java process. Default heap
size is 512Mb.

# Use the following property to customize JVM options.

#Recommendations:


sonar.ce.javaOpts=-Xmx512m -Xms256m -XX:+HeapDumpOnOutOfMemoryError

3. once you made changes, restart sonarQube server
sudo service sonar stop
sudo service sonar start

Friday, April 13, 2018

TeamCity install on Ubuntu - Install Teamcity on Ubuntu

Please find below steps for installing TeamCity on Ubuntu:

Pre-requistes:
Make sure instance has at least 4 GB RAM memory (for EC2 at least medium instance)
Open port 8111 in security firewall.

We need to set up some database for storing all the build information. For this exercise, lets us use default option:

Java installation
sudo apt-get update
sudo apt-get install default-jdk -y

TeamCity installation
wget https://download.jetbrains.com/teamcity/TeamCity-2017.1.2.tar.gz
tar -xvf TeamCity-2017.1.2.tar.gz
sudo mkdir /opt/JetBrains
sudo mv TeamCity /opt/JetBrains/TeamCity
cd /opt/JetBrains/TeamCity
sudo nano /etc/init.d/teamcity
(copy the whole text colored in green)
#!/bin/sh
### BEGIN INIT INFO
# Description:       Enable service provided by daemon.
# /etc/init.d/teamcity -  startup script for teamcity
### END INIT INFO

#  Ensure you enter the  right  user name that  TeamCity will run  under
USER="ubuntu"

export TEAMCITY_DATA_PATH="/opt/JetBrains/TeamCity/.BuildServer"

case $1 in

start)
 start-stop-daemon --start  -c $USER --exec /opt/JetBrains/TeamCity/bin/runAll.sh start
 ;;
stop)
 start-stop-daemon --start -c $USER  --exec  /opt/JetBrains/TeamCity/bin/runAll.sh stop
 ;;
 esac

exit 0

Ctrl + O enter
Ctrl + X enter
sudo chmod +x /etc/init.d/teamcity
sudo update-rc.d teamcity defaults
sudo /etc/init.d/teamcity start

tail -f /opt/JetBrains/TeamCity/buildAgent/logs/teamcity-agent.log

Open browser and access team city url in the browser
http://public_dns_name:8111


please wait and watch..As It may take a few mins…Click on Proceed.

Click on proceed again with Internal database option.

Scroll down the page, Accept license agreement
Uncheck Send anonymous usage statistics
Continue button

Now click on Add users to create a new admin user.
Register as a user and create an account with Admin privileges:
create admin as a user and admin as a password

How to get super user token from TeamCity server logs?


TeamCity Super user token should be in the teamcity-server.log file.
Execute the below command to view Super user token from the logs file:
tail -f /opt/JetBrains/TeamCity/logs/teamcity-server.log

[2018-04-14 01:31:05,165]   INFO -   jetbrains.buildServer.SERVER - Super user authentication token: "6259483750804166498". To login as Super user use an empty username and this token as a password on the login page.

Monday, April 9, 2018

How to see already signed requests in Puppet Master?

In order to see list of signed requests in Puppet Master, execute the below command to view the signed certs:

/opt/puppetlabs/bin/puppet cert list --all

Ansible playbook for installing Apache on Redhat Linux

---
 - hosts: Apache_Group
   become: true
   tasks:
     - name: install the latest version of Apache
       yum:
         name: httpd
         state: latest

     - name: ensure apache started
       service: name=httpd state=started enabled=yes

How to do deployment to Tomcat using Pipeline in Jenkins

Please follow below steps for deploying WARs into Tomcat that is setup on a different machine.

Pre-requistes:

1.  install ssh agent plugin in Jenkins master.

2. create ssh-keys in by executing the below command:
ssh-keygen

make sure you copy ssh public keys in target node where tomcat server is running.

3. also make sure you give permission to upload the WAR in by following command:
sudo chown ubuntu:ubuntu /var/lib/tomcat8/webapps/

Deployment steps:

Step 1:

Go to Jenkins, Add credentials. Select SSH username with private key. enter source machine SSH private keys. enter username as jenkins or ubuntu. Click OK


step 2: Go to Jenkins, Credentials, now copy the ID of the entry you made.

Step 3: Go to Pipeline: use the above ID in deploy stage and also make sure you enter target server ip address.

node {


-------

    stage ('Deploy') {

                echo "deploying to DEV tomcat "
               sshagent(['15a9ed22-6dcb-4916-8536-bde265de07e8']) {

                sh 'scp -o StrictHostKeyChecking=no /var/lib/jenkins/workspace/$JOB_NAME/MyWebApp/target/MyWebApp.war ubuntu@server_ip:/var/lib/tomcat8/webapps'
             
               }
          }
}

Friday, April 6, 2018

How to provision EC2 using AWS CloudFormation templates in Ubuntu

AWS comes with CloudFormation template for creating resources in AWS using code. You can create any resources using CloudFormation. Let us try to create an EC2 using AWS CLI in Ubuntu.

pre-requistes:
AWS CLI needs to be installed. It can be installed by executing below command:
sudo apt install awscli

Steps:
Login to Ubuntu instance. create the below file with content
sudo vi create-jenkins-ec2.xml

AWSTemplateFormatVersion: 2010-09-09
Resources:
  MyJenkinsSG:
    Type: 'AWS::EC2::SecurityGroup'
    Properties:
      GroupDescription: Jenkins Security Group
      GroupName: Jenkins-security-group
      SecurityGroupIngress:
        - IpProtocol: tcp
          FromPort: 22
          ToPort: 22
          CidrIp: 0.0.0.0/0
        - IpProtocol: tcp
          FromPort: 80
          ToPort: 80
          CidrIp: 0.0.0.0/0
        - IpProtocol: tcp
          FromPort: 8080
          ToPort: 8080
          CidrIp: 0.0.0.0/0
  MyEc2Instance:
    Type: 'AWS::EC2::Instance'
    Properties:
      KeyName: myKey
      AvailabilityZone: us-east-2b
      ImageId: ami-916f59f4
      SecurityGroupIds:
        - !Ref MyJenkinsSG
      InstanceType: t2.micro
      Tags:
        - Key: MyEc2
          Value: JenkinsEC2

After saving the file,

You may have to give AWS access key, security keys and region code by running
aws configure
AWS Access Key ID [None]:
AWS Secret Access Key [None]:
Default region name [None]:

Then execute the below command:

aws cloudformation create-stack --stack-name myjenkinsstack --template-body file:///create-jenkins-ec2.xml

Now check in AWS Mgmt console to see if EC2 is created.


Wednesday, April 4, 2018

Provision EC2 instance in AWS using Terraform - Create Terraform files for provisioning resources on AWS

Terraform can provision resources on any cloud platform. We will see how you can use Terraform to provision EC2 instance.

1. Login to AWS console, click on username and go to My security credentials. 2. Continue on security credentials, click on access keys 3. Create a new access key if you don't have one. Make sure you download the keys.

4. create aws.tf file with below content. make sure you update with your Access key and secret keys.
replace red marked with keys you received from step # 3 above.
sudo vi aws.tf

provider "aws" {
access_key = "xx"
  secret_key = "
xx"
  region     = "us-east-2"
}


Now execute the below command:

terraform init


the above command should load the AWS plug-ins.


sudo vi create_ec2.tf
copy the below code in yellow color:


resource "aws_instance" "myFirstInstance" {
  ami           = "ami-916f59f4"


  key_name = "my_key"
  instance_type = "t2.micro"
  security_groups= [ "security_jenkins_grp"]
  tags= {
    Name = "jenkins_instance"
  }

}

resource "aws_security_group" "security_jenkins_grp" {
  name        = "security_jenkins_grp"
  description = "security group for jenkins"

  ingress {
    from_port   = 8080
    to_port     = 8080
    protocol    = "tcp"
    cidr_blocks = ["0.0.0.0/0"]
  }

 ingress {
    from_port   = 22

    to_port     = 22
    protocol    = "tcp"
    cidr_blocks = ["0.0.0.0/0"]
  }

 # outbound from jenkis server
  egress {
    from_port   = 0
    to_port     = 65535
    protocol    = "tcp"
    cidr_blocks = ["0.0.0.0/0"]
  }

  tags= {
    Name = "security_jenkins_grp"
  }
}

terraform plan

the above command will show you what Terraform is going to do..

terraform apply
type yes

Now login to EC2 console to see newly provisioned EC2 instance.

Tuesday, April 3, 2018

Install Docker from Ubuntu Repositories

You can install Docker from Ubuntu repositories.

sudo apt-get update 
sudo apt-get install -y docker.io
Docker —version
Docker version 1.13.1, build 092cba3

sudo docker run hello-world