Puppet is an Infrastructure provisioning tool, similar to Ansible, Chef. We will see how to create EC2 instances in AWS using Puppet in this article.
How to provision an EC2 instance using Puppet?
Pre-requistes:
Make sure you have installed Puppet Master along with required AWS SDK gems
Go to the instance where you have installed Puppet Master.
How to provision an EC2 instance using Puppet?
Pre-requistes:
Make sure you have installed Puppet Master along with required AWS SDK gems
Go to the instance where you have installed Puppet Master.
cd ~
Now you need to create AWS credentials file. Create .aws directory under /home/ubuntu
sudo mkdir ~/.aws
Create the file to add credentials. make sure you give access key and secret keys:
image_id => 'ami-916f59f4',
instance_type => 't2.small',
security_groups => ['mySecurityGroup'],
subnet => 'subnet-aff937d5',
sudo vi destroy-ec2.pp
region => 'us-east-2',
image_id => 'ami-916f59f4',
instance_type => 't2.micro',
security_groups => ['mySecurityGroup'],
subnet => 'subnet-aff937d5',
Now you need to create AWS credentials file. Create .aws directory under /home/ubuntu
sudo mkdir ~/.aws
Create the file to add credentials. make sure you give access key and secret keys:
sudo vi ~/.aws/credentials
[default]
aws_access_key_id = ?
aws_secret_access_key = ?
Now execute the below command just to make sure it is showing the information about current instance by executing below command:
sudo /opt/puppetlabs/bin/puppet resource ec2_instance
Now let us create puppet modules to create new EC2 instance. Go into modules directory.
cd /opt/puppetlabs/puppet/modules/
create directory by
sudo mkdir aws-examples
sudo vi create-ec2.pp
and then copy below code, make sure you change region, subnet name and key name based on yours
ec2_instance { 'Target Agent EC2':
ensure => present,
region => 'us-east-2',image_id => 'ami-916f59f4',
instance_type => 't2.small',
security_groups => ['mySecurityGroup'],
subnet => 'subnet-aff937d5',
key_name => 'mykeyName',
}
ec2_securitygroup { 'mySecurityGroup':
region => 'us-east-2',
ensure => present,
description => 'Security group for aws Ec2 instance',
ingress => [{
protocol => 'tcp',
port => 8080,
cidr => '0.0.0.0/0',
},{
protocol => 'tcp',
port => 80,
cidr => '0.0.0.0/0',
},{
protocol => 'tcp',
port => 22,
cidr => '0.0.0.0/0',
}],
tags => {
tag_name => 'mySecurityGroup',
},
}
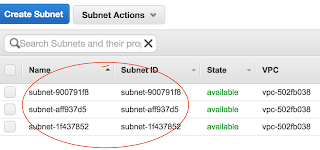
You need to change all the values (high lighted above) per your settings. Make sure you also change the subnet id per your settings. you need to follow the below steps
13. Now execute the below command to create EC2 instance.
sudo /opt/puppetlabs/bin/puppet apply create-ec2.pp
If no errors, login to EC2 console to see the newly created instance.
Note:
If you would like destroy, just change to absent (This STEP is not required for this lab)
Note:
If you would like destroy, just change to absent (This STEP is not required for this lab)
sudo vi destroy-ec2.pp
ec2_instance { 'My Target EC2-Agent':
ensure => absent,region => 'us-east-2',
image_id => 'ami-916f59f4',
instance_type => 't2.micro',
security_groups => ['mySecurityGroup'],
subnet => 'subnet-aff937d5',
key_name => 'mykeyName',
}
sudo /opt/puppetlabs/bin/puppet apply destroy-ec2.pp
the above command will destroy EC2 instance that was created.
the above command will destroy EC2 instance that was created.


D39B98EDF7
ReplyDeleteTakipçi Satın Al
M3u Listesi
Coin Kazanma
Happn Promosyon Kodu
Brawl Stars Elmas Kodu