Are you in IT? Tired of your work? Are you not able to make any good progress in your career?
Are you not having a job? Looking for a break in IT? Are you interested in learning DevOps?
Did you get laid off from your previous job due to Covid-19?
If the answer is YES to all the above questions, You are in the right place to kick start your career in DevOps. DevOps is one of the top and hot IT skills right now. Currently almost all the employers are struggling to get right resources in their teams who can do the DevOps and automation work..You could be that person by attending this coaching program.
DevOps Coaching Classes schedules - Dec 2023(Holidays discounts are available, talk to Coach AK)
Date
Time
Type
When?
Dec 11th
6:00 to 8:00 PM CST
Weekdays
Mondays/Wednesdays
Dec 9th
09:45 AM CST to 11:35 AM CST on Saturdays 10:30 AM CST to 12:30 PM CST on Sundays
Weekends
Sat/Sundays
DevOps Coaching Highlights:
- Comprehensive hands on knowledge on Git, Jenkins, Maven, SonarQube, Nexus, Terraform, Ansible, Puppet, Docker, Kubernetes, Helm, AWS IAM, ECR, Docker registry on AWS and Azure cloud platforms. - Coach is having about 22+ yrs of professional IT experience, 9+ Yrs in DevOps/Cloud/Automation. - Many students already got placed in reputed companies from this coaching program successfully. - Working as a Sr.DevOps Coach/Architect in a one of the top IT services companies in USA. - Unique program...less theory, more hands on lab exercises
- Resume preparation will be done with candidates personally. - One-to-one Interview coaching. - Coaching is purely hands on with 101% job relevant. - 100% Job assistance. - Coached about 1600+ students successfully for past five years and many of my students got placed with many large enterprises in DFW, Charlotte, Houston, Austin, Chicago, Florida, Seattle, Bay area, Ohio, NJ and NY areas..
To join DevOps Coaching classes, contact coach AK below:
Contact no # : +1(469)733-5248 Email id: devops.coaching@gmail.com Contact: Coach AK
sh ('kubectl apply -f jenkins-aks-deploy-from-acr.yaml')
}
}
}
}
}
}
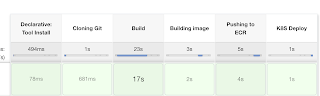
Step # 5 - Build the pipeline
Step # 6 - Verify deployments to AKS
kubectl get pods
kubectl get services
Steps # 7 - Access Springboot App Deployed in AKS cluster
Once deployment is successful, go to browser and enter above load balancer URL mentioned above
You should see page like below:
Clean up the Cluster:
To avoid charges from Azure, you should clean up unneeded resources. When the cluster is no longer needed, use the az group delete command to remove the resource group, container service, and all related resources.
az group delete --name myResourceGroup --yes --no-wait
Webhooks allows developers to trigger jobs in CI server (such as Jenkins or Azure DevOps) for every code changes in SCM. In this article, we will learn how to trigger Azure Pipeline build jobs instantly for every code change in SCM.
Pre-requistes:
1. Azure Devops pipeline already configured. If you dont know how to create Azure pipeline, click on this link.
2. SCM repo have been setup, either in GitHub or Bitbucket or any SCM
Watch Steps in YouTube:
Steps to Enable Webhooks in Azure Build Pipeline
Go to Azure DevOps project dash board.
Go to Pipelines
Click on Pipelines
Click on Edit
Click on Triggers tab, Click Continuous Integration checkbox to enable Webhooks.
Click on Save the Job. You don't have to Queue the job.
Now go to your SCM and make a code change, you will see pipeline will trigger immediately.
Microsoft has temporarily disabled the free grant of parallel jobs for public projects and for certain private projects in new organizations. However, you can request this grant by submitting a request. Submit a ticket using below url to request increased parallelism in Azure DevOps.
CICD Process Flow Diagram - Implement CICD using Jenkins
What is Continuous Integration?
Continuous integration is a DevOps software development practice where developers regularly merge their code changes into a central repository, after which automated builds and tests are run.
The key goals of continuous integration are to find and address bugs quicker, improve software quality, and reduce the time it takes to validate and release new software updates.
How does Continuous Integration Work?
Developers frequently commit to a shared repository using a version control system such as Git. Prior to each commit, developers may choose to run local unit tests on their code as an extra verification layer before integrating. A continuous integration service automatically builds and runs unit tests on the new code changes to immediately surface any errors.
Benefits of Continuous Integration
Improve Developers productivity
Find bugs early in the software development stage
Deliver products into market place sooner
Improve the feedback loop
What is Continuous Delivery?
Continuous delivery is a software development practice where code changes are automatically prepared for a release to production. Continuous delivery is the next extension of continuous integration. The delivery phase is responsible for packaging an artifact together to be delivered to end-users. This phase runs automated building tools to generate this artifact.
Let's say you have setup SonarQube using Docker or Docker Compose, you have forgotten the admin password for SonarQube. This article helps you to reset/recover the admin password. If you changed and then lost the admin password, you can reset it using the following steps.
As we have configured SonarQube using Docker compose, We need to login to PostgreSQL running inside postgres docker container and execute update command to reset to default password.
Step 1: Login into PostgreSQL docker container
type below command to see the list of containers running in your EC2 instance.
sudo docker ps
Copy the container ID from above command.
Now login into PostgresSQL docker container
docker exec -it <container_id> /bin/bash
Step 2: Connect to PostgreSQL database by executing below command:
from my lab exercise, password for sonar user is admin123
Make sure it shows sonarqube which is your database schema inside PostgresSQL db.
Step 3: Execute the below query to change admin password to default password which is also admin
update users set crypted_password='100000$t2h8AtNs1AlCHuLobDjHQTn9XppwTIx88UjqUm4s8RsfTuXQHSd/fpFexAnewwPsO6jGFQUv/24DnO55hY6Xew==', salt='k9x9eN127/3e/hf38iNiKwVfaVk=', hash_method='PBKDF2', reset_password='true', user_local='true' where login='admin';
Step 4: Login to SonarQube UI and login as admin/admin
Login as admin/admin
Now it will immediately ask you to change the default admin password to something else:
That's it! That is how you recover SonarQube admin password.
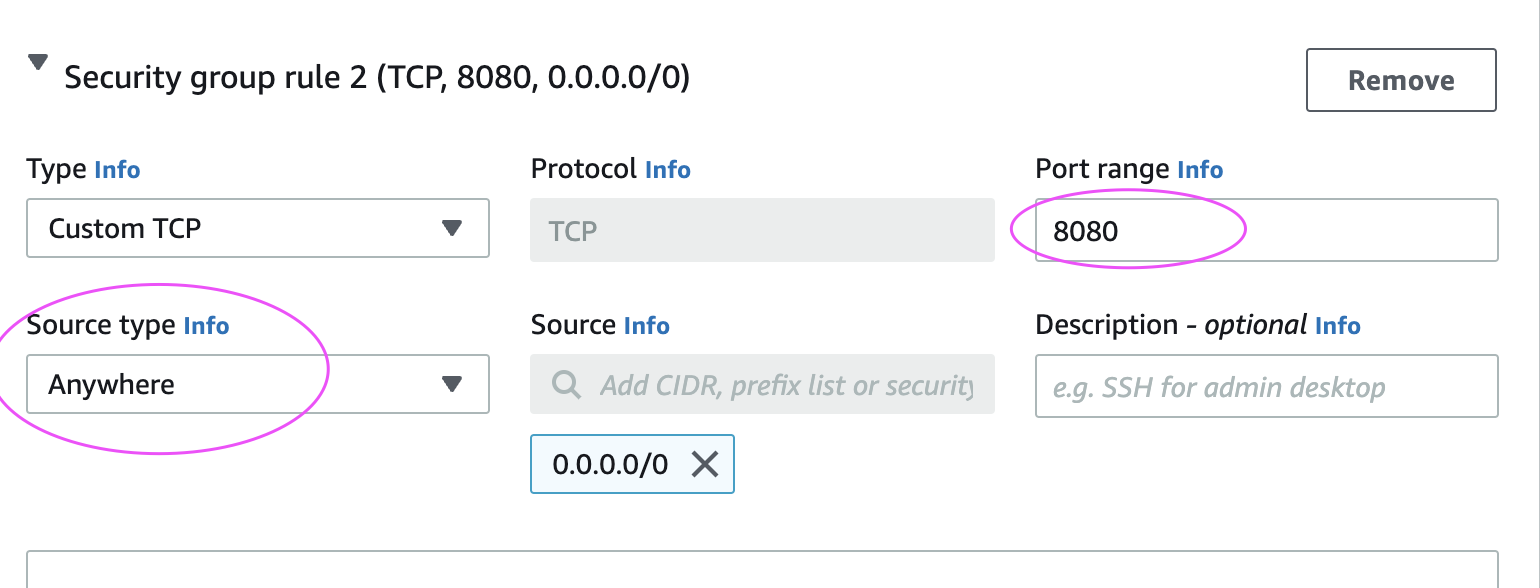
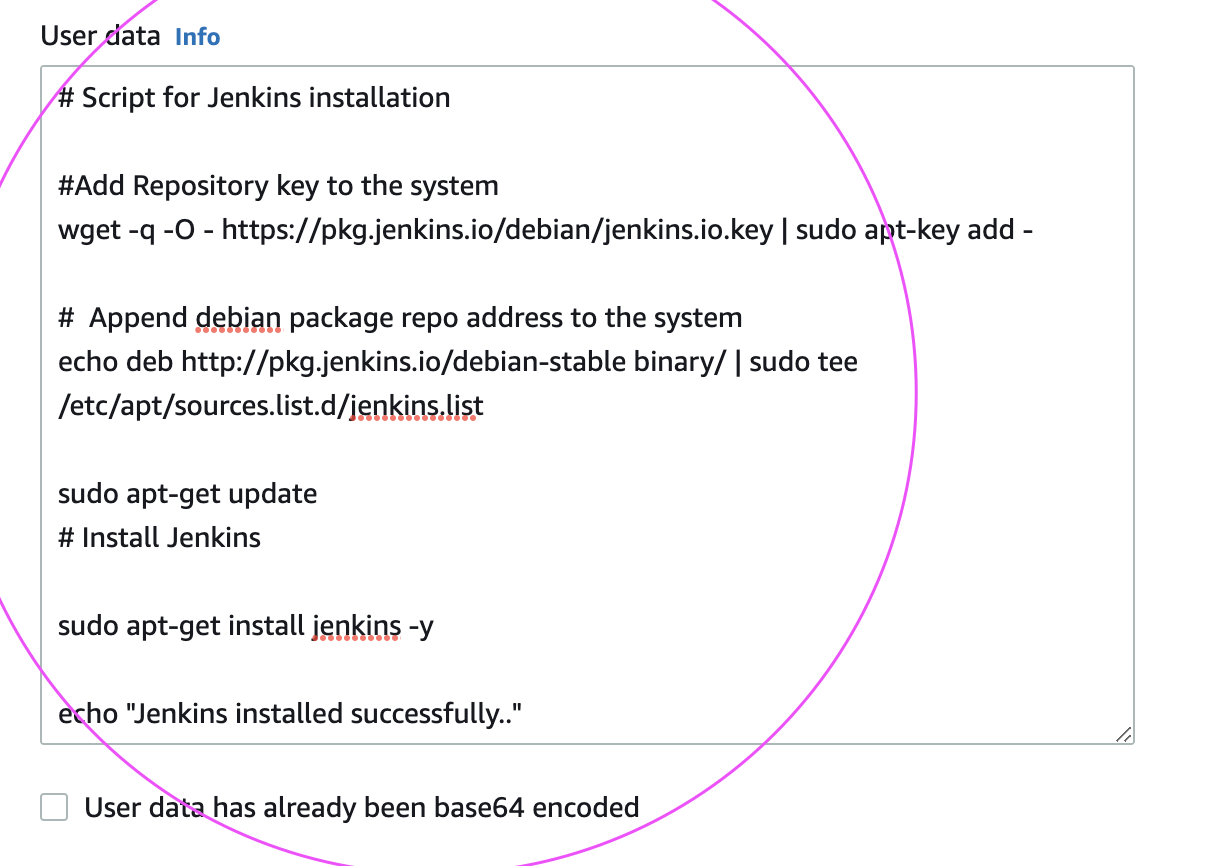
If you want to execute some commands during boot up(launch), you can execute it easily by loading script in user data section during EC2 launch. Bootstrap scripts run only once - when the instance is instantiated for the 1st time.
Please follow the below steps to create an EC2 instance. We will be installing Java, Maven and Jenkins during boot up.
How to create EC2 instance in AWS console?
What is EC2 instance?
It is virtual server provided by AWS. We will be using this EC2 to setup Jenkins. Please follow the below steps to create an EC2 instance.
We will learn how to automate springboot microservices builds using Jenkins pipeline and Deploy into AWS EKS Cluster with help of Kubernetes CLI plug-in.
We will use Springboot Microservices based Java application. I have already created a repo with source code + Dockerfile. The repo also have Jenkinsfile for automating the following:
- Automating builds using Jenkins - Automating Docker image creation - Automating Docker image upload into AWS ECR - Automating Docker Containers Deployments to Kubernetes Cluster
Step # 1 - Create Maven3 variable under Global tool configuration in Jenkins
Make sure you create Maven3 variable under Global tool configuration.
Step #2 - Create Credentials for connecting to Kubernetes Cluster using kubeconfig
Click on Add Credentials, use Kubernetes configuration from drop down.
use secret file from drop down.
execute the below command to login as jenkins user.
sudo su - jenkins
you should see the nodes running in EKS cluster.
kubectl get nodes
Execute the below command to get kubeconfig info, copy the entire content of the file:
cat /var/lib/jenkins/.kube/config
Open your text editor or notepad, copy and paste the entire content and save in a file.
We will upload this file.
Enter ID as K8S and choose File and upload the file and save.
Enter ID as K8S and choose enter directly and paste the above file content and save.
Step # 3 - Create a pipeline in Jenkins
Create a new pipeline job.
Step # 4 - Copy the pipeline code from below Make sure you change red highlighted values below as per your settings: Your docker user id should be updated. your registry credentials ID from Jenkins from step # 1 should be copied


.jpg)