Showing posts with label Jenkins integration. Show all posts

Tuesday, December 19, 2023

How to trigger a Jenkins job from another Jenkins job | Jenkins job Integrating another Jenkins Job | Jenkins Pipeline job triggering another Jenkins Job

Jenkins job can be triggered so many different ways. This article provides steps to trigger a Jenkins job from another Jenkins job. 


Pre-requisites:

Scenario #1(post build) - How to trigger a Jenkins job from another Free style Job?

1. Login to Jenkins instance.
2. Open your any existing freestyle build job.
3. Click on Configure


4. Go to post build action

5. Add post-build action --> click on Build other projects

6. Select job name(projects)  that you want to trigger by typing the name of the job and also check trigger only if build is stable


7. Save the job. 
8. Build job now, once the current job is built, it will trigger the next job immediately.
Check the console output of the current job, you will see id would trigger second job 

9. Go to the secondJob
Check console output. You will see the second job got triggered by first build job.

Scenario #2 (pre-build) - How to trigger a Jenkins job from another Free style Job?

1. Open your freestyle build job.
2. Click on Configure
3. Click on Build triggers
4. Check build other projects are built.


Select source job name which will be built first and then once the build is stable, it will be trigger this job. And also check trigger only if build is stable.

5. Save the job. 

6. Run the first job. once that job is successful, and then it will trigger this job.


Scenario #3 - How to trigger any Jenkins job from a pipeline Job:

pipeline {

    agent any

    stages {

        stage('Trigger Another Job') {

            steps {

                    build job: 'mySecondJob', wait: false

            }

        }

    }

}


Watch Steps in YouTube channel: 

Thursday, February 2, 2023

How to Integrate Artifactory with Jenkins | Upload Artifacts from Jenkins to Artifactory | Artifactory and Jenkins Integration

 How to Integrate Artifactory with Jenkins?

You can install plug-in called Artifactory plug-in to integrate Artifactory with Jenkins. Let us see how to integrate Jenkins with Artifactory and able to upload any binary file such as War/Ear/Jar/Exe/DLLs from Jenkins.

            go to Jenkins, Manage Jenkins, Click on Available plug-ins, type Artifactory. Click on Artifactory             and click install without restart


  • Configure Maven in Jenkins
Make sure Maven 3 is also configured under Manage Jenkins--> Global Tool configuration
Enter Name as Maven3
/usr/share/maven as MAVEN_HOME

Configure Artifactory in Jenkins:
1. Go to Manage Jenkins, Click on configure system. Look for JFrog section, click on Add JFrog Platform instance


2. Enter some name and Artifactory url like given below. Enter admin user name as ciadmin and admin password of ciadmin user you have configured.

You should get the message like below:


3. Once you configured Artifactory in Jenkins, let us integrate from our Jenkins job.

How to Integrate from Jenkins Job
1. Create a new free style job in Jenkins


2. Provide your repo details to check out the project you want to build

3. Go under Build environment
Select Maven 3 - Artifactory integration check box
and click on refresh Repositories and choose repos as mentioned below:

 4.Click on Add Build step and choose Invoke Artifactory Maven 3

5. Enter value as below, MyWebApp/pom.xml as root POM
and goal as install

6. Now click on Build, Jenkins should build using Maven and upload WAR file into Artifactory.

7. Login to Artifactory, Click on Artifactory --> Artifacts


That's it folks!

Please watch the steps in details in my YouTube channel:

Monday, October 31, 2022

CICD Process Flow Diagram | Implement CICD using Jenkins

 CICD Process Flow Diagram - Implement CICD using Jenkins


What is Continuous Integration?
Continuous integration is a DevOps software development practice where developers regularly merge their code changes into a central repository, after which automated builds and tests are run.

The key goals of continuous integration are to find and address bugs quicker, improve software quality, and reduce the time it takes to validate and release new software updates.

How does Continuous Integration Work?
Developers frequently commit to a shared repository using a version control system such as Git. Prior to each commit, developers may choose to run local unit tests on their code as an extra verification layer before integrating. A continuous integration service automatically builds and runs unit tests on the new code changes to immediately surface any errors.

Benefits of Continuous Integration
  • Improve Developers productivity 
  • Find bugs early in the software development stage
  • Deliver products into market place sooner
  • Improve the feedback loop
What is Continuous Delivery?
Continuous delivery is a software development practice where code changes are automatically prepared for a release to production. Continuous delivery is the next extension of continuous integration. The delivery phase is responsible for packaging an artifact together to be delivered to end-users. This phase runs automated building tools to generate this artifact.

Benefits of Continuous Delivery
  • Automate the Software Release Process
  • Improve Developer Productivity
  • Find bugs early in the software development stage
  • Deliver updates faster

Tuesday, August 16, 2022

How to setup Docker Containers as Build Agents | Setup dynamic Docker Slave and Integrate with Jenkins Master | Jenkins Build Agent Setup using Docker

Jenkins has powerful feature of master slave architecture which enables distributed builds. This article we will learn how to setup slave nodes using Docker and integrate with Jenkins Master.


Advantages of using Docker Containers as Jenkins Build Agents
  • Ephemeral 
  • Better resource utilization
  • Customized agents as it can run different builds like Java 8, Java 11 
  • Scalability 
Let us see how to configure slave nodes dynamically using Docker. If you like to learn how to setup Jenkins Master on Ubuntu EC2 instance, click here.

Watch this Lab in YouTube channel:

Pre-requisites:

Step 1 - Configure Docker Host with Remote API

Login to Docker host machine. Open docker service file. Search for ExecStart and replace that line with the following.
sudo vi /lib/systemd/system/docker.service

You can replace with below line:
ExecStart=/usr/bin/dockerd -H tcp://0.0.0.0:4243 -H unix:///var/run/docker.sock

Restart Docker service
   sudo systemctl daemon-reload
   sudo service docker restart

Validate API by executing below curl command
curl http://localhost:4243/version

Step 2 - Build Jenkins slave Docker image

Download Dockerfile from below repo.
git clone https://github.com/akannan1087/jenkins-docker-slave; cd jenkins-docker-slave

Build Docker image

sudo docker build -t my-jenkins-slave .

Perform below command to see the list of docker images:

sudo docker images

Step 3 - Configure Jenkins Server with Docker plug-in

Now login to Jenkins Master. Make sure you install Docker plug-in in Jenkins.


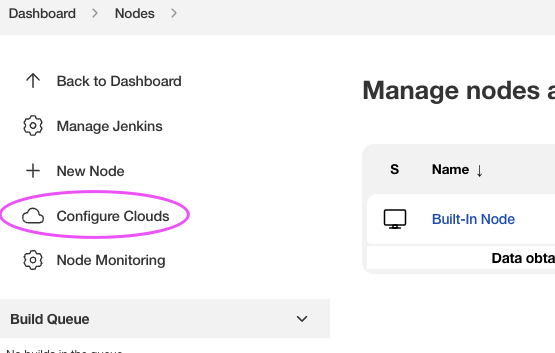
Now go to Manage Jenkins -> Configure Nodes Cloud


Click on Docker Cloud Details
Enter docker host dns name or ip address
tcp://docker_host_dns:4243
Make sure Enabled is selected
Now click on Test Connection to make sure connecting with docker host is working. 


Step 4 - Configure Docker Agent Templates

Now click on Docker Agent templates:
Enter label as "docker-slave" and give some name
Click on Enabled
Now enter the name of the docker image you have built previously in docker host.
enter /home/jenkins as Remote file system root
 

Choose Connect with SSH as connection method:
Enter SSH credentials per your Dockerfile - jenkins/password


choose Never Pull as pull strategy as we have already image stored in DockerHost.
Click on Save.

Step 5 - Create build job in Jenkins

Now Create a pipeline job in Jenkins with below pipeline code:

pipeline {
    agent { 
        label "docker-slave"
     }
    stages {
        stage('Hello') {
            steps {
                echo 'Hello World'
            }
        }
    }
}

Click Apply and Save. 
Now build the job. Now you will see output like below:


Create a free style job

Choose Restrict where this project can be run and enter docker-slave as label


Tuesday, May 3, 2022

stderr: remote: Bitbucket Cloud recently stopped supporting account passwords for Git authentication. remote: App passwords are recommended | Fix for this issue | How to Create app passwords in Bitbucket?

When you are creating any freestyle jobs or pipeline jobs in Jenkins, when you try to checkout a project from Bitbucket and If you are using Bibucket password, you may get this error.

Reason for this error:

Beginning March 1, 2022, Bitbucket Cloud users will no longer be able to use their account passwords when using Basic authentication for Git over HTTPS and the Bitbucket Cloud REST API. The removal of account password usage for Basic authentication when using Git over HTTPS and/or the Bitbucket Cloud REST API is due to Bitbucket Cloud's ongoing effort to align with internal infrastructure and improve Atlassian account security. App passwords are substitute passwords for a user's account and are designed to be used for a single purpose with limited permissions.


How to Create App Passwords in Bitbucket?

Go to Bitbucket--> Settings
Click on App passwords --> Create app password


Now enter label name and click on read/write under repositories

Click on Create, this will generate app password.
Now you can this app password in Jenkins.

Monday, January 3, 2022

Jenkins Terraform Integration | How do you integrate Terraform with Jenkins | Automate Infrastructure setup using Terraform and Jenkins | Remote Store in S3 Bucket

We will be learning how to provision resources in AWS cloud using Terraform and Jenkins. We will also learn how to store terraform state info remotely in AWS S3 bucket.

We will create S3 bucket for storing terraform state info and Dynamo DB table for locking capability. 

We will try to create an EC2 instance and S3 Bucket using Terraform and Jenkins in AWS cloud. Look at the diagram that describes the whole flow. 

Watch these steps in action in YouTube channel:


Pre-requisites:
  • Create S3 bucket for storing TF state
  • Create dynamo DB table for providing lock capability
  • Jenkins is up and running
  • Terraform is installed in Jenkins
  • Terraform files already created in your SCM
  • Make sure you have necessary IAM role created with right policy and attached to Jenkins EC2 instance. see below for the steps to create IAM role.
I have provided my public repo as an example which you can use.

Step # 1 - Create S3 Bucket:
Login to AWS, S3. Click on create S3 bucket.

Give unique name to the bucket, name needs to be unique.

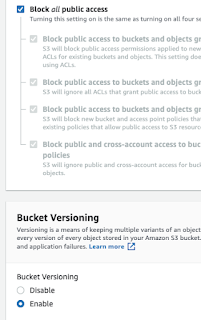
Block all public access, enable bucket versioning as well.

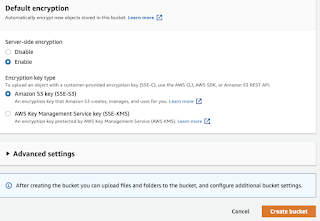
Enable encryption.


Step # 2 - Create DynamoDB Table
Create a new table with LockID as partition Key


Step - 3 Create IAM role to provision EC2 instance in AWS 


Select AWS service, EC2, Click on Next Permissions


Type EC2 and choose AmazonEC2FullAccess as policy and type S3 and add AmazonS3FullAccess, type Dynamo

Attach three policies


Click on Next tags, Next Review
give some role name and click on Create role.


Step 4 - Assign IAM role to EC2 instance

Go back to Jenkins EC2 instance, click on EC2 instance, Security, Modify IAM role


Type your IAM role name my-ec2-terraform-role and Save to attach that role to EC2 instance.


Step 5 - Create a new Jenkins Pipeline

Give a name to the pipeline you are creating.


Step 6 - Add parameters to the pipeline

Click checkbox - This project is parameterized, choose Choice Parameter


Enter name as action
type apply and enter and type destroy as choices as it is shown below(it should be in two lines)


Go to Pipeline section

Add below pipeline code and modify per your GitHub repo configuration.

pipeline {
    agent any

    stages {
        stage('Checkout') {
            steps {
            checkout scm
            }
        }
        
        stage ("terraform init") {
            steps {
                sh ('terraform init -reconfigure') 
            }
        }
        stage ("terraform plan") {
            steps {
                sh ('terraform plan') 
            }
        }
                
        stage ("terraform Action") {
            steps {
                echo "Terraform action is --> ${action}"
                sh ('terraform ${action} --auto-approve') 
           }
        }
    }
}
Click on Build with Parameters and choose apply to build the infrastructure or choose destroy if you like to destroy the infrastructure you have built. 


Click on Build With Parameters,
choose apply from the dropdown
Now you should see the console output if you choose apply.


Pipeline will look like below:


Login to AWS console


Login to S3 Bucket, you should see terraform state info is also added


How to Destroy all the resources created using Terraform?

run the Jenkins Pipeline with destroy option. This should destroy all the resources you have created using Terraform.