Showing posts with label Binary Repo. Show all posts

Friday, November 10, 2023

How to Integrate Artifactory with Azure DevOps | Upload Artifacts from Azure DevOps YAML Pipelines to Artifactory | Artifactory and Azure DevOps Integration | Upload Java WAR file into Artifactory from Azure Pipelines

How to integrate Artifactory with Azure DevOps for uploading build artifacts?

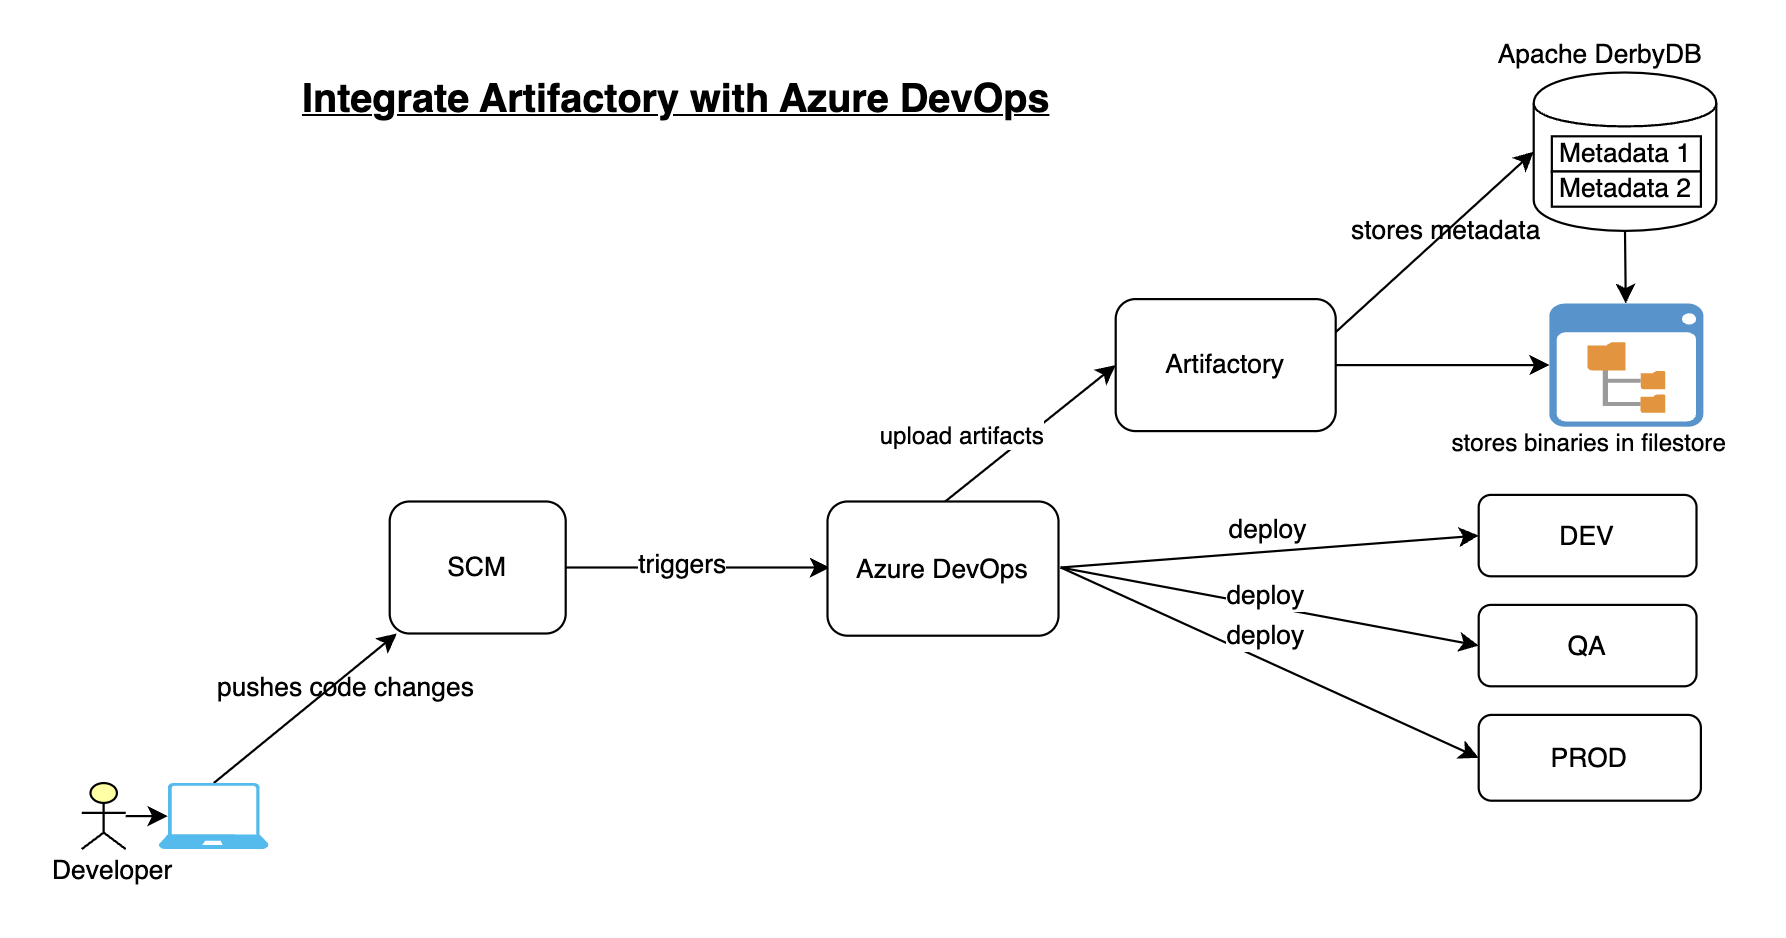

Artifactory is one of the popular binary repository managers. It is Java based open source tool, used for storing build artifacts and docker images.

Some of the key features of Artifactory:
  • Supports 27 different package types including helm charts, docker images regardless of tech stack.
  • A single source of truth for all your binaries
  • Integration with all CICD tools
  • role based authorization with teams to manage artifacts 
  • you can create local, remote and virtual repositories
Pre-requisites:

We will automate building a Java project configured in GitHub and we will use Maven to build, package in Azure YAML pipeline and upload WAR file into Artifactory.

Steps to be followed to create a pipeline:

Create a Pipeline:
Login to your Azure Devops dashboard https://dev.azure.com


Go to Pipelines, Click New
select your SCM, in my case, Java Web App code is in GitHub.


Select the Java Repo, select Maven from the option. This will generate YAML file for us.

Add a task for uploading WAR file.
Click on Show assistant, search for generic and select JFrog Generic Artifacts


Choose Upload as command, choose service connection for Artifactory, enter *.war as pattern, enter repo name where artifact will be uploaded. Click on Add.


Now save the pipeline.. Run the pipeline

Azure DevOps YAML Pipeline Code

using the pipeline code we can automate build using Maven and upload WAR file into Artifactory

# Build your Java project using Maven and Upload WAR file to Artifactory

trigger:
- main
pool:
vmImage: ubuntu-latest
steps:
- task: Maven@3
inputs:
mavenPomFile: 'MyWebApp/pom.xml'
mavenOptions: '-Xmx3072m'
javaHomeOption: 'JDKVersion'
jdkVersionOption: '1.8'
jdkArchitectureOption: 'x64'
publishJUnitResults: true
testResultsFiles: '**/surefire-reports/TEST-*.xml'
goals: 'package'
- task: JFrogGenericArtifacts@1
inputs:
command: 'Upload'
connection: 'Artifactory_svc_conn'
specSource: 'taskConfiguration'
fileSpec: |
{
"files": [
{
"pattern": "*.war",
"target": "libs-snapshot-local"
}
]
}
failNoOp: true

Now login to Artifactory..Click on Artifactory --> Artifacts. We can see the WAR file being uploaded.


This is how we can easily integrate Artifactory with Azure DevOps for uploading build artifacts.

Watch Steps in YouTube channel:

Sunday, October 8, 2023

How to Install JFrog Artifactory on Ubuntu | Setup JFrog Artifactory on Ubuntu | Install JFrog Artifactory 7.X on Ubuntu 22.0.4

Artifactory is one of the popular binary repository managers. It is Java based open source tool, used for storing build artifacts and docker images.

Some of the key features of Artifactory:
  • Supports 27 different package types including helm charts, docker images regardless of tech stack.
  • A single source of truth for all your binaries
  • Integration with all CICD tools
  • role based authorization with teams to manage artifacts 
  • you can create local, remote and virtual repositories


Artifactory can be integrated with many Continuous integration and Continuous delivery tools. Artifactory is mainly used by Ant, Maven and Gradle build tools. Let us see how to install Artifactory on Ubuntu 22.0.4 using Deb packages.

Pre-requisites:
  • VM needs to have at least 4GB RAM, for AWS choose at least medium instance type.
  • Default ports 8081 and 8082 needs to be opened. 8081 for Artifactory REST APIs. 8082 for everything else (UI, and all other product’s APIs).
Change Host Name to Artifactory
sudo hostnamectl set-hostname Artifactory

Update Ubuntu OS
sudo apt update

Add JFrog Artifactory APT repository
echo "deb https://releases.jfrog.io/artifactory/artifactory-debs xenial main" | sudo tee -a /etc/apt/sources.list.d/artifactory.list


Import repository GPG key by running the following commands
curl -fsSL  https://releases.jfrog.io/artifactory/api/gpg/key/public|sudo gpg --dearmor -o /etc/apt/trusted.gpg.d/artifactory.gpg

Update the package
sudo apt update

Install Artifactory
sudo apt install jfrog-artifactory-oss -y
The above message should confirm Artifactory have been successfully installed.
Now let us start Artifactory service.

Start Artifactory 
sudo systemctl start artifactory.service
Create symbolic link
sudo systemctl enable artifactory.service


Check whether Artifactory is running?
sudo systemctl status artifactory.service

Press q to quit 

You can also check the logs

sudo tail -f /var/opt/jfrog/artifactory/log/artifactory-service.log


Check if service is running locally on 8081 port

curl localhost:8081

Access Artifactory App
Go to browser and open public IP/DNS name along with port no:8081
http://your_public_dns_name:8081

You should see Artifactory welcome page, login with default username and password which is
admin/password


After Login, click on Get started. 

Now reset admin password. enter as Admin1234/Admin1234

Skip for base URL and skip proxy setup
Click Next, click on Finish


That's it! Artifactory is setup successfully.

How to Integrate Artifactory and Jenkins?
https://www.coachdevops.com/2020/04/integrate-artifactory-with-jenkins.html

You can watch the steps in details on our YouTube channel:
  

Thursday, February 2, 2023

How to Integrate Artifactory with Jenkins | Upload Artifacts from Jenkins to Artifactory | Artifactory and Jenkins Integration

 How to Integrate Artifactory with Jenkins?

You can install plug-in called Artifactory plug-in to integrate Artifactory with Jenkins. Let us see how to integrate Jenkins with Artifactory and able to upload any binary file such as War/Ear/Jar/Exe/DLLs from Jenkins.

            go to Jenkins, Manage Jenkins, Click on Available plug-ins, type Artifactory. Click on Artifactory             and click install without restart


  • Configure Maven in Jenkins
Make sure Maven 3 is also configured under Manage Jenkins--> Global Tool configuration
Enter Name as Maven3
/usr/share/maven as MAVEN_HOME

Configure Artifactory in Jenkins:
1. Go to Manage Jenkins, Click on configure system. Look for JFrog section, click on Add JFrog Platform instance


2. Enter some name and Artifactory url like given below. Enter admin user name as ciadmin and admin password of ciadmin user you have configured.

You should get the message like below:


3. Once you configured Artifactory in Jenkins, let us integrate from our Jenkins job.

How to Integrate from Jenkins Job
1. Create a new free style job in Jenkins


2. Provide your repo details to check out the project you want to build

3. Go under Build environment
Select Maven 3 - Artifactory integration check box
and click on refresh Repositories and choose repos as mentioned below:

 4.Click on Add Build step and choose Invoke Artifactory Maven 3

5. Enter value as below, MyWebApp/pom.xml as root POM
and goal as install

6. Now click on Build, Jenkins should build using Maven and upload WAR file into Artifactory.

7. Login to Artifactory, Click on Artifactory --> Artifacts


That's it folks!

Please watch the steps in details in my YouTube channel:

Sunday, November 14, 2021

Integrate Artifactory with Jenkins - Upload Artifacts from Jenkins to Artifactory - How to Integrate Jenkins with Artifactory

How to Integrate Jenkins with Artifactory?

You can install Artifact plug-in to integrate Artifactory with Jenkins. Let us see how to integrate Jenkins with Artifactory and able to upload War/Ear/Jar files using Maven.


Pre-requisites:
Install Artifactory plugin in Jenkins.
go to Jenkins, Manage Jenkins, Manage plug-ins page, search for artifactory under available tab.

Make sure Maven 3 is also configured under Manage Jenkins--> Global Tool configuration
Enter Name as Maven3
/usr/share/maven as MAVEN_HOME

Configure Arifactory in Jenkins:
Once you successfully install Artifactory plug-in, 
1. Go to Manage Jenkins, Click on configure system. Look for JFrog section, click on JFrog Platform instance.
Enter some name for Instance_ID and enter Artifactory url like below:
http://public_dns_name:8081/artifactory


2. Click on Advanced configuration
Enter Artifactory URL again
http://public_dns_name:8081/artifactory

 and also distribution URL as below
http://public_dns_name:8081/distribution

3. Add Credentials Entry


Enter admin as username and enter Artifactory password as Admin123
Click on Test connection to verify everything is right.

4. Once you installed the above plug-in, click on existing Freestyle job configuration.
4. Go under Build environment
Select Maven 3 - Artifactory integration check box
and click on refresh Repositories and choose repos as mentioned below:


 5.Click on Add Build step and choose Invoke Artifactory Maven 3

6. Enter value as below, MyWebApp/pom.xml as root POM
and goal as install

7. Now click on Build, Jenkins should build using Maven and upload WAR file into Artifactory.

8. Login to Artifactory, Click on Artifactory --> Artifacts


Click on Builds to see the artifacts


That's it folks!

Thursday, April 23, 2020

Install Artifactory on Ubuntu - Setup Artifactory on Ubuntu - Install Artifactory 7.4.1 on Ubuntu 18.0.4 EC2 in AWS

Artifactory is one of the popular binary repository managers. It is Java based open source tool, used for storing artifacts. Artifactory can be used for storing Docker images as well.

Artifactory can be integrated with many Continuous integration and Continuous delivery tools. Artifactory is mainly used by Ant, Maven and Gradle build tools.

Let us see how to install Artifactory on Ubuntu 18.0.4.

Pre-requistes:
Install Artifactory on 2GM RAM, for AWS choose at least small or medium instance type.
Default ports 8081 and 8082 needs to be opened.
8081 for Artifactory REST APIs.
8082 for everything else (UI, and all other product’s APIs).

Update Ubuntu server
sudo apt-get update

Install Java Open JDK 11 package
sudo apt-get install default-jdk -y

Verify Java Version
java -version

Download Artifactory 
Add artifactory repository key and file to Ubuntu.
sudo wget -qO - https://api.bintray.com/orgs/jfrog/keys/gpg/public.key | sudo apt-key add - 

sudo add-apt-repository "deb [arch=amd64] https://jfrog.bintray.com/artifactory-debs $(lsb_release -cs) main"
Update the package
sudo apt-get update

Install Artifactory 
sudo apt install jfrog-artifactory-oss
The above message should confirm Artifactory have been successfully installed.
Now let us start Artifactory service.

Start Artifactory 
sudo systemctl start artifactory.service

Create symbolic link
sudo systemctl enable artifactory.service


Check whether Artifactory is running?
sudo systemctl status artifactory.service

Check if service is running locally on 8081 port
curl localhost:8081

Access Artifactory Web Interface
You should see Artifactory welcome page, Login with Username:  admin and Password: password 


After Login, click on Get started. Now reset admin password. enter as Admin123/Admin123

Skip for base URL and skip proxy setup, choose Generic and Maven
Click Next

That's it! Artifactory is setup successfully. Please watch the steps in details below in my YouTube channel:

Jenkins Artifactory Integration
Find steps involved in integrating Artifactory with Jenkins.

https://www.coachdevops.com/2020/04/integrate-artifactory-with-jenkins.html