Thursday, February 9, 2023

How to create Azure Resources using Terraform in Azure Cloud | Automate Infrastructure setup using Terraform in Azure Cloud | Create Azure WebApp using Terraform

Azure Web App service lets us quickly build, deploy, and scale enterprise-grade web, mobile, and API apps running on any platform. It supports .NET, .NET core, Java, PHP,  Python, Ruby and NodeJS. It is a fully managed Platform as a Serice (PaaS) where developers can deploy mobile, API apps or web applications in Azure Cloud in matter of seconds.

We will provision WebApp in Azure cloud using Terraform.

Terraform is an open-source tool for provisioning and managing cloud infrastructure. Terraform can provision resources on any cloud platform. 

Terraform allows you to create infrastructure in configuration files(tf files) that describe the topology of cloud resources. These resources include virtual machines, storage accounts, and networking interfaces. The Terraform CLI provides a simple mechanism to deploy and version the configuration files to Azure.

Pre-requisites:

Azure CLI needs to be installed.

Terraform needs to be installed.

How to Authenticate with Azure?

Terraform can authenticate with Azure in many ways, in this example we will use Azure CLI to authenticate with Azure and then we will create resources using Terraform.

Logging into the Azure CLI

Login to the Azure CLI using:

az login

The above command will open the browser and will ask your Microsoft account details. Once you logged in, you can see the account info by executing below command:

az account list

Now create a directory to store Terraform files.

mkdir azure-terraform

cd azure-terraform

Let's create a terraform file to use azure provider. To configure Terraform to use the Default Subscription defined in the Azure CLI, use the below cod.

sudo vi azure.tf

terraform {
  required_providers {
    azurerm = {
      source  = "hashicorp/azurerm"
      version = "=3.42.0"
    }
  }
}

# Configure the Microsoft Azure Provider
provider "azurerm" {
  features {}
}

Now initialize the working directory

Perform the below command:

terraform init

Once directory is initialized, you can start writing code for setting up the infrastructure. 

Create WebApp(App Service) using Terraform script

sudo vi create-app-svc.tf

# Create a resource group
resource "azurerm_resource_group" "dev-rg" {
  name     = "dev-environment-rg"
  location = "Central US"
}

# Create app service plan
resource "azurerm_service_plan" "service-plan" {
  name = "simple-service-plan"
  location = azurerm_resource_group.dev-rg.location
  resource_group_name = azurerm_resource_group.dev-rg.name
  os_type = "Linux"
  sku_name = "S1"
  tags = {
    environment = "dev"
  }
}

# Create Web App service for hosting Java Web App in Tomcat server
resource "azurerm_linux_web_app" "app-service" {
  name = "mysuperjavawebapp2"
  location = azurerm_resource_group.dev-rg.location
  resource_group_name = azurerm_resource_group.dev-rg.name
  service_plan_id = azurerm_service_plan.service-plan.id

        site_config {
        always_on          = true
          application_stack {
             java_server         = "TOMCAT"
             java_server_version = "8.5"
             java_version        = "11"
         }
        }
tags = {
    environment = "dev"
  }
}

Now Perform the below command to validate terraform files.

terraform validate

perform plan command to see how many resources will be created.

terraform plan

terraform apply --auto-approve

 
Now Login into Azure Cloud to see all the resources created.
 

To clean up the resources created from Terraform

terraform destroy --auto-approve

Thursday, February 2, 2023

How to create regular Artifactory Admin user in JFrog Artifactory? | How to create admin user in JFrog Artifactory?

Login to Artifactory server

Click on Tools--> User Management --> Users

Click on New user


Create an admin user 


Make sure you follow password policy as mentioned. Click on Save


that's it..that is how you create an admin user in Artifactory.

How to Integrate Artifactory with Jenkins | Upload Artifacts from Jenkins to Artifactory | Artifactory and Jenkins Integration

 How to Integrate Artifactory with Jenkins?

You can install plug-in called Artifactory plug-in to integrate Artifactory with Jenkins. Let us see how to integrate Jenkins with Artifactory and able to upload any binary file such as War/Ear/Jar/Exe/DLLs from Jenkins.

            go to Jenkins, Manage Jenkins, Click on Available plug-ins, type Artifactory. Click on Artifactory             and click install without restart


  • Configure Maven in Jenkins
Make sure Maven 3 is also configured under Manage Jenkins--> Global Tool configuration
Enter Name as Maven3
/usr/share/maven as MAVEN_HOME

Configure Artifactory in Jenkins:
1. Go to Manage Jenkins, Click on configure system. Look for JFrog section, click on Add JFrog Platform instance


2. Enter some name and Artifactory url like given below. Enter admin user name as ciadmin and admin password of ciadmin user you have configured.

You should get the message like below:


3. Once you configured Artifactory in Jenkins, let us integrate from our Jenkins job.

How to Integrate from Jenkins Job
1. Create a new free style job in Jenkins


2. Provide your repo details to check out the project you want to build

3. Go under Build environment
Select Maven 3 - Artifactory integration check box
and click on refresh Repositories and choose repos as mentioned below:

 4.Click on Add Build step and choose Invoke Artifactory Maven 3

5. Enter value as below, MyWebApp/pom.xml as root POM
and goal as install

6. Now click on Build, Jenkins should build using Maven and upload WAR file into Artifactory.

7. Login to Artifactory, Click on Artifactory --> Artifacts


That's it folks!

Please watch the steps in details in my YouTube channel:

Tuesday, January 31, 2023

How to Setup JFrog Artifactory using Docker-Compose | Install Artifactory using Docker Compose | Install Artifactory using Docker Compose on Ubuntu 18.0.4

How to setup Artifactory using Docker compose?

Artifactory is open source, binary repository manager. Artifactory is the single solution for managing all the artifacts, binaries, files and containers throughout your software supply chain. 

Some of the key features of Artifactory:
  • Supports 27 different package types including helm charts, docker images regardless of tech stack.
  • A single source of truth for all your binaries
  • Integration with all CICD tools
  • role based authorization with teams to manage artifacts 
  • you can create local, remote and virtual repositories
What is Docker Compose?
Compose is a tool for defining and running multi-container Docker applications. With Compose, you use a YAML file to configure your application’s services. Then, with a single command, you create and start all the services from your configuration. Since Docker Compose lets you configure related containers in a single YAML file, you get the same Infrastructure-as-Code abilities as Kubernetes. But they come in a simpler system that’s more suited to smaller applications that don’t need Kubernetes’ resiliency and scaling.
 
The purpose of docker-compose is to function as docker cli but to issue multiple commands much more quickly. To make use of docker-compose, you need to encode the commands you were running before into a docker-compose.yml file
 
Run docker-compose up and Compose starts and runs your entire app.

Watch the Steps in YouTube channel: 

Pre-requisites:
  • Ubuntu EC2 up and running with at least t2.medium (4GB RAM), 2GB will not work
  • Port 8081, 8082 is opened in security firewall rule
  • instance should have docker-compose installed

Change Host Name to Artifactory
sudo hostnamectl set-hostname Artifactory

Perform System update
sudo apt update

Install Docker-Compose
sudo apt install docker-compose -y

Create docker-compose.yml
this yml has all the configuration for installing Artifactory on Ubuntu EC2.
sudo vi docker-compose.yml 

(Copy the below code high-lighted in yellow color)
version: "3.3"
services:
  artifactory-service:
    image: docker.bintray.io/jfrog/artifactory-oss:7.49.6
    container_name: artifactory
    restart: always
    networks:
      - ci_net
    ports:
      - 8081:8081
      - 8082:8082
    volumes:
      - artifactory:/var/opt/jfrog/artifactory

volumes:
  artifactory:
networks:
  ci_net:

Save the file by entering :wq!

Now execute the compose file using Docker compose command to start Artifactory Container
sudo docker-compose up -d 

-d means detached mode

Make sure Artifactory is up and running
sudo docker-compose logs --follow


Once you see the message, that's it. Artifactory is been setup successfully. Now press Control C and enter to come out of the above screen.

Check Artifactory is up and running by typing below command:
curl localhost:8081
This confirms that Artifactory is up and running locally.

How to access Artifactory in the browser?

Now access Artifactory UI by going to browser and enter public dns name with port 8081
http://change to_artifactory_publicdns_name:8081

How to integrate Artifactory with Jenkins?

How to stop Artifactory container
sudo docker-compose down


Friday, January 27, 2023

How to Setup Self Hosted Linux Agent in Azure DevOps | How to configure Self Hosted Agent for Azure Pipelines | Create Build Agent in Azure Cloud

Let us learn how to create and configure a Self-Hosted Agent in Azure DevOps (ADO).

What is an Agent?

An agent is computing infrastructure with installed agent software that runs one job at a time.

To build your code or deploy your software using Azure Pipelines, you need at least one agent. As you add more code and people, you'll eventually need more.

When your pipeline runs, the system begins one or more jobs. 


In Azure pipelines, there are two types of build agents:

  1. Microsoft-hosted agents - This is a service totally managed by Microsoft and it's cleared on every execution of the pipeline (on each pipeline execution, you have a fresh new environment).
  2. Self-hosted agents - This is a service that you can to set up and manage by yourself. This can be a custom virtual machine on Azure or a custom on-premise machine inside your infrastructure. In a self-hosted agent, you can install all the software you need for your builds, and this is persisted on every pipeline execution. A self-hosted agent can be on Windows, Linux, macOS, or in a Docker container.
Pre-requisites:

Watch Steps in YouTube channel:

How to configure Self-hosted build agent?

1. Go to Azure DevOps dashboard - https://dev.azure.com/
2. Select your project dashboard
3. Go to your project settings
4. Click on Agent pools


Create a new Agent pool name

Enter name as Ubuntu18-VM-Pool or any name
Make sure you select Grant access permission to all pipelines
click on Ubuntu18-VM-Pool, Agents, New agent


Click on Linux

Note down the steps to configure Linux build agent.
Login to your Azure VM now.

Step #1 - Create the Agent
mkdir myagent && cd myagent

Step #2 - Download the agent
wget https://vstsagentpackage.azureedge.net/agent/2.214.1/vsts-agent-linux-x64-2.214.1.tar.gz


Step #3 - Configure the Agent
tar zxvf vsts-agent-linux-x64-2.214.1.tar.gz


List the files in the directory after extracting.
ls -al


Step #4:
Run the below command:
./config.sh


Accept the Team Explorer Everywhere license agreement now?
Type Y and enter
Step #5:
Enter server URL >
https://dev.azure.com/{yourorganization}

Step #6:
Enter authentication type (press enter for PAT) > PAT

Step #7:
Enter personal access token, generated from this step

Step #8:
Enter Agent pool
Give some name

Step #9:
Enter Agent name --> myBuildAgent_1

Step #10:
Enter work folder > enter

that's it agent is successfully configured.

Configure the Agent to run as a Service

sudo ./svc.sh install &

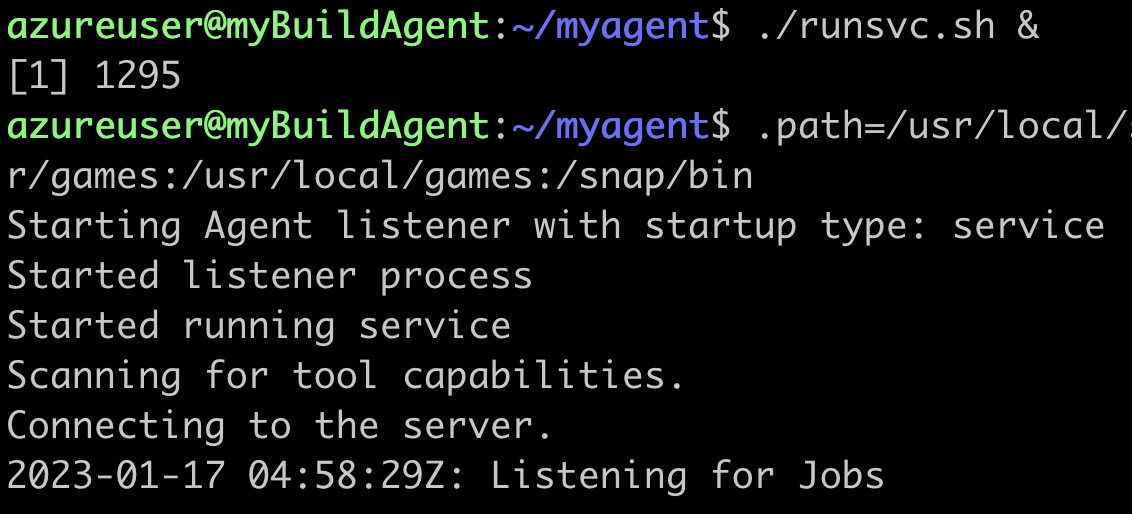
Execute now to run as a service
./runsvc.sh &

Check the status of build Agent
Click on Ubuntu-18-VM pool name
Click on Agents

This confirms that Build agent is successfully configured in Azure DevOps and is available to run builds.

Steps for removing Agent from the agent pool
Remove the service first
sudo ./svc.sh uninstall


./config.sh remove

To Perform Java related builds on this Agent, make sure you install Java and Maven on this VM.

Install Java 11
sudo apt-get install default-jdk -y

Maven Installation
Maven is a popular build tool used for building Java applications. Please click here to learn more about Maven. You can install Maven by executing below command:

sudo apt update && sudo apt install maven -y

Check if Maven got installed

mvn --version

Wednesday, January 4, 2023

How to run Ansible playbook from Jenkins pipeline job | Automate EC2 provisioning in AWS using Jenkins and Ansible Playbook | Create new EC2 instance in AWS cloud using Ansible Playbook and Jenkins Pipeline

We will learn how to create new EC2 instance using Ansible playbook and automate using Jenkins Pipeline. 


Watch Steps in YouTube Channel:

Pre-requisites:

  • Ansible is installed and Boto is also installed on Jenkins instance
  • Ansible plug-in is installed in Jenkins. 
  • Make sure you create an IAM role with AmazonEC2FullAccess policy and attach the role to Jenkins EC2 instance.
  • Playbook for creating new EC2 instance needs to be created but you can refer my GitHub Repo
Steps:

Create Ansible playbook for provisioning EC2 instance

(Sample playbook is available in my GitHub Repo, you can use that as a reference)

Create Jenkins Pipeline 
pipeline {
    agent any

    stages {
        
        stage ("checkout") {
            steps {
                        checkout([$class: 'GitSCM', branches: [[name: '*/master']], extensions: [],                                                     userRemoteConfigs: [[url: 'https://github.com/akannan1087/myAnsibleInfraRepo']]])         
            }
        }
        stage('execute') {
            steps {
                //to suppress warnings when you execute playbook    
                sh "pip install --upgrade requests==2.20.1"
                // execute ansible playbook
                ansiblePlaybook playbook: 'create-EC2.yml'
            }
        }
    }
}

Execute Pipeline


Pipeline Console output