Let us learn how to create and configure a Self-Hosted Agent in Azure DevOps (ADO).

What is an Agent?
An agent is computing infrastructure with installed agent software that runs one job at a time.
To build your code or deploy your software using Azure Pipelines, you need at least one agent. As you add more code and people, you'll eventually need more.
When your pipeline runs, the system begins one or more jobs.
In Azure pipelines, there are two types of build agents:
- Microsoft-hosted agents - This is a service totally managed by Microsoft and it's cleared on every execution of the pipeline (on each pipeline execution, you have a fresh new environment).
- Self-hosted agents - This is a service that you can to set up and manage by yourself. This can be a custom virtual machine on Azure or a custom on-premise machine inside your infrastructure. In a self-hosted agent, you can install all the software you need for your builds, and this is persisted on every pipeline execution. A self-hosted agent can be on Windows, Linux, macOS, or in a Docker container.
Pre-requisites:
- Microsoft account setup
- Azure account and subscription setup
- Create a VM(Ubuntu 18.0.4) in Azure Cloud
- Create Personal Access Token in Azure DevOps
Watch Steps in YouTube channel:
How to configure Self-hosted build agent?
1. Go to Azure DevOps dashboard - https://dev.azure.com/
2. Select your project dashboard
3. Go to your project settings


Make sure you select Grant access permission to all pipelines


Note down the steps to configure Linux build agent.


List the files in the directory after extracting.

 Step #5:

that's it agent is successfully configured.

Check the status of build Agent
This confirms that Build agent is successfully configured in Azure DevOps and is available to run builds.


click on Ubuntu18-VM-Pool, Agents, New agent

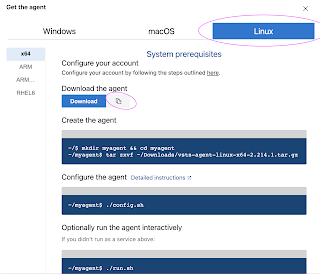
Click on Linux

Login to your Azure VM now.
Step #1 - Create the Agent
mkdir myagent && cd myagent
Step #2 - Download the agent
wget https://vstsagentpackage.azureedge.net/agent/2.214.1/vsts-agent-linux-x64-2.214.1.tar.gz

Step #3 - Configure the Agent
tar zxvf vsts-agent-linux-x64-2.214.1.tar.gz

ls -al

Step #4:
Run the below command:
./config.sh

Accept the Team Explorer Everywhere license agreement now?
Type Y and enter
Enter server URL >
https://dev.azure.com/{yourorganization}
https://dev.azure.com/{yourorganization}
Step #6:
Enter authentication type (press enter for PAT) > PAT
Step #7:
Enter personal access token, generated from this step
Step #8:
Enter Agent pool
Give some name
Step #9:
Enter Agent name --> myBuildAgent_1
Step #10:
Enter work folder > enter

that's it agent is successfully configured.
Configure the Agent to run as a Service
sudo ./svc.sh install &
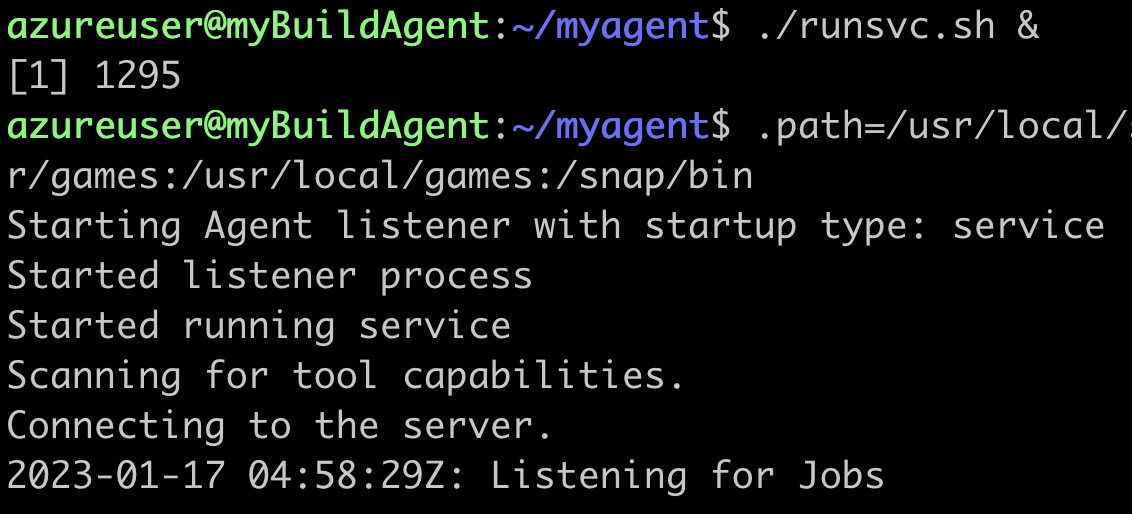
Execute now to run as a service
./runsvc.sh &
Click on Ubuntu-18-VM pool name
Click on Agents

This confirms that Build agent is successfully configured in Azure DevOps and is available to run builds.
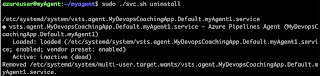
Steps for removing Agent from the agent pool
Remove the service first
sudo ./svc.sh uninstall

./config.sh remove

To Perform Java related builds on this Agent, make sure you install Java and Maven on this VM.
Install Java 11
sudo apt-get install default-jdk -y
Maven Installation
Maven is a popular build tool used for building Java applications. Please click here to learn more about Maven. You can install Maven by executing below command:
sudo apt update && sudo apt install maven -y
Maven is a popular build tool used for building Java applications. Please click here to learn more about Maven. You can install Maven by executing below command:
sudo apt update && sudo apt install maven -y
Check if Maven got installed
mvn --version


I appreciate the step-by-step instructions for creating the agent pool and configuring the Linux agent. It makes onboarding new build agents much simpler. I’ve personally faced issues with PAT tokens expiring—do you plan to cover automation for renewing agent authentication in azure cloud?
ReplyDeleteAC3B9AB076
ReplyDeleteTakipçi Satın Al
3D Car Parking Para Kodu
MMORPG Oyunlar
Zula Hediye Kodu
Total Football Hediye Kodu
A99A8ED8DF
ReplyDeletesteroid sipariş
Cam Şov
steroid fiyat