Friday, February 21, 2020

How to upload Docker images into Nexus docker Registry | How to Upload Docker images to Nexus Decker Registry

How to upload Docker images into Nexus docker Registry - Upload Docker images to Nexus Decker Registry.

Pre-requisites:

Docker is installed and up and running.
Nexus is up and running and Docker registry is already configured. If you have not configured yet, click here to setup Nexus 3 to configure as Docker Registry.

Steps to configure in Docker to upload Docker images to Nexus
login to EC2 instance where you have installed Docker, try to perform below commands:
Configure Docker service to use insecure registry with http. Create Docker daemon file if it does not exist.

sudo vi /etc/docker/daemon.json
Add entries like below:
Enter Nexus URL along with port number used for Docker registry.


{
    "insecure-registries" : ["nexus_public_dns_name:8085"]
}


Restart Docker daemon after above configuration changes.

sudo systemctl restart docker

sudo systemctl status docker
Make sure Docker was able to restart successfully. Press q to come out of above window.


Login to Docker Registry hosted in Nexus 3

Make sure you are able to login to Docker Registry hosted in Nexus by executing below command:
sudo docker login -u admin nexus_public_dns_name:8085

Now enter the Nexus admin password(it will not show the password when you type which is ok)


Download Dockerized code

git clone https://bitbucket.org/ananthkannan/mydockerrepo; cd mydockerrepo/pythonApp

Create a Docker image and tag the image per Nexus Registry

sudo docker build . -t nexus_public_dns_name:8085/mypythonapp


Push the image into Docker Registry
sudo docker push nexus_public_dns_name:8085/mypythonapp


Verify if Docker image is uploaded into Nexus successfully
Login to Nexus, click on Browse, choose Docker registry

Please watch in YouTube channel for the demo:

How to configure Nexus 3 as Docker private Registry | How to configure Docker private Registry in Nexus 3

Nexus 3 is one of the popular binary repository managers. It can be also used to store Docker images as well besides storing binaries such as WARs, EARs, Jars, DLLs and EXE files.

Let us see how to configure Nexus 3 to host as Docker registry.

Pre-requisites:
Steps to configure Nexus 3 as Docker Registry:

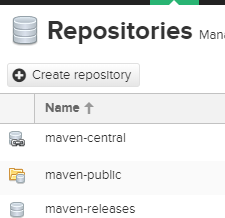
1. Login to Nexus and click on Server Administration link at the top of the window. Click on Repositories.


2. Now click on create repository


3. Choose docker hosted repository


4. Choose the value as mentioned:


5. Click on Create repository.

Configure Realm
6. Go to Security. Click on Realms

Move Docker Bearer Token realm to right by clicking on >

This settings allows docker repository to have anonymous read enabled.


7. after moving save it.

Wednesday, February 19, 2020

Install Java using Puppet on Agent - Create Puppet Manifest to Install Java on Ubuntu

Puppet is a software configuration management tool, used for managing software stack on servers. Java also can be managed using Puppet.

Here below are the steps for installing Java using Puppet on Ubuntu:

First install Java modules on Puppet Master using sudo command.

Step 1
sudo /opt/puppetlabs/bin/puppet module install puppetlabs-java --version 2.2.0

The above command will install Java module on Puppet Master.

Step 2
After that change the manifest in site.pp file in Puppet Master by executing the below command:

sudo vi /etc/puppetlabs/code/environments/production/manifests/site.pp


node 'target_node_ip_address' {
class { 

    'java':
   distribution => 'jre',
  }
}


Step 3
Now go to Puppet Agent node and apply the changes by executing the below command:

sudo /opt/puppetlabs/bin/puppet agent --test

Monday, February 3, 2020

Install Docker Ubuntu - How to install Docker in Ubuntu 16.0.4? setup Docker on Ubuntu

Please find the steps needed for installing Docker in Ubuntu 16.0.4 instance.

sudo curl -fsSL https://download.docker.com/linux/ubuntu/gpg | sudo apt-key add -
sudo add-apt-repository "deb [arch=amd64] https://download.docker.com/linux/ubuntu $(lsb_release -cs) stable"
sudo apt-get update
sudo apt-cache policy docker-ce
sudo apt-get install -y docker-ce
sudo systemctl status docker

now press q to come out this.
ps -ef | grep docker

docker --version

sudo docker run hello-world

the above command should display the below message..

you should see below message 
Hello from Docker!
This message shows that your installation appears to be working correctly.

Also, create an account(keep all lowercase in your username)  in the below website for storing docker images in public docker registry..

Saturday, January 18, 2020

How to create Ubuntu 16.0.4 Virtual Machine (VM) in Azure? Create Ubuntu Virtual Machine in Azure and Connect using SSH keys from locally into Azure Virtual Machine

How to Create a Virtual Machine in Azure Cloud?

Creating Virtual Machine in Azure is easy and straight forward. Let us see how to do that in Azure Portal.

Steps to create a Virtual Machine in Azure 

1. Login to Azure portal, go to https://portal.azure.com
2. Click on Virtal Machines.


3. Now enter the details as below or give values per what your subscription(Free Subscription) and requirements:

You can choose Ubuntu 16.0.4 or 18.0.4 from the drop down from Image drop down. Create new resource group as any name.

4. Also enter username as azure (make sure your key has this name and copy content of ssh keys


5. Once done, click on Review + create

6. Download SSH keys by clicking on Download private key and create resource. You should download keys locally.
7. Once created, Click on virtual machines. It may take more than a couple of mins to create the VM.
8. you should see a message like this, download is complete.
9. Click on Home--> Click on Virtual machine


9. Now select that instance, click on connect


10. Now enter the value as it shows below in your local terminal. You can use Git bash in Windows or iTerm in Apple laptop.

go into downloads directory:

cd downloads
chmod 400 myAzureVM_key.pem
11. ssh -i myAzureVM_key.pem AzureUser@your_azure_ip_address


12. Now it should show you that you are connected to Azure.


Wednesday, November 27, 2019

How to upload Docker images to Azure Container Registry - Hosting Docker images in Azure Container Registry

Azure Container Registry is a managed, private docker registry service. You can create and maintain Azure container registries to store and manage your private Docker container images.

It is alternative to Docker Hub. Azure Container Registry allows you to build, store, and manage container images and artifacts in a private registry for all types of container deployments.

Let us see how to upload a docker images from your VM into ACR.

Pre-requistes:
Make sure you have docker installed on your VM.
 
Step 1 - Create Azure Container Registry (ACR)

Go to https://portal.azure.com/
Create a Resource, Give container registry as a name

Click on Create

  
Enter values as mentioned below:
Give registry name, resource group and choose Enable admin user and SKU as Basic 


 Click on Review and then create, now your container registry is been created.

Step 2 - Download sample Python App

Go to your machine where you have docker images stored. perform below command to download sample pythonapp which is already dockerized.
 
git clone https://bitbucket.org/ananthkannan/mydockerrepo/src/master/pythonApp/ 

cd  pythonApp

docker build . -t mypythonapp

type below command:
sudo docker images

this should show docker images you have created locally.

Now go to ACR, click on docker registry you created. Click on access keys under Settings.


Copy value under login server 

Step 3 - Upload your docker images to ACR
Login to Azure Container Registry through command line.
sudo docker login mydockerazureregistry.azurecr.io
Username: mydockerazureregistry

Enter password by copying value below password

Now tag the docker image per as below:
sudo docker tag mypythonapp mydockerazureregistry.azurecr.io/mypythonapp

sudo docker push mydockerazureregistry.azurecr.io/mypythonapp

That's it..Docker image is pushed into ACR. You can see it under Services--> repositories