Saturday, March 10, 2018

Playbook for installing Apache on Ubuntu - Ansible Playbook for installing Apache on Ubuntu

Please find steps for installing Apache software on nodes using Ansible in Ubuntu EC2:

1. Login to Ansible machine. Create SSH keys in Ansible host machine by executing the below command:
ssh-keygen
2. Copy the public keys(id_rsa.pub) from ansible node each node in /home/ubuntu/.ssh/authorized_keys file. Execute the below command on Ansible and copy the content:
    sudo cat ~/.ssh/id_rsa.pub

3. Now login to target node, execute the below command to open the file
 sudo vi /home/ubuntu/.ssh/authorized_keys
type shift A and then enter. now 
    and paste the key in the above file. please do not delete any existing keys.

4. go back to ansible mgmt node, make sure you are able to ssh from ansible mgmt node after copying the keys above:
  ssh private_ip_of_target_node
now type exit to come out of the target node.
5. Now in ansible mgmt node, now make changes in /etc/ansible/hosts file to include the node you will be installing software. Make sure you add public IP address as highlighted below in green color:
   sudo vi /etc/ansible/hosts
[My_Group]  
34.216.41.94 ansible_ssh_user=ubuntu ansible_ssh_private_key_file=~/.ssh/id_rsa  ansible_python_interpreter=/usr/bin/python3

6. make changes in playbooks as given below,
cd ~/playbooks

sudo vi installApache.yml
Copy the below content

---
- hosts: My_Group
  become: true
  tasks:
    - name: Install apcahe
      apt: name=apache2 state=present update_cache=yes

    - name: ensure apache started
      service: name=apache2 state=started enabled=yes


7. now execute the playbook by running the below command:
sudo ansible-playbook installApache.yml
8. This should install Apache on the nodes and should bring the apache up and running.
9. Now enter public ip address or public dns name of target server by in thr browser to see home page of Apache running.

Friday, March 9, 2018

How to Install Teamcity on Ubuntu? How to set up TeamCity on Ubuntu 16.0.4 with Postgres?

Please find below steps for installing TeamCity on Ubuntu:

Pre-requistes:
Make sure instance has at least 2 GB RAM memory(for EC2 at least small instance)
Open port 8111 in security firewall.

We need to set up some database for storing all the build information. For this exercise, lets us use Postgres:

Postgres Installation
sudo apt-get update
sudo sh -c 'echo "deb http://apt.postgresql.org/pub/repos/apt/ `lsb_release -cs`-pgdg main" >> /etc/apt/sources.list.d/pgdg.list'
sudo wget -q https://www.postgresql.org/media/keys/ACCC4CF8.asc -O - | sudo apt-key add -
sudo apt-get -y install postgresql postgresql-contrib

sudo systemctl enable postgresql
sudo systemctl start postgresql

Change the password for postgres user by entering below command
sudo passwd postgres
Enter any password but do remember the password and confirm the same password
su - postgres
createuser teamcity

Switch to sql shell by entering
psql
ALTER USER teamcity WITH ENCRYPTED password 'password';
CREATE DATABASE teamcity OWNER teamcity;
\q

type exit to come out of postgres user.

TeamCity Installation

sudo apt-get update

sudo apt-get install default-jdk -y


Download TeamCity

wget https://download.jetbrains.com/teamcity/TeamCity-2020.1.5.tar.gz
tar -xvf TeamCity-2020.1.5.tar.gz
sudo mkdir /opt/JetBrains
sudo mv TeamCity /opt/JetBrains/TeamCity
cd /opt/JetBrains/TeamCity
sudo nano /etc/init.d/teamcity
(copy the whole text colored in green)
#!/bin/sh
### BEGIN INIT INFO
# Provides:          TeamCity autostart
# Required-Start:    $remote_fs $syslog
# Required-Stop:     $remote_fs $syslog
# Default-Start:     2 3 4 5
# Default-Stop:      0 1 6
# Short-Description: Start teamcity daemon at boot time
# Description:       Enable service provided by daemon.
# /etc/init.d/teamcity -  startup script for teamcity
### END INIT INFO

#  Ensure you enter the  right  user name that  TeamCity will run  under
USER="ubuntu"

export TEAMCITY_DATA_PATH="/opt/JetBrains/TeamCity/.BuildServer"

case $1 in

start)
  start-stop-daemon --start  -c $USER --exec /opt/JetBrains/TeamCity/bin/runAll.sh start
 ;;
stop)
  start-stop-daemon --start -c $USER  --exec  /opt/JetBrains/TeamCity/bin/runAll.sh stop
 ;;
 esac

exit 0

Ctrl + O enter
Ctrl + X enter
sudo chmod +x /etc/init.d/teamcity
sudo update-rc.d teamcity defaults
sudo /etc/init.d/teamcity start

cat /opt/JetBrains/TeamCity/buildAgent/logs/teamcity-agent.log

Open browser and access team city url in the browser
http://public_dns_name:8111

Click on Proceed.
Select database type as jdbc driver as Postgres SQL from the dropdown and Click on Proceed.

now you need to download the jdbc driver at below location.
cd /opt/JetBrains/TeamCity/.BuildServer/lib/jdbc
sudo wget https://jdbc.postgresql.org/download/postgresql-9.4.1212.jar

Select database type as PostgreSQL
Refresh JDBC driver
You should see like this —> Loaded PostgreSQL JDBC driver version: 9.4

Now provide the below info
Enter database Host - localhost
Enter database name - teamcity
User name - teamcity
Password - password
Click on Proceed

please wait and watch..As It may take a few mins…

Scroll down the page, Accept license agreement
Uncheck Send anonymous usage statistics
Continue button

Register as a user and create an account

Tuesday, March 6, 2018

Free disk space requirement of 3 GB could not be met for directory /opt/JetBrains/TeamCity/buildAgent/work

By default TeamCity has 3 GB space for build. If you have smaller instance, you can change it to reduce.

Open buildAgent configuration file by executing below command:
sudo vi /opt/JetBrains/TeamCity/buildAgent/conf/buildAgent.properties

add below line
system.teamcity.agent.ensure.free.space = 2gb

save the file

Now restart the build agent
/opt/JetBrains/TeamCity/buildAgent/bin/agent.sh stop

/opt/JetBrains/TeamCity/buildAgent/bin/agent.sh start


Click here to see steps for installing Team City on Ubuntu

How to Install Ansible on Ubuntu - How to setup Ansible on Ubuntu 22.0.4

Here are the steps for installing Ansible on Ubuntu 22.0.4:

The best way to install Ansible for Ubuntu is to add the project's PPA (personal package archive) to your system. you can do it by executing the below command:


Update Repository
sudo apt-add-repository -y ppa:ansible/ansible


then you need to refresh the package by executing the below command:
sudo apt update


Now you can install Ansible:
sudo apt install -y ansible


sudo apt install python-pip -y
 ( this is just comment -  Package manager for python)


Install Boto Framework
sudo pip install boto
(This is AWS SDK for python)
 
sudo pip install boto3
sudo apt-get install python-boto -y
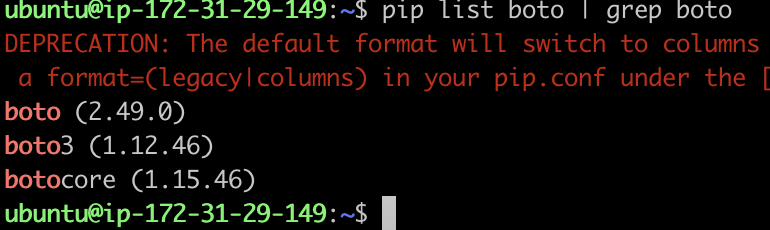
pip list boto | grep boto (the above command should display below output)
Ignore warning in Red color.

ansible --version


you will see this output..

ansible 2.9.6
  config file = /etc/ansible/ansible.cfg
  configured module search path = [u'/home/ubuntu/.ansible/plugins/modules', u'/usr/share/ansible/plugins/modules']
  ansible python module location = /usr/lib/python2.7/dist-packages/ansible
  executable location = /usr/bin/ansible
  python version = 2.7.12 (default, Dec  4 2017, 14:50:18) [GCC 5.4.0 20160609]


Monday, March 5, 2018

How to install Docker in Ubuntu | Install Docker in Ubuntu

Please find the steps needed for installing Docker in Ubuntu 18.0.4 instance.

sudo curl -fsSL https://download.docker.com/linux/ubuntu/gpg | sudo apt-key add -
sudo add-apt-repository "deb [arch=amd64] https://download.docker.com/linux/ubuntu $(lsb_release -cs) stable"
sudo apt-get update
sudo apt-cache policy docker-ce
sudo apt-get install -y docker-ce
sudo systemctl status docker

now press q to come out this.
ps -ef | grep docker

docker --version

sudo docker run hello-world

the above command should display the below message..

you should see below message 
Hello from Docker!
This message shows that your Docker installation appears to be working correctly.

Setup Docker Registry
Now we need to setup Docker registry. You have one of two options.

Option 1 - DockerHub as Docker Registry
Also, create an account(keep all lowercase in your username)  in the below website for storing docker images in public docker registry..

https://cloud.docker.com/
 
Option 2 - Configure Nexus as Docker Registry
Please click below link to configure Nexus as Docker Registry.
https://www.cidevops.com/2020/02/how-to-configure-nexus-as-docker.html

Option 3 - Configure AWS ECR as Docker Registry
Please click below link to configure Amazon ECR as Docker Registry.
https://www.cidevops.com/2020/05/how-to-setup-elastic-container-registry.html 
 
Option 4 - Configure Azure Container Registry
Please click below link to configure ACR in Azure.
https://www.coachdevops.com/2019/12/how-to-upload-docker-images-to-azure.html

Thursday, March 1, 2018

How to integrate SonarQube with Jenkins?

Here below are the steps for integrating SonarQube with Jenkins:
Pre-requisites: 
1. Make sure SonarQube is up and running and do the below steps.
2. Also make sure to install the sonarqube plug-in in Jenkins.

1. You need to login to SonarQube using admin/admin(default username/password) or login as your administrator credentials.

2. Click on administration, security, users, click on Tokens, under generate token. Give some value for token name and click on generate. 
3. Copy the value of token.
4. Now login to Jenkins. Manage Jenkins --> Configure System --> SonarQube installation
enter some name such as SonarQube_server, SonarQube URL, paste the token value from step # 3
5. Click on Enable injection of Sonarqube server configuration.
6. Save.
7. Click on free style job configuration. click on prepare sonarqube scanner  environment
8. enter maven goal as clean install sonar:sonar
9. click on save and build the job.