Friday, February 4, 2022

Create Amazon EKS cluster by eksctl | How to create EKS cluster in AWS cloud using eksctl | Create EKS Cluster in command line using IAM Role

What is Amazon EKS

Amazon EKS is a fully managed container orchestration service. EKS allows you to quickly deploy a production ready Kubernetes cluster in AWS, deploy and manage containerized applications more easily with a fully managed Kubernetes service.

EKS takes care of master node/control plane. We need to create worker nodes.

EKS cluster can be created in following different ways

1. AWS console
2. AWS CLI
3. eksctl command
4. using Terraform

We will create EKS cluster using eksctl command line tool.

Please watch the steps in YouTube channel:

Pre-requistes:

This Lab is using Jenkins EC2 instance. Jenkins EC2 instance needs to have following configured:

  • Install AWS CLI – Command line tools for working with AWS services, including Amazon EKS.

  • Install eksctl – A command line tool for working with EKS clusters that automates many individual tasks.

  • Install kubectl  – A command line tool for working with Kubernetes clusters. 

Create IAM Role with Administrator Access

You need to create an IAM role with AdministratorAccess policy.
Go to AWS console, IAM, click on Roles. create a role


Select AWS services, Click EC2, Click on Next permissions.
 
 Now search for AdministratorAccess policy and click


Skip on create tag.
Now give a role name and create it.
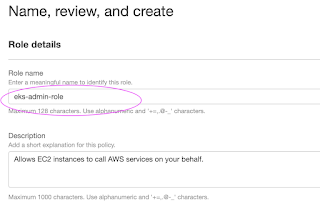
Assign the role to EC2 instance
Go to AWS console, click on EC2, select EC2 instance, Choose Security.
Click on Modify IAM Role
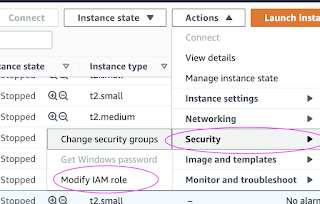


Choose the role you have created from the dropdown.
Select the role and click on Apply.
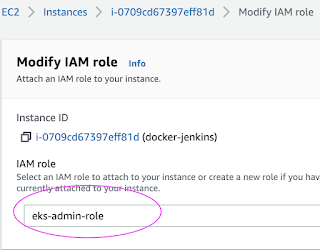
Switch to Jenkins user
sudo su - jenkins

Create EKS Cluster with two worker nodes using eksctl

eksctl create cluster --name demo-eks --region us-east-2 --nodegroup-name my-nodes --node-type t3.small --managed --nodes 2

the above command should create a EKS cluster in AWS, it might take 15 to 20 mins. The eksctl tool uses CloudFormation under the hood, creating one stack for the EKS master control plane and another stack for the worker nodes. 

Once EKS cluster is created, kubeconfig file be created under /var/lib/jenkins/.kube folder.

you can view the kubeconfig file by entering the below command:

cat  /var/lib/jenkins/.kube/config

Connect to EKS cluster using kubectl commands

To view the list of worker nodes as part of EKS cluster.

kubectl get nodes

kubectl get ns

Deploy Nginx on a Kubernetes Cluster
Let us run some apps to make sure they are deployed to Kubernetes cluster. The below command will create deployment:

kubectl create deployment nginx --image=nginx


View Deployments
kubectl get deployments

Delete EKS Cluster using eksctl

eksctl delete cluster --name demo-eks --region us-east-2 

the above command should delete the EKS cluster in AWS, it might take a few mins to clean up the cluster.

Errors during Cluster creation
If you are having issues when creating a cluster, try to delete the cluster by executing the below command and re-create it.

eksctl delete cluster --name demo-eks --region us-east-2 


or Login to AWS console --> AWS Cloud formation --> delete the stack manually.

you can also delete the cluster under AWS console --> Elastic Kubernetes Service --> Clusters
Click on Delete cluster

Wednesday, January 26, 2022

Install Helm 3 Linux - Setup Helm 3 on Linux | Install Helm 3 on Ubuntu | Setup Helm 3 on Linux | Setup Helm 3 on Ubuntu

What is Helm and How to install Helm version 3?

Helm is a package manager for Kubernetes. Helm is the K8s equivalent of yum or apt. It accomplishes the same goals as Linux system package managers like APT or YUM: managing the installation of applications and dependencies behind the scenes and hiding the complexity from the user.

Why use Helm?

As the Kubernetes platform and ecosystem continued to expand, deploying one and only one Kubernetes configuration file (ie: a single YAML) was not the norm anymore. As number of K8S deployment files increased, how to manage those files? Helm solves that problem. 

Watch the steps in YouTube channel

Helm Charts

Helm uses a packaging format called Charts. A Helm Chart is a collection of files that describe a set of Kubernetes resources. Helm Charts helps you define, install, and upgrade even the most complex Kubernetes application. Charts are easy to create, version, share, and publish.


Helm Kubernetes Integration

In helm 3 there is no tiller component. Helm client directly interacts with the Kubernetes API for the helm chart deployment.

Helm 3 can be installed many ways. We will install Helm 3 using scripts option.

Download scripts 
curl -fsSL -o get_helm.sh https://raw.githubusercontent.com/helm/helm/master/scripts/get-helm-3

provide permission
sudo chmod 700 get_helm.sh

Execute script to install
sudo ./get_helm.sh

 
Verify installation
helm version --client


Wednesday, January 19, 2022

Deploy Python App into Kubernetes Cluster using kubectl Jenkins Pipeline | Containerize Python App and Deploy into EKS Cluster | Kubectl Deployment using Jenkins

We will learn how to automate Docker builds using Jenkins and Deploy into Kubernetes Cluster in AWS Cloud. We will use kubectl command to deploy Docker images into EKS cluster. We will use Python based application. I have already created a repo with source code + Dockerfile. The repo also have Jenkinsfile for automating the following:

- Automating builds using Jenkins
- Automating Docker image creation
- Automating Docker image upload into Elastic container registry
- Automating Deployments to Kubernetes Cluster using kubectl CLI plug-in


Pre-requisites:
1. EKS Cluster is setup and running. Click here to learn how to create EKS cluster.
2. Jenkins Master is up and running.
3. Install Docker in Jenkins.
4. Docker, Docker pipeline and Kubectl CLI plug-ins are installed in Jenkins


5. ECR repo created to store docker images.

The Code for this video is here:
and make necessary changes in eks-deploy-from-ecr.yaml file after you fork into your account.

Step #1 - Create Credentials for connecting to EKS cluster using Kubeconfig
Go to Jenkins UI, click on Credentials -->


Click on Global credentials
Click on Add Credentials

use secret file from drop down.

execute the below command to login as jenkins user.
sudo su - jenkins

you should see the nodes running in EKS cluster.

kubectl get nodes


Execute the below command to get kubeconfig info, copy the entire content of the file:
cat /var/lib/jenkins/.kube/config


Open your text editor or notepad, copy and paste the entire content and save in a file.
We will upload this file.

Enter ID as K8S and choose File and upload the file and save.


Step # 2 - Create a pipeline in Jenkins
Create a new pipeline job.


Step # 3 - Copy the pipeline code from below
Make sure you change values as per your settings highlighted in yellow below:

pipeline {
    agent any

    environment {
        registry = "account_id.dkr.ecr.us-east-2.amazonaws.com/my-docker-repo"
    }
    stages {
        stage('checkout') {
            steps {
                checkout([$class: 'GitSCM', branches: [[name: '*/master']], extensions: [], userRemoteConfigs: [[url: 'https://github.com/akannan1087/myPythonDockerRepo']]])
            }
        }
        
        stage ("build image") 
        {
            steps {
                script {
                    dockerImage = docker.build registry
                    }
                }
        }
        
        stage ("upload ECR") {
            steps {
                script {
                    sh "aws ecr get-login-password --region us-east-2 | docker login --username AWS --password-stdin account_id.dkr.ecr.us-east-2.amazonaws.com"
                    sh "docker push account_id.dkr.ecr.us-east-2.amazonaws.com/my-docker-repo:latest"
                }
            }
        }
        
        stage ("Deploy to K8S") {
            steps {
                withKubeConfig(caCertificate: '', clusterName: '', contextName: '', credentialsId: 'K8S', namespace: '', serverUrl: '') {
                      sh 'kubectl apply -f eks-deploy-from-ecr.yaml'
                }
            }
        }
    }    
}

Step # 4 - Build the pipeline


Step # 5 - Verify deployments to EKS

kubectl get pods


kubectl get deployments
kubectl get services


Steps # 6 - Access Python App in K8S cluster
Once deployment is successful, go to browser and enter above load balancer URL 

You should see page like below:


Tuesday, January 11, 2022

Install SonaType Nexus 3 using Docker Compose | Install SonaType Nexus 3 using Docker on Ubuntu 18.0.4 | Install Nexus 3 using Docker-Compose

How to setup SonaType Nexus 3 using Docker compose?

Nexus is open source, binary repository manager and Java based tool. It can be installed quickly using Docker with less manual steps.

Watch Steps in YouTube channel:


Pre-requisites:

  • Ubuntu EC2 up and running with at least t2.medium(4GB RAM), 2GB will not work
  • Port 8081 is opened in security firewall rule

Perform System update
sudo apt-get update

Install Docker
sudo apt-get install docker -y

Install Docker-Compose
sudo apt-get install docker-compose -y

Add current user to Docker group
sudo usermod -aG docker $USER

What is Docker Compose?
Compose is a tool for defining and running multi-container Docker applications. With Compose, you use a YAML file to configure your application’s services. Then, with a single command, you create and start all the services from your configuration.
 
The purpose of docker-compose is to function as docker cli but to issue multiple commands much more quickly. To make use of docker-compose, you need to encode the commands you were running before into a docker-compose.yml file
 
Run docker-compose up and Compose starts and runs your entire app.

Create docker-compose.yml
this yml has all configuration for installing Nexus on Ubuntu EC2.
sudo vi docker-compose.yml 

(Copy the below code high-lighted in yellow color)
version: "3"
services:
  nexus:
    image: sonatype/nexus3
    restart: always
    volumes:
      - "nexus-data:/sonatype-work"
    ports:
      - "8081:8081"

volumes:
  nexus-data: {}

Save the file by entering :wq!

Now execute the compose file using Docker compose command to start Nexus Container
sudo docker-compose up -d 


-d means detached mode

Make sure Nexus 3 is up and running
sudo docker-compose logs --follow


How to get Nexus admin password? sure Nexus 3 is up and running

Once you see the message, that's it. Nexus 3 is been setup successfully. press control C and enter.
Now access Nexus UI by going to browser and enter public dns name with port 8081
Now to go to browser --> http://change to_nexus_publicdns_name:8081

We need to login to docker container to get admin password.
Identify Docker container name
sudo docker ps

Get admin password by executing below command
sudo docker exec -it ubuntu_nexus_1 cat /nexus-data/admin.password


Please follow below steps for integrating Nexus 3 with Jenkins

https://www.cidevops.com/2018/06/jenkins-nexus-integration-how-to.html

How to Stop Nexus Container
sudo docker-compose down


Saturday, January 8, 2022

Top 10 DevOps Popular Tools | Popular DevOps Tools You Must Know In 2022 | Learn DevOps Tools in 2022

Here are the top 10 DevOps Tools to focus on to put your DevOps learning in fast-track and kick start your career quickly as a Cloud or DevOps engineer in about 8 weeks from now.

1.    Terraform # 1 Infrastructure automation tool
2.    Git – BitBucket/GitHub/Azure Git - # 1 - SCM tool
3.    Jenkins, Maven, Master/Slave, Pipelines - scripted, declarative - # 1 CI tool
4.    Docker# 1 Container platform 
5.    Kubernetes # 1 container orchestration tool 
6.    Ansible# 1 Configuration Management tool
7.    Azure DevOps, Pipelines – Microsoft platform for migrating applications to Azure Cloud
8.    SonarQube – # 1 Code quality tool
9.    Slack – # 1 Collaboration tool
10.  Nexus – # 2 Binary repo manager 

Finally having some scripting knowledge is also good – Python, YAML playbooks, JSON script
Cloud experience - AWS and Azure
Watch about each of the above tools in YouTube..

Monday, January 3, 2022

Install SonarQube using Docker | Install SonarQube using Docker on Ubuntu 18.0.4 | Install SonarQube using Docker-Compose

How to setup SonarQube using Docker and Docker compose?

SonarQube is static code analyis tool. It can be installed quickly using Docker with less manual steps.

Pre-requistes:

  • Ubuntu EC2 up and running with at least t2.small
  • Port 9000 is opened in security firewall rule
  • Make sure maximum number of 

sudo vi /etc/sysctl.conf

Add the following lines to the bottom of that file:

vm.max_map_count=262144
fs.file-max=65536

To make sure changes are getting into effect:

sudo sysctl -p

Install Docker
sudo apt-get install docker -y

Install Docker-Compose
sudo apt-get install docker-compose -y

What is Docker Compose?
Compose is a tool for defining and running multi-container Docker applications. With Compose, you use a YAML file to configure your application’s services. Then, with a single command, you create and start all the services from your configuration.
 
The purpose of docker-compose is to function as docker cli but to issue multiple commands much more quickly. To make use of docker-compose, you need to encode the commands you were running before into a docker-compose.yml file
 
Run docker-compose up and Compose starts and runs your entire app.

Create docker-compose.yml
this yml has all configuration for installing both SonarQube and Postgresql:
sudo vi docker-compose.yml 

(Copy the below code high-lighted in yellow color)
version: "3"

services:
  sonarqube:
    image: sonarqube:lts-community
    container_name: sonarqube
    restart: unless-stopped
    environment:
      - SONARQUBE_JDBC_USERNAME=sonar
      - SONARQUBE_JDBC_PASSWORD=password123
      - SONARQUBE_JDBC_URL=jdbc:postgresql://db:5432/sonarqube
    ports:
      - "9000:9000"
      - "9092:9092"
    volumes:
      - sonarqube_conf:/opt/sonarqube/conf
      - sonarqube_data:/opt/sonarqube/data
      - sonarqube_extensions:/opt/sonarqube/extensions
      - sonarqube_bundled-plugins:/opt/sonarqube/lib/bundled-plugins

  db:
    image: postgres:12
    container_name: db
    restart: unless-stopped
    environment:
      - POSTGRES_USER=sonar
      - POSTGRES_PASSWORD=password123
      - POSTGRES_DB=sonarqube
    volumes:
      - sonarqube_db:/var/lib/postgresql10
      - postgresql_data:/var/lib/postgresql10/data

volumes:
  postgresql_data:
  sonarqube_bundled-plugins:
  sonarqube_conf:
  sonarqube_data:
  sonarqube_db:
  sonarqube_extensions:

Save the file by entering :wq!

Now execute the compose file using Docker compose command:
sudo docker-compose up -d 


If you are getting any errors like this, make sure you exit below commands to adding Docker group to current user.

sudo usermod -aG docker $USER

Make sure SonarQube is up and running
sudo docker-compose logs --follow


Once you see the message, that's it. SonarQube is been installed successfully. press control C and enter.
Now access sonarQube UI by going to browser and enter public dns name with port 9000

Please follow steps for integrating SonarQube with Jenkins
https://www.coachdevops.com/2020/04/how-to-integrate-sonarqube-with-jenkins.html




