Thursday, July 23, 2020

Automate Docker builds using Jenkins Pipelines | Dockerize Python App | Upload Docker Images into AWS ECR

We will learn how to automate Docker builds using Jenkins. We will use Python based application. I have already created a repo with source code + Dockerfile. We will see how to create Docker image and upload into AWS ECR successfully. We will not be using AWS access keys to upload image into ECR, we will be using IAM role and attach to Jenkins instance to access ECR.

- Automating builds
- Automating Docker image builds
- Automating Docker image upload into AWS ECR
- Automating Docker container provisioning
 
Watch here for YouTube channel:
 
Pre-requisites:

1. Jenkins is up and running
2. Docker installed on Jenkins instance. Click here to for integrating Docker and Jenkins
3. Docker and Docker pipelines plug-in are installed
4. Repo created in ECR, Click here to know how to do that.
5. Make sure port 8096 is opened up in firewall rules. 
6. Create an IAM role with AmazonEC2ContainerRegistryFullAccess policy, attach role to Jenkins EC2 instance
7. Make sure AWS cli is installed in Jenkins instance.

Code for this video is here:
and make changes in the pipeline accordingly.

Step # 1 - Create a pipeline in Jenkins, name can be anything

Step # 2 - Copy the pipeline code from below
Make sure you change red highlighted values below:
Your account_d should be updated and repo should be updated.

pipeline {
    agent any
    environment {
        registry = "acct_id.dkr.ecr.
us-east-1.amazonaws.com/your_ecr_repo"
    }
   
    stages {
        stage('Cloning Git') {
            steps {
                checkout([$class: 'GitSCM', branches: [[name: '*/master']], doGenerateSubmoduleConfigurations: false, extensions: [], submoduleCfg: [], userRemoteConfigs: [[credentialsId: '', url: '
https://github.com/akannan1087/myPythonDockerRepo']]])     
            }
        }
  
    // Building Docker images
    stage('Building image') {
      steps{
        script {
          dockerImage = docker.build registry
        }
      }
    }
   
    // Uploading Docker images into AWS ECR
    stage('Pushing to ECR') {
     steps{  
         script {
                sh 'aws ecr get-login-password --region
us-east-1 | docker login --username AWS --password-stdin acct_id.dkr.ecr.us-east-1.amazonaws.com'
                sh 'docker push
acct_id.dkr.ecr.us-east-1.amazonaws.com/your_ecr_repo:latest'
         }
        }
      }
   
         // Stopping Docker containers for cleaner Docker run
     stage('stop previous containers') {
         steps {
            sh 'docker ps -f name=mypythonContainer -q | xargs --no-run-if-empty docker container stop'
            sh 'docker container ls -a -fname=mypythonContainer -q | xargs -r docker container rm'
         }
       }
      
    stage('Docker Run') {
     steps{
         script {
                sh 'docker run -d -p 8096:5000 --rm --name mypythonContainer
acct_id.dkr.ecr.us-east-1.amazonaws.com/your_ecr_repo:latest'
            }
      }
    }
    }
}

Step # 3 - Click on Build - Build the pipeline
Once you create the pipeline and changes values per your ECR account ID, click on Build now.
Steps # 4 - Check Docker images are uploaded into ECR
Login to ECR, click on your repo, now you should see the image got uploaded.


Steps # 5 - Access PythonApp in the browser which is running inside docker container
Once build is successful, go to browser and enter http://public_dns_name:8096
You should see page like below:


Sunday, July 12, 2020

How to create an Elastic IP Address in AWS and assign to your EC2 instance | Associate Elastic IP address to EC2 instance

Elastic IP address is static IP address provided by AWS, you should avoid using public ip address as it changes every stop/start of EC2 instance.
How to create Elastic IP address:

Go to AWS console, Click on EC2, Elastic IPs.

Click on Allocate Elastic IP address


Now it should create Elastic IP address.


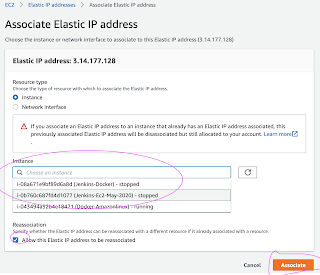
Click on Actions, Associate Elastic IP address and choose your instance from Instances textbox and pick up the Private ip address automatically.

That's it! Elastic IP(static) address have been assigned to your EC2 instance.

How to clean workspace after Jenkins Build - Clean up workspace after every build

You can clean workspace using Workspace cleanup plugin in Jenkins after builds executions.

Install workspace clean up Plug-in

Free Style Job Workspace - cleanup

Go to your existing freestyle job, click on Post-Build actions --> Select Delete workspace when build is done option.

Now run the job. You should be able to see workspace is cleaned up after build is done inside Jenkins node. You will not see any folder with job name, in Ubuntu usually under /var/lib/jenkins/workspace/

Pipeline Job Workspace - cleanup code

Go to your existing pipeline job, you can code something like this below:
pipeline {
    agent any
     tools {
        maven 'Maven3'
    }
    stages {
        stage ("checkout")  {
            steps {
            checkout logic here
            }
        }
    stage ('build')  {
        steps {
            sh "mvn clean install -f MyWebApp/pom.xml"
        }
     }
    }

/*** workspace clean up*/
    post {
        always {
            cleanWs()
        }
    }   

 }

Watch this on YouTube video:

Monday, June 22, 2020

How to setup Kubernetes Cluster in Ubuntu | Install Kubernetes Cluster in Ubuntu | Setup Master Node and one worker Node in AWS

Kubernetes  is an open source container platform that eliminates many of the manual processes involved in deploying and scaling containerized applications. We will learn how to setup Kubernetes Cluster in Ubuntu 18.0.4. You can setup Kubernetes Cluster in many ways. One of the ways is to use Kubeadm. 

Kubeadm is a tool built to provide kubeadm init and kubeadm join as best-practice “fast paths” for creating Kubernetes clusters.

Pre-Requistes:

1. Ubuntu instance with 4 GM RAM - Master Node - (with port open to all traffic
2. Ubuntu instance with at least 2 GM RAM - Worker Node - (with ports open to all traffic)

Kubernetes Setup using Kubeadm

###Start - Execute the below commands in both Master/worker nodes##########

Login to both instances execute the below commands:
sudo apt-get update -y  && sudo apt-get install apt-transport-https -y

Change to root user
sudo su -
sudo curl -s https://packages.cloud.google.com/apt/doc/apt-key.gpg | apt-key add -

cat <<EOF >/etc/apt/sources.list.d/kubernetes.list
deb https://apt.kubernetes.io/ kubernetes-xenial main
EOF


sudo apt-get update


#Disable swap memory
swapoff -a
sudo sed -i '/ swap / s/^\(.*\)$/#\1/g' /etc/fstab

Enable IP tables
#We need to enable IT tables for pod to pod communication.
modprobe br_netfilter
sysctl -p
sudo sysctl net.bridge.bridge-nf-call-iptables=1


Install Docker on both Master and Worker nodes
apt-get install docker.io -y

Add ubuntu user to Docker group
usermod -aG docker ubuntu
systemctl restart docker
systemctl enable docker.service


Install Kubernetes Modules
sudo apt-get install -y kubelet kubeadm kubectl kubernetes-cni

sudo systemctl daemon-reload
sudo systemctl start kubelet
sudo systemctl enable kubelet.service
sudo systemctl status docker
#End - Execute the above commands in both Master/worker nodes##########

Initialize Kubeadm on Master Node(only on Master Node)

#Execute the below command as root user
sudo su -
kubeadm init

#exit from root user and execute as normal user

mkdir -p $HOME/.kube
sudo cp -i /etc/kubernetes/admin.conf $HOME/.kube/config
sudo chown $(id -u):$(id -g) $HOME/.kube/config

Installing the Weave Net Add-On
kubectl apply -f "https://cloud.weave.works/k8s/net?k8s-version=$(kubectl version | base64 | tr -d '\n')"
It make take a few mins to execute the above command

You will get below messages.
serviceaccount "weave-net" created
clusterrole "weave-net" created
clusterrolebinding "weave-net" created
role "weave-net" created
rolebinding "weave-net" created
daemonset "weave-net" created

Now execute the below command to see the pods.

kubectl get pods  --all-namespaces


Now login to Worker Node

Join worker node to Master Node
The below command will join worker node to master node.
sudo kubeadm join <master_node_ip>:6443 --token xrvked.s0n9771cd9x8a9oc \
    --discovery-token-ca-cert-hash sha256:288084720b5aad132787665cb73b9c530763cd1cba10e12574b4e97452137b4a


Go to Master and type the below command
kubectl get nodes
the above command should display both Master and worker nodes.


It means Kubernetes Cluster - both Master and worker nodes are setup successfully and up and running!!!

Deploy Nginx on a Kubernetes Cluster
Let us run some apps to make sure they are deployed to Kuberneter cluster. We will do this in master node. The below command will create deployment:

kubectl create deployment nginx --image=nginx

View Deployments
kubectl get deployments
Create as a service 
kubectl create service nodeport nginx --tcp=80:80
kubectl get svc
run the above command to see a summary of the service and the ports exposed.

Now go Master or worker node, enter public dns and access it with port exposed
You should see the welcome page!


Friday, June 19, 2020

Install Helm 2 on Linux - Setup Helm 2 on Linux | Install Helm 2 on Ubuntu | Setup Helm 2 on Linux

Helm is package manager for Kubernetes. Helm helps you manage Kubernetes applications. Helm Charts helps you define, install, and upgrade even the most complex Kubernetes application. Charts are easy to create, version, share, and publish.

Helm is made of two components: the CLI binary named helm that allows you to perform communication with a remote component, named tiller that lives inside your Kubernetes cluster that is responsible to perform patches and changes to resources you ask to manage. 

Helm can be installed by below way:

Download installables
sudo curl -LO https://git.io/get_helm.sh
provide permission
sudo chmod 700 get_helm.sh

Execute script to install 
sudo ./get_helm.sh

 
Verify installation

helm version --client

 
Tiller
Tiller is the service that actually communicates with the Kubernetes API to manage our Helm packages.
 
cat <<EOF > tiller-rbac-config.yaml
apiVersion: v1
kind: ServiceAccount
metadata:
  name: tiller
  namespace: kube-system
---
apiVersion: rbac.authorization.k8s.io/v1beta1
kind: ClusterRoleBinding
metadata:
  name: tiller
roleRef:
  apiGroup: rbac.authorization.k8s.io
  kind: ClusterRole
  name: cluster-admin
subjects:
  - kind: ServiceAccount
    name: tiller
    namespace: kube-system
EOF
 
Apply the RBAC configuration for Tiller via a kubectl command: 
kubectl create -f tiller-rbac-config.yaml 

Initialize Tiller
helm init --service-account tiller

Thursday, June 18, 2020

Install AWS CLI 2 on Red Hat Linux

curl "https://awscli.amazonaws.com/awscli-exe-linux-x86_64.zip" -o "awscliv2.zip"
unzip awscliv2.zip
sudo ./aws/install