Thursday, April 16, 2020

How to setup SonaType Nexus 3 on Redhat Enterprise Linux in EC2? Nexus installation on RedHat Linux - Install Nexus on RedHat Linux

Nexus is binary repository manager, used for storing build artifacts. We will eventually integrate Nexus with Jenkins for uploading WAR/EAR/JAR files there.

Here are the steps for installing Sonatype Nexus 3 in RHEL in EC2 on AWS. Please create a new Redhat EC2 instance with small type. Choose Redhat Enterprise 8.


Pre-requisites:
Make sure you open port 8081 in AWS security group

Installation Steps:

sudo yum install wget -y


Download Open JDK
sudo yum install java-1.8.0-openjdk.x86_64 -y

Execute the below command to navigate to /opt directory by changing directory:
cd /opt

Download Nexus
sudo wget http://download.sonatype.com/nexus/3/nexus-3.23.0-03-unix.tar.gz

Extract Nexus
sudo tar -xvf nexus-3.23.0-03-unix.tar.gz
sudo mv nexus-3.23.0-03 nexus

Create a user called Nexus
sudo adduser nexus

Change the ownership of nexus files and nexus data directory to nexus user.
sudo chown -R nexus:nexus /opt/nexus
sudo chown -R nexus:nexus /opt/sonatype-work

Configure to run as Nexus user
change as below screenshot by removing # and adding nexus
 sudo vi /opt/nexus/bin/nexus.rc

Modify memory settings in Nexus configuration file
sudo vi /opt/nexus/bin/nexus.vmoptions

Modify the above file as shown in red highlighted section:


-Xms512m
-Xmx512m
-XX:MaxDirectMemorySize=512m
after making changes, press wq! to come out of the file.

Configure Nexus to run as a service

sudo vi /etc/systemd/system/nexus.service
Copy the below content highlighted in green color.

[Unit]
Description=nexus service
After=network.target
[Service]
Type=forking
LimitNOFILE=65536
User=nexus
Group=nexus
ExecStart=/opt/nexus/bin/nexus start
ExecStop=/opt/nexus/bin/nexus stop
User=nexus
Restart=on-abort
[Install]
WantedBy=multi-user.target

Create a link to Nexus
sudo ln -s /opt/nexus/bin/nexus /etc/init.d/nexus

Execute the following command to add nexus service to boot.

sudo chkconfig --add nexus
sudo chkconfig --levels 345 nexus on

Start Nexus
sudo service nexus start


Check whether Nexus service is running
sudo service nexus status

Check the logs to see if Nexus is running
tail -f /opt/sonatype-work/nexus3/log/nexus.log

You will see Nexus started..
If you Nexus stopped, review the steps above.

Now press Ctrl C to come out of this windows.

Once Nexus is successfully installed, you can access it in the browser by URL - http://public_dns_name:8081

Click on Sign in link
user name is admin and password can be found by executing below command:

sudo cat /opt/sonatype-work/nexus3/admin.password


Copy the password and click sign in.
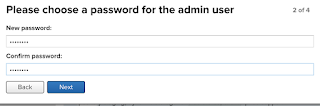
Now setup admin password as admin123

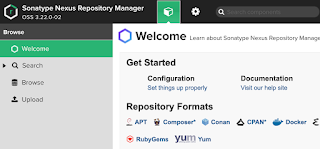
you should see the home page of Nexus:


Please follow steps for integrating Nexus with Jenkins

Please watch my YouTube channel on demo on How to setup Nexus 3 on Red Hat Linux in AWS:

Install SonaType Nexus 3 on Ubuntu 16.0.4 | How to configure SonaType Nexus 3 on Ubuntu | Install Nexus 3 on Ubuntu

How to setup SonaType Nexus3 on Ubuntu:

SonaType Nexus3 is one of the popular binary repository managers, used for storing build artifacts such as Jars,WARs, EARs. SonaType Nexus3 is java based application. 

Java

sudo apt-get update

Java 8 installation
sudo apt install openjdk-8-jre-headless -y

Note: Nexus is not compatible with Java 11 in Ubuntu 18.0.4. So we need to install Java 8.

Execute the below commands -  navigate to /opt directory by changing directory:
cd /opt

Download Nexus
sudo wget http://download.sonatype.com/nexus/3/nexus-3.26.1-02-unix.tar.gz

Extract Nexus
sudo tar -xvf nexus-3.26.1-02-unix.tar.gz
sudo mv nexus-3.26.1-02 nexus

Create a user called Nexus
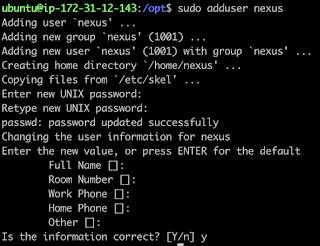
sudo adduser nexus
give some password may be as admin, but do remember.
Keep entering enter for all other values and press y to confirm the entries.

Give permission to Nexus user  
sudo chown -R nexus:nexus /opt/nexus
sudo chown -R nexus:nexus /opt/sonatype-work

sudo vi /opt/nexus/bin/nexus.rc
change run_as_user="nexus"

Modify memory settings
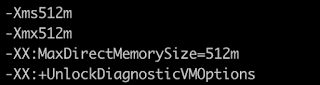
sudo vi /opt/nexus/bin/nexus.vmoptions
Add all the below changes the file with below yellow highlighted entry:

Configure Nexus to run as a service
sudo vi /etc/systemd/system/nexus.service
Copy the below content highlighted in green color.

[Unit]
Description=nexus service
After=network.target

[Service]
Type=forking
LimitNOFILE=65536
User=nexus
Group=nexus
ExecStart=/opt/nexus/bin/nexus start
ExecStop=/opt/nexus/bin/nexus stop
User=nexus
Restart=on-abort

[Install]
WantedBy=multi-user.target


Now Start Nexus
sudo systemctl enable nexus
sudo systemctl start nexus 
sudo systemctl status nexus 

If it says stopped, review the steps above and you can troubleshoot by looking into Nexus logs by executing below command:

tail -f /opt/sonatype-work/nexus3/log/nexus.log

It should say Nexus is running..If you see Nexus stopped message, review the steps above.
Press control C to come out of the above window. 

Once Nexus is successfully installed, you can access it in the browser by 


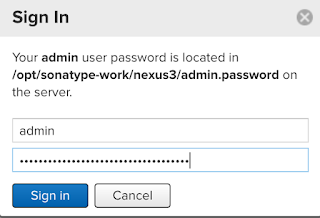
Now click on Sign in, enter admin as user name and password by executing below cat command.


cat /opt/sonatype-work/nexus3/admin.password
Now change admin password as admin123


Now click next, do not check Enable anonymous access.

Click Finish.

Now login with user name/password is admin/admin123

Please follow steps for integrating Nexus with Jenkins

Tuesday, April 14, 2020

How to install Puppet on Ubuntu 16.0.4 - How to configure Puppet Master

Puppet is an Infrastructure provisioning tool, similar to Ansible, Chef. We will see how to create EC2 instances in AWS using Puppet in this article.


Pre-requistes:
install puppet master on new Ubuntu with medium instance
port 8140 needs to be opened.

Steps:
First let us how to install Puppet on your Ubuntu machine.

Steps for Puppet Master
 Installation

1. Download puppet installable

curl -O https://apt.puppetlabs.com/puppetlabs-release-pc1-xenial.deb
sudo dpkg -i puppetlabs-release-pc1-xenial.deb
sudo apt-get update
sudo apt-get install puppetserver -y

sudo ufw allow 8140
sudo systemctl enable puppetserver
 

(the above command is to start the service during starting the Ubuntu instance)

sudo systemctl start puppetserver          

(The above command is for starting the server and this may take some time)
sudo systemctl status puppetserver 

       you should see a message like
       puppet systemd[1]: Started puppetserver Service.
    
That's it puppet master is up and running.

Now press q to come out of window.


This confirms that Puppet Master is installed successfully.

2. you need to install the aws-sdk-core and retries gems as root (or superuser):
sudo /opt/puppetlabs/puppet/bin/gem install aws-sdk-core retries
Done installing documentation for retries after 0 seconds
6 gems installed
3. Also install AWS SDK

sudo /opt/puppetlabs/puppet/bin/gem install aws-sdk retries

(The above command may take 3 to 5 mins to get gems installed)


4. Now you can install puppet-labs-aws module 
sudo /opt/puppetlabs/bin/puppet module install puppetlabs-aws

That's it. Puppet Master is setup successfully!!!!

Wednesday, April 8, 2020

Top 10 DevOps Popular Tools | Popular DevOps Tools You Must Know In 2023 | Learn DevOps Tools in 2023

Here are the top 10 DevOps Tools to focus on to put your DevOps learning in fast-track and kick start your career quickly as a Cloud or DevOps engineer in about 8 weeks from now.

1.    Terraform # 1 Infrastructure automation tool
2.    Git – BitBucket/GitHub/Azure Git - # 1 - SCM tool
3.    Jenkins - Create CICD Pipelines - scripted, declarative - # 1 CI tool
4.    Ansible- # 1 Configuration Management tool
5.    Docker- # 1 Container platform 
6.    Kubernetes # 1 container orchestration tool 
7.    Azure DevOps, Pipelines – provides platform for migrating applications to Azure Cloud
8.    SonarQube# 1 Code quality tool
9.    Slack# 1 Collaboration tool
10.  Nexus# 2 Binary repo manager 

Finally having some scripting knowledge is also good – Python, YAML playbooks, JSON script
Cloud experience - AWS and Azure
Watch about each of the above tools in YouTube..

Tuesday, April 7, 2020

Setup SonarQube Server on Azure VM | Install SonarQube Server on Ubuntu VM in Azure Cloud

Please find steps for installing SonarQube on a Ubuntu VM running in Azure Cloud. SonarQube is open source, Java based tool along with backend, Database can be MySQL, Oracle or PostgreSQL. We will use PostgreSQL which is open source for database with SonarQube installation.

Pre-requistes:
Make sure port 9000 is opened as port 9000 is default port for SonarQube.
Ubuntu 16.0.4 instance at least 2 GM RAM

How to open port 9000 in Azure VM?

1. Select VM, under Settings--> choose Network


2. Click on Add inbound security role

 
3. Make sure you add entries like below: 
9000 as Destination port ranges
TCP as protocol
310 as priority number
port_9000 as Name

 4. Click on Add, once you add it should be like below:


Let us start with java installation on Azure VM.

1. Java 8 Installation steps

sudo apt-get update && sudo apt-get install default-jdk -y


2. PostgreSQL Installation

PostgreSQL is a popular open source database tool.

sudo sh -c 'echo "deb http://apt.postgresql.org/pub/repos/apt/ `lsb_release -cs`-pgdg main" >> /etc/apt/sources.list.d/pgdg.list'


sudo wget -q https://www.postgresql.org/media/keys/ACCC4CF8.asc -O - | sudo apt-key add -


sudo apt-get -y install postgresql postgresql-contrib


sudo systemctl start postgresql
sudo systemctl enable postgresql
Login as postgres user now
sudo su - postgres

Now create a user below
createuser sonar

Switch to sql shell by entering
psql


Execute the below three lines (one by one)

ALTER USER sonar WITH ENCRYPTED password 'password';

CREATE DATABASE sonar OWNER sonar;

\q 
to come out of PSQL.


type exit to come out of postgres user.


3. Now install SonarQube Web App

sudo wget https://binaries.sonarsource.com/Distribution/sonarqube/sonarqube-6.4.zip

Extract SonarQube Zip file
sudo apt-get -y install unzip
sudo unzip sonarqube-6.4.zip -d /opt


Re-name the folder
sudo mv /opt/sonarqube-6.4 /opt/sonarqube -v


Modify Sonar configuration file

sudo vi /opt/sonarqube/conf/sonar.properties
uncomment the below lines by removing # and add values highlighted yellow
sonar.jdbc.username=sonar
sonar.jdbc.password=password

Next, Add the below line for PostgreSQL
sonar.jdbc.url=jdbc:postgresql://localhost/sonar

Now press escape, and enter :wq! to come out of the above screen.


Create Sonar as a service
Execute the below command (and add the below code in green color)
sudo vi /etc/systemd/system/sonar.service


[Unit]
Description=SonarQube service
After=syslog.target network.target

[Service]
Type=forking

ExecStart=/opt/sonarqube/bin/l
inux-x86-64/sonar.sh start
ExecStop=/opt/sonarqube/bin/li
nux-x86-64/sonar.sh stop

User=root
Group=root
Restart=always

[Install]
WantedBy=multi-user.target

Once copied, enter :wq! and enter to come out of the screen.

Now perform the below commands

sudo systemctl enable sonar
sudo systemctl start sonar
sudo systemctl status sonar
type q now to come out of this mode.
Now execute the below command to see if Sonarqube is up and running. This may take a few minutes.

tail -f /opt/sonarqube/logs/sonar.log

Press Contrl-C to come out of the above window.
Make sure you get the below message that says Sonarqube is up..


Access SonarQube UI by going to browser and enter public_ip_address with port 9000
You should be able to login to SonarQube using default credentials -->  admin/admin

Friday, April 3, 2020

How to install Ansible on Mac OS | Ansible Installation Steps on Apple Mac OS

Ansible is one of the popular configuration management tools. Ansible can also be used for infrastructure provisioning as well in AWS. Please find steps for installing Ansible on Apple Mac OS or laptop.

Ansible can be installed on Mac OS many ways, but preferred way is using pip which is a Python package manager.

Install Pip

If pip isn’t already available on your system of Python, run the following commands to install it:
curl https://bootstrap.pypa.io/get-pip.py -o get-pip.py

sudo python3 get-pip.py --user
pip3 --version

Install Ansible using Pip

sudo pip3 install ansible --user
Once Ansible is installed, you can verify the version.

ansible --version
You should be able to see the version.

ansible 2.10.5

Install Boto framework
pip3 install boto --user
pip3 install boto3 --user
 
Create Ansible hosts file
when you install Ansible on Mac OS, it does not create ansible hosts file. so you need to create it.
sudo mkdir /etc/ansible