Friday, May 8, 2020

Install Jenkins Master using Docker | Install Jenkins using Docker | Install Jenkins using Docker-Compose

Jenkins is a popular continuous integration tool. It can be installed quickly using Docker with less manual steps.

How to setup Jenkins using Docker and Docker compose

Pre-requistes:
8080 is opened security firewall rules

Install Docker
sudo apt-get install docker.io -y

Install Docker-Compose
sudo apt-get install docker-compose -y 

Add Docker group to user 
sudo usermod -aG docker $USER

Now logout and login again.

Create docker-compose.yml
sudo vi docker-compose.yml

version: '3.1'
services:
    jenkins:
        container_name: jenkins
        ports:
            - '8080:8080'
            - '50000:50000'
        image: jenkins/jenkins:lts
        restart: always
        environment:
            - 'JENKINS_URL=http://jenkins:8080'
        volumes:
            - /var/run/docker.sock:/var/run/docker.sock  # Expose the docker daemon in the container
            - /home/jenkins:/home/jenkins # Avoid mysql volume mount issue
Save the file by entering :wq!
Now execute the compose file using Docker compose command:
docker-compose up -d

If you are getting any errors like this, make sure you execute below commands to adding Docker group to current user.

sudo usermod -aG docker $USER

Make sure Jenkins is up and running
sudo docker-compose logs

Once you see the message, that's it. Jenkins has been installed successfully.
Now access Jenkins UI by going to browser and enter public dns name with port 8080
Now to go to browser --> http://your_Jenkins_publicdns_name:8080
You can copy the password from above command.

Thursday, May 7, 2020

Jenkins Scripted Pipeline - Create Jenkins Pipeline for Automating Builds, Code quality checks, Deployments to Tomcat - How to build, deploy WARs using Jenkins Pipeline - Build pipelines integrate with GitHub, Sonarqube, Slack, JaCoCo, Artifactory, Tomcat

Please find below steps for creating pipelines using Jenkins.


- Pipelines are better than freestyle jobs, you can write a lot of complex tasks using pipelines when compared to Freestyle jobs.
- You can see how long each stage takes time to execute so you have more control compared to freestyle.
- Pipeline is groovy based script that have set of plug-ins integrated for automating the builds, deployment and test execution.
- Pipeline defines your entire build process, which typically includes stages for building an application, testing it and then delivering it. 
 - You can use snippet generator to generate pipeline code for the stages you don't know how to write groovy code.
- Pipelines are two types - Scripted pipeline and Declarative pipeline

Pre-requistes:


Install plug-ins
1. Install Deploy to container, Slack, Jacoco, Artifactory and SonarQube plug-ins (if already installed, you can skip it)

Steps to Create Scripted Pipeline in Jenkins

1. Login to Jenkins

2. Create a New item

3. Give name as MyfirstPipelineJob and choose pipeline

4. Click ok. Pipeline is created now

5. Under build triggers, click on poll SCM, schedule as

H/02 * * * *

6. Go to Pipeline definition section, click on Pipeline syntax link. under sample step drop down, choose checkout: Checkout from version control. enter bitbucket Repository URL, and choose the bitbucket user/password from the drop town. scroll down, click on Generate Pipeline script. Copy the code.
7. Now copy the below pipeline code highlighted section into Pipeline section in the pipeline. Please copy stage by stage
8. Change Maven3, SonarQube variables and also Slack channel name as highlighted above in red as per your settings.
9. For Dev Deploy stage, you can copy credentials ID used for connecting to Tomcat.


Pipeline Code:

node {

    def mvnHome = tool 'Maven3'
    stage ("checkout")  {
       // copy code here which you generated from step #6
    }

   stage ('build')  {
    sh "${mvnHome}/bin/mvn clean install -f MyWebApp/pom.xml"
    }

     stage ('Code Quality scan')  {
       withSonarQubeEnv('SonarQube') {
       sh "${mvnHome}/bin/mvn -f MyWebApp/pom.xml sonar:sonar"
        }
   }
  
   stage ('Code coverage')  {
       jacoco()
   }

   stage ('Artifactory Upload') {
          server = Artifactory.server('My_Artifactory')
          rtMaven = Artifactory.newMavenBuild()
          rtMaven.tool = 'Maven3'
          rtMaven.deployer releaseRepo: 'libs-release-local', snapshotRepo: 'libs-snapshot-local', server: server
          rtMaven.resolver releaseRepo: 'libs-release', snapshotRepo: 'libs-snapshot', server: server
          rtMaven.deployer.deployArtifacts = false // Disable artifacts deployment during Maven run
          buildInfo = Artifactory.newBuildInfo()
          rtMaven.run pom: 'MyWebApp/pom.xml', goals: 'install', buildInfo: buildInfo
          rtMaven.deployer.deployArtifacts buildInfo
          server.publishBuildInfo buildInfo
         
      }   
   stage ('DEV Deploy')  {
      echo "deploying to DEV Env "
      deploy adapters: [tomcat8(credentialsId: '4c55fae1-a02d-4b82-ba34-d262176eeb46', path: '', url: 'http://localhost:8090')], contextPath: null, war: '**/*.war'

    }

   stage ('DEV Approve')  {
            echo "Taking approval from DEV Manager"     
            timeout(time: 7, unit: 'DAYS') {
            input message: 'Do you want to deploy?', submitter: 'admin'
            }
     }

  stage ('Slack notification')  {
    slackSend(channel:'channel-name', message: "Job is successful, here is the info -  Job '${env.JOB_NAME} [${env.BUILD_NUMBER}]' (${env.BUILD_URL})")
   }


stage ('QA Deploy')  {
     echo "deploying to QA Env " 
deploy adapters: [tomcat8(credentialsId: '4c55fae1-a02d-4b82-ba34-d262176eeb46', path: '', url: 'http://localhost:8090')], contextPath: null, war: '**/*.war'

}

stage ('QA Approve')  {
    echo "Taking approval from QA manager"
    timeout(time: 7, unit: 'DAYS') {
        input message: 'Do you want to proceed to PROD?', submitter: 'admin,manager_userid'
  }
}
}

11. Click Apply, Save
12. Now click on Build. It should execute all the stages and show pipeline view like this.


Install SonarQube using Docker | Install SonarQube using Docker on Ubuntu 18.0.4 | Install SonarQube using Docker-Compose

SonarQube is code quality tool. It can be installed quickly using Docker with less manual steps.

How to setup Sonarqube using Docker and Docker compose?

Pre-requisites:
9000 is opened security firewall rules

Install Docker
sudo apt-get install docker -y

Install Docker-Compose
sudo apt-get install docker-compose -y

What is Docker Compose?
Compose is a tool for defining and running multi-container Docker applications. With Compose, you use a YAML file to configure your application’s services. Then, with a single command, you create and start all the services from your configuration.
 
The purpose of docker-compose is to function as docker cli but to issue multiple commands much more quickly. To make use of docker-compose, you need to encode the commands you were running before into a docker-compose.yml file
 
Run docker-compose up and Compose starts and runs your entire app.

Create docker-compose.yml
this yml has all configuration for installing both SonarQube and Postgresql:
sudo vi docker-compose.yml 

(Copy the below code high-lighted in yellow color)
version: "3"

services:
  sonarqube:
    image: sonarqube:6.7.1
    container_name: sonarqube
    restart: unless-stopped
    environment:
      - SONARQUBE_JDBC_USERNAME=sonar
      - SONARQUBE_JDBC_PASSWORD=password123
      - SONARQUBE_JDBC_URL=jdbc:postgresql://db:5432/sonarqube
    ports:
      - "9000:9000"
      - "9092:9092"
    volumes:
      - sonarqube_conf:/opt/sonarqube/conf
      - sonarqube_data:/opt/sonarqube/data
      - sonarqube_extensions:/opt/sonarqube/extensions
      - sonarqube_bundled-plugins:/opt/sonarqube/lib/bundled-plugins

  db:
    image: postgres:10.1
    container_name: db
    restart: unless-stopped
    environment:
      - POSTGRES_USER=sonar
      - POSTGRES_PASSWORD=password123
      - POSTGRES_DB=sonarqube
    volumes:
      - sonarqube_db:/var/lib/postgresql10
      - postgresql_data:/var/lib/postgresql10/data

volumes:
  postgresql_data:
  sonarqube_bundled-plugins:
  sonarqube_conf:
  sonarqube_data:
  sonarqube_db:
  sonarqube_extensions:

Save the file by entering :wq!

Now execute the compose file using Docker compose command:
sudo docker-compose up -d 


If you are getting any errors like this, make sure you exit below commands to adding Docker group to current user.

sudo usermod -aG docker $USER

Make sure SonarQube is up and running
sudo docker-compose logs

Once you see the message, that's it. SonarQube is been installed successfully.
Now access sonarQube UI by going to browser and enter public dns name with port 9000

Please follow steps for integrating SonarQube with Jenkins
https://www.coachdevops.com/2020/04/how-to-integrate-sonarqube-with-jenkins.html

Tuesday, May 5, 2020

How to Deactivate a Rule in SonarQube | Deactivate a rule in Sonarqube community edition

How to deactivate a rule in SonarQube Ruleset in Sonarqube 7.7 version. You can not deactivate a rule in built-in profile. You need to have your own profile by copying from built-in profile and then you can activate/deactive/customize rules at will.


Create a custom profile by copying from built-in profile


Give some name

 Once you created click on Total rules 379 under Active

Now you can deactivate rule in SonarQube


Once you created custom profile, make sure you associate profile with your project or set as default.

How to install SonarQube on Ubuntu | Install Sonarqube 7.7 on Ubuntu 18.0.4 with PostgreSQL

SonarQube is one of the popular static code analysis tools. SonarQube is open-source, java based tool It also needs database as well - Database can be MySQL, Oracle or PostgreSQL.  We will use PostgreSQL as it is open source as well.

Please find steps for installing SonarQube 7.7 on Ubuntu 18.0.4. Make sure port 9000 is opened in security group(firewall rule).

Pre-requistes:
  • Instance should have at least 2 GB RAM. For AWS, instance should new and type should be t2.small
  • Make sure port 9000 is opened in security group(firewall rule).
Java 11 installation steps
sudo apt-get update && sudo apt-get install default-jdk -y

2. PostgreSQL Installation

sudo sh -c 'echo "deb http://apt.postgresql.org/pub/repos/apt/ `lsb_release -cs`-pgdg main" >> /etc/apt/sources.list.d/pgdg.list'

sudo wget -q https://www.postgresql.org/media/keys/ACCC4CF8.asc -O - | sudo apt-key add -


sudo apt-get -y install postgresql postgresql-contrib
Ignore the message in red color below:

Start PostGresSQL

sudo systemctl start postgresql
sudo systemctl enable postgresql

Login as postgres user

sudo su - postgres


Now create a sonar user below

createuser sonar


9. Switch to sql shell by entering
psql


Setup user name and password in Postgresql

Execute the below three lines (one by one)
ALTER USER sonar WITH ENCRYPTED password 'password';
CREATE DATABASE sonarqube OWNER sonar;
\q


type exit to come out of postgres user.


3. Now install SonarQube Web App
sudo wget https://binaries.sonarsource.com/Distribution/sonarqube/sonarqube-7.7.zip


sudo apt-get -y install unzip
sudo unzip sonarqube-7.7.zip -d /opt


sudo mv /opt/sonarqube-7.7 /opt/sonarqube -v


Create Group and User:
sudo groupadd sonarGroup

Now add the user with directory access
sudo useradd -c "user to run SonarQube" -d /opt/sonarqube -g sonarGroup sonar
sudo chown sonar:sonarGroup /opt/sonarqube -R

Modify sonar.properties file
sudo vi /opt/sonarqube/conf/sonar.properties
uncomment the below lines by removing # and add values highlighted yellow
sonar.jdbc.username=sonar
sonar.jdbc.password=password


Next, add the below line:
sonar.jdbc.url=jdbc:postgresql://localhost/sonarqube

Press escape, and enter :wq! to come out of the above screen.

Edit the sonar script file and set RUN_AS_USER
sudo vi /opt/sonarqube/bin/linux-x86-64/sonar.sh
(Scroll down by using down arrow button)

#enable the below line  by removing #

RUN_AS_USER=sonar


Create Sonar as a service
Execute the below command:
sudo vi /etc/systemd/system/sonar.service


add the below code in green color, please press insert button before you copy and paste.
[Unit]
Description=SonarQube service
After=syslog.target network.target

[Service]
Type=forking

ExecStart=/opt/sonarqube/bin/l
inux-x86-64/sonar.sh start
ExecStop=/opt/sonarqube/bin/li
nux-x86-64/sonar.sh stop

User=sonar
Group=sonarGroup
Restart=always

[Install]
WantedBy=multi-user.target

# once you add press :wq! to come out of the above editor
sudo systemctl start sonar

sudo systemctl enable sonar

sudo systemctl status sonar
type q now to come out of this mode.
Now execute the below command to see if Sonarqube is up and running. This may take a few minutes.

Check Sonar logs by executing tail command:
tail -f /opt/sonarqube/logs/sonar.log

Make sure you get the below message that says sonarqube is up..


Now access SonarQube UI by going to browser and enter public dns name with port 9000
Login as admin/admin

Please follow steps for integrating SonarQube with Jenkins

https://www.coachdevops.com/2020/04/how-to-integrate-sonarqube-with-jenkins.html

Please watch the above steps as a demo in YouTube as well:

Monday, May 4, 2020

Build Docker images using Jenkins | Dockerize Java App | Automate Docker builds using Jenkins

We will learn how to automate Docker builds using Jenkins. We will use Java based application. I have already created a repo with source code + Dockerfile. The repo also have Jenkinsfile for automating the following:

- Automating builds
- Automating Docker image creation
- Automating Docker image upload
- Automating Docker container provisioning

Pre-requisites:
1. Jenkins is up and running
2. Docker installed on Jenkins instance. Click to here to know how to integrate Jenkins and Docker.
3. Docker plug-in installed in Jenkins
4. user account setup in https://cloud.docker.com
5. Port 8085 open in security firewall rules

Step #1 - Create Credentials for Docker Hub
Go to your Jenkins where you have installed Docker as well. Go to credentials -->


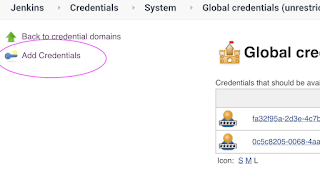
Click on Global credentials
Click on Add Credentials


Now Create an entry for Docker Hub credentials

Make sure you take note of the ID as circled below:


Step # 2 - Create a scripted pipeline in Jenkins, name can be anything

Step # 3 - Copy the pipeline code from below
Make sure you change red highlighted values below:
Your docker user id should be updated.
your registry credentials ID from Jenkins from step # 1 should be copied

node {
  def image
  def mvnHome = tool 'Maven3'
     stage ('checkout') {
        checkout([$class: 'GitSCM', branches: [[name: '*/master']], doGenerateSubmoduleConfigurations: false, extensions: [], submoduleCfg: [], userRemoteConfigs: [[credentialsId: '', url: 'https://bitbucket.org/ananthkannan/myawesomeangularapprepo/']]])      
        }
   
    stage ('Build') {
            sh 'mvn -f MyAwesomeApp/pom.xml clean install'           
        }
       
    stage ('archive') {
            archiveArtifacts '**/*.jar'
        }
       
    stage ('Docker Build') {
         // Build and push image with Jenkins' docker-plugin
            withDockerRegistry([credentialsId: "fa32f95a-2d3e-4c7b-8f34-11bcc0191d70", url: "https://index.docker.io/v1/"]) {
            image = docker.build("your_docker_user_id/mywebapp", "MyAwesomeApp")
            image.push()    
            }
        }

       stage('docker stop container') {
            sh 'docker ps -f name=myContainer -q | xargs --no-run-if-empty docker container stop'
            sh 'docker container ls -a -fname=myContainer -q | xargs -r docker container rm'
       }

    stage ('Docker run') {
        image.run("-p 8085:8085 --rm --name myContainer")
    }
}


Step # 4 - Click on Build to build the pipeline
Once you create the pipeline and changes values per your Docker user id and credentials ID, click on Build Now
Once build is successful, you should see stage view like below:

Steps # 5 - Access Java App which is running inside Docker container
go to browser and enter http://public_dns_name:8085
You should see page like below: