Monday, July 29, 2019

How to take back ups in Jenkins? Thin backup plugin for Jenkins

As you all know, Jenkins does not use a database to store its configuration, It uses XMLs files to store. It is very important to take back up all jobs, configs, logs and plug-ins.

Jenkins thin backup plug-in is what we will be using for taking backups of Jenkins data.

Install plug-in:
It backs up all the data based on your schedule and it handles the backup retention as well.
To get started, first install the plugin.
1. Go to Manage Jenkins –> Manage Plugins
2. Click the Available tab and search for “Thin backup”


3. install plug-in and restart Jenkins.

How to take backups?

As plug-in is installed, we need to configure how we will be doing backups in Jenkins.

1. Go to manage Jenkins->ThinBack
2. Click on settings. Enter info as needed for the backup.

3. after saving, click Backup Now link to run the back up to make sure it is creating data where needed.


4. Now you should see the back up folder.

Thursday, May 16, 2019

Install JFrog Artifactory on Ubuntu - Artifactory install Ubuntu using Docker

Artifactory is one of the popular Binary repository manager. It is Java based tool, used for storing artifacts. Artifactory can be integrated with many Continuous integration and Continuous delivery tools. Artifactory is mainly used by Ant, Maven and Gradle build tools.
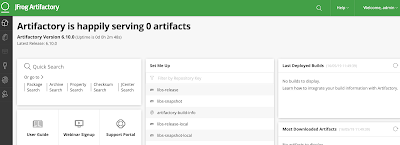
Let us see how to configure Artifactory on Ubuntu 16.0.4 using Docker. We will configure Artifactory by doing the three steps:

1. Install Docker on Ubuntu 16.0.4
2. Download Artifactory image
3. Spin up a container using the Artifactory image 

1. Install Docker on Ubuntu

Install packages to allow apt to use a repository over HTTPS:

sudo apt -y install apt-transport-https ca-certificates curl software-properties-common

Add Docker’s official GPG key:
curl -fsSL https://download.docker.com/linux/ubuntu/gpg | sudo apt-key add -

Add stable repository:
sudo add-apt-repository "deb [arch=amd64] https://download.docker.com/linux/ubuntu $(lsb_release -cs) stable"

Install Docker CE:
sudo apt update && sudo apt -y install docker-ce

If you would like to use Docker as a non-root user, you should now consider adding your user to the “docker” group with something like:
sudo usermod -aG docker $USER

Run the command below to see a version of docker installed.
docker version
 Client:
 Version:           18.09.6
 API version:       1.39
 Go version:        go1.10.8
 Git commit:        481bc77
 Built:             Sat May  4 02:35:27 2019
 OS/Arch:           linux/amd64
 Experimental:      false

Step 2: Download Artifactory Docker image

There are different editions of JFrog Artifactory available, let us use open source version.

Pull the latest Docker image of JFrog Artifactory.
sudo docker pull docker.bintray.io/jfrog/artifactory-oss:latest

Display docker images
sudo docker images

Step 3: Create Data Directory

Create data directory on host system to ensure data used on container is persistent.
sudo mkdir -p /jfrog/artifactory
sudo chown -R 1030 /jfrog/

Step 4: Start JFrog Artifactory container

To start an Artifactory container, use the command:
sudo docker run --name artifactory -d -p 8081:8081 \
 -v /jfrog/artifactory:/var/opt/jfrog/artifactory \
   docker.bintray.io/jfrog/artifactory-oss:latest
 

Step 5: Run Artifactory as a service

sudo vim /etc/systemd/system/artifactory.service
 
# Copy the below code highlighted in green 
[Unit]
Description=Setup Systemd script for Artifactory Container
After=network.target

[Service]
Restart=always
ExecStartPre=-/usr/bin/docker kill artifactory
ExecStartPre=-/usr/bin/docker rm artifactory
ExecStart=/usr/bin/docker run --name artifactory -p 8081:8081 \
  -v /jfrog/artifactory:/var/opt/jfrog/artifactory \
  docker.bintray.io/jfrog/artifactory-oss:latest
ExecStop=-/usr/bin/docker kill artifactory
ExecStop=-/usr/bin/docker rm artifactory

[Install]
WantedBy=multi-user.target 

Reload Systemd
sudo systemctl daemon-reload

Then start Artifactory container with systemd.
sudo systemctl start artifactory
 
Enable it to start at system boot.
sudo systemctl enable artifactory

Check whether Artifactory is running?
sudo systemctl status artifactory

Step 6: Access Artifactory Web Interface

http://server_url:8081/artifactory

You should see Artifactory welcome page.


Tuesday, May 7, 2019

Why we need DevOps - Why DevOps is so Important - Why DevOps

Transforming to DevOps requires a change in culture and mindset. One of the key benefits of DevOps is to remove silos (the communication barriers between teams) between development and ops teams. 
 
Adopting DevOps to an organization always comes with a lot of challenges. Transitioning to DevOps requires a change in culture & mindset and much more.

Let's look at the top 5 reasons why companies are adopting to DevOps:

1. Time to Market
When you competitors are able to delivery products quickly, you don't want to fall too behind. How can you achieve this? By having end to end devops pipelines setup for your applications.

2. Reduced Build/Deployment errors
Companies spent millions of dollars in hiring Devops skilled people. why? they don't want to find issues in PROD environment rather they would like to have find more issues in DEV or QA environment and eliminate them quickly. This saves a lot of time and $.

3. Better communication and Collaboration
Adopting to Devops brings better communication between Dev, QA and Ops team.

4. Better efficiencies
By setting up CICD pipelines, you can automate and speed up the software delivery process and make the process completely free of errors with human intervention. Teams practicing CD can build, configure, and package software and orchestrate its deployment in such a way that it can be released into production (low cost, high automation) at any time.

5. Reduced Cost
All of the DevOps benefits translate to reduced overall costs and IT headcount requirements.There is no handover between two teams. The same team that developed the functionality is involved in the go-live, and support during the riskiest moments.

Thursday, May 2, 2019

Jenkins Pipelines Tutorial | Pipeline as a code - Difference between Scripted, Declarative and Multibranch Pipelines

Jenkins is an open-source automation server used to build, test, and deploy software continuously.

Jenkins support various source code management, build, and delivery tools. Jenkins is #1 Continuous integration tool, especially new features like Jenkins Pipelines (Scripted and Declarative Pipeline) makes the delivery process very easy and help Team to adopt DevOps easily.


Jenkins pipeline

- Pipelines are better than freestyle jobs, you can write a lot of complex tasks using pipelines when compared to Freestyle jobs.
- You can see how long each stage takes time to execute so you have more control compared to freestyle.
- Pipeline is groovy based script that have set of plug-ins integrated for automating the builds, deployment and test execution.
- Pipeline defines your entire build process, which typically includes stages for building an application, testing it and then delivering it.
- You can use snippet generator to generate pipeline code for the stages you don't know how to write groovy code.
- Pipelines are two types - Scripted pipeline and Declarative pipeline

Jenkins Pipeline execution engine supports two DSL syntaxes: Scripted Pipeline and Declarative Pipeline.

Type of Jenkins Pipelines
  1. Scripted pipeline
  2. Declarative pipeline
 Scripted pipeline

- Scripted pipeline is traditional way of writing pipeline using groovy scripting in Jenkins UI.
- stricter groovy syntax
- each stage can not be executed in parallel in multiple build agents(Slaves) that easily.
- Code is defined within a node block

// Scripted pipeline
node {
  stage('Build') {
       echo 'Building....'
  }
  stage('Test') {
      echo 'Building....'
  }
  stage('Deploy') {
      echo 'Deploying....'
  }
}


Declarative Pipeline (Jenkinsfile)

- New feature added to Jenkins where you create a Jenkinsfile and check in as part of SCM such as Git.
- simpler groovy syntax
- Code is defined within a 'pipeline' block
- each stage can be executed in parallel in multiple build agents(Slaves)

// Declarative pipeline
pipeline {
  agent { label 'slave-node' }
  stages {
    stage('checkout') {
      steps {
        git 'https://bitbucket.org/myrepo''
      }
    }
    stage('build') {
      tools {
        gradle 'Maven3'
      }
      steps {
        sh 'mvn clean test'
      }
    }
  }
}


Wednesday, April 24, 2019

Ansible playbook to install OpenJDK 8 on Ubuntu - Install OpenJDK 8 using Ansible playbook

 Here below is ansible playbook to install Open JDK 8 on Ubuntu:

---
- hosts: Java_Group

  tasks:
  - name: Update APT package manager repositories cache
    become: true
    apt:
      update_cache: yes

  - name: Install OpenJDK Java
    become: yes
    apt:
      name: "{{ item }}"
      state: present
    with_items:
     openjdk-8-jdk

How to install Jenkins on Ubuntu - Install Jenkins Ubuntu

Please follow steps to install Java, Jenkins on Ubuntu EC2 we provisioned in the class.(use git bash or ITerm window). You need to execute below steps on Ubuntu Ec2.

You need to start with Java installation

Open JDK 8 on Ubuntu

sudo apt-get update

sudo apt-get install default-jdk -y


Once install java, enter the below command

Verify Java version
java -version

openjdk version "1.8.0_191"
OpenJDK Runtime Environment (build 1.8.0_191-8u191-b12-2ubuntu0.16.04.1-b12)
OpenJDK 64-Bit Server VM (build 25.191-b12, mixed mode)

Now lets do Jenkins installation

Jenkins (make sure you open port number - 8080 in security rules, edit inbound rules)

wget -q -O - https://pkg.jenkins.io/debian/jenkins-ci.org.key | sudo apt-key add -
echo deb http://pkg.jenkins.io/debian-stable binary/ | sudo tee /etc/apt/sources.list.d/jenkins.list
sudo apt-get update
sudo apt-get install jenkins -y