Artifactory is one of the popular Binary repository manager. It is Java based tool, used for storing artifacts. Artifactory can be integrated with many Continuous integration and Continuous delivery tools. Artifactory is mainly used by Ant, Maven and Gradle build tools.
Let us see how to configure Artifactory on Ubuntu 16.0.4 using Docker. We will configure Artifactory by doing the three steps:
1. Install Docker on Ubuntu 16.0.4
2. Download Artifactory image
3. Spin up a container using the Artifactory image
Add Docker’s official GPG key:
Add stable repository:
Install Docker CE:
If you would like to use Docker as a non-root user, you should now consider adding your user to the “docker” group with something like:
Run the command below to see a version of docker installed.
Pull the latest Docker image of JFrog Artifactory.
sudo docker pull docker.bintray.io/jfrog/artifactory-oss:latest
Display docker images
sudo docker images

Reload Systemd
sudo systemctl daemon-reload
Then start Artifactory container with systemd.
Check whether Artifactory is running?

Let us see how to configure Artifactory on Ubuntu 16.0.4 using Docker. We will configure Artifactory by doing the three steps:
1. Install Docker on Ubuntu 16.0.4
2. Download Artifactory image
3. Spin up a container using the Artifactory image
1. Install Docker on Ubuntu
Install packages to allow apt to use a repository over HTTPS:sudo apt -y install apt-transport-https ca-certificates curl software-properties-common
Add Docker’s official GPG key:
curl -fsSL https://download.docker.com/linux/ubuntu/gpg | sudo apt-key add -
Add stable repository:
sudo add-apt-repository "deb [arch=amd64] https://download.docker.com/linux/ubuntu $(lsb_release -cs) stable"
Install Docker CE:
sudo apt update && sudo apt -y install docker-ce
If you would like to use Docker as a non-root user, you should now consider adding your user to the “docker” group with something like:
sudo usermod -aG docker $USER
Run the command below to see a version of docker installed.
docker version Client:
Version: 18.09.6
API version: 1.39
Go version: go1.10.8
Git commit: 481bc77
Built: Sat May 4 02:35:27 2019
OS/Arch: linux/amd64
Experimental: false
Step 2: Download Artifactory Docker image
There are different editions of JFrog Artifactory available, let us use open source version.Pull the latest Docker image of JFrog Artifactory.
sudo docker pull docker.bintray.io/jfrog/artifactory-oss:latest
Display docker images
sudo docker images
Step 3: Create Data Directory
Create data directory on host system to ensure data used on container is persistent.sudo mkdir -p /jfrog/artifactory
sudo chown -R 1030 /jfrog/
Step 4: Start JFrog Artifactory container
To start an Artifactory container, use the command:sudo docker run --name artifactory -d -p 8081:8081 \ -v /jfrog/artifactory:/var/opt/jfrog/artifactory \ docker.bintray.io/jfrog/artifactory-oss:latest
Step 5: Run Artifactory as a service
sudo vim /etc/systemd/system/artifactory.service
# Copy the below code highlighted in green
[Unit]
Description=Setup Systemd script for Artifactory Container
After=network.target

[Service]
Restart=always
ExecStartPre=-/usr/bin/docker kill artifactory
ExecStartPre=-/usr/bin/docker rm artifactory
ExecStart=/usr/bin/docker run --name artifactory -p 8081:8081 \
  -v /jfrog/artifactory:/var/opt/jfrog/artifactory \
  docker.bintray.io/jfrog/artifactory-oss:latest
ExecStop=-/usr/bin/docker kill artifactory
ExecStop=-/usr/bin/docker rm artifactory

[Install]
WantedBy=multi-user.target
Reload Systemd
sudo systemctl daemon-reload
Then start Artifactory container with systemd.
sudo systemctl start artifactory
Enable it to start at system boot.
sudo systemctl enable artifactory
Check whether Artifactory is running?
sudo systemctl status artifactory
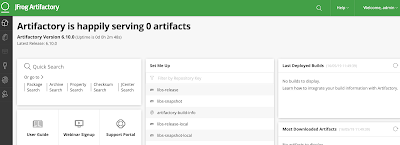
Step 6: Access Artifactory Web Interface
http://server_url:8081/artifactoryYou should see Artifactory welcome page.


A4A8208A46
ReplyDeletekiralık hacker
hacker arıyorum
kiralık hacker
hacker arıyorum
belek
19AB7AB8
ReplyDeleteKaraman Esçort
Bayburt Esçort
Aksaray Esçort
Kayseri Esçort
Edirne Esçort
Bilecik Esçort
Nevşehir Esçort
Çanakkale Esçort
Tekirdağ Esçort