This command turns a directory into an empty Git repository. This is
the first step in creating a repository. After running git init, adding
and committing files/directories is possible.
git add
Adds files in the to the staging area for Git. Before a file is
available to commit to a repository, the file needs to be added to the
Git index (staging area). There are a few different ways to use git add,
by adding entire directories, specific files, or all unstaged files.
git commit
Record the changes made to the files to a local repository. For easy reference, each commit has a unique ID.
It’s best practice to include a message with each commit explaining
the changes made in a commit. Adding a commit message helps to find a
particular change or understanding the changes.
git status
This command returns the current state of the repository.
git clone
To create a local working copy of an existing remote repository, use git clone to copy and download the repository to a computer.
git fork
A fork is a copy of a repository.
Forking a repository allows you to freely experiment with changes
without affecting the original project.
git pull
To get the latest version of a repository run git pull. This pulls the changes from the remote repository to the local computer.
git push
Sends local commits to the remote repository. git push requires two parameters: the remote repository and the branch that the push is for.
git checkout
To start working in a different branch, use git checkout to switch branches.
git merge
Integrate branches together. git merge combines the changes
from one branch to another branch. For example, merge the changes made
in a staging branch into the stable branch.
git commit --amend
You can also re-write history of your most recent commit in your local git repository by using git commit --amend command.
Please find steps below to increase or decrease memory for the EC2 instances. For example, if your t2.micro instance is too
small for its workload, you can change it to an m3.medium instance.
1. Go to AWS console, choose the instance, instance state, click on stop the instance.
2. once stopped, go to Instance settings, change Instance type to desired type
3. Start the instance again.
That's it. You don't have to create a new instance. This is how you do it!
Puppet uses Client/Server model. The server does all the automation of tasks on nodes/servers that have a client(agent) installed. The work of the Puppet agent is to send facts to the puppet master and request a catalog based on certain interval level(default time 30 mins). Once it receives a catalog, Puppet agent applies it to the node by checking each resource the catalog describes. It makes relevant changes to attain the desired state. The work of the Puppet master is to control configuration information. Each managed agent node requests its own configuration catalog from the master. Please find the steps needed for Integrating Puppet master and agent on Ubuntu 16.0.4:
Pre-requisites:
a) One Ubuntu instance for Puppet Master - this instance should have 4 GB RAM. so instance type should be at least medium. Master ubuntu EC2 should have a security group to ensure that below ports are open in security firewall * TCP 8140 - Agents will talk to the master on this port(puppet enterprise) * TCP 22 - To login to the server/instance using SSH
b) one Ubuntu instance as node which will have agent installed - This can be micro instance.
sudo ufw allow 8140 sudo systemctl enable puppetserver (the above command is to start the service during starting the Ubuntu instance)
sudo systemctl start puppetserver (The above command is for starting the server and this may take some time) sudo systemctl status puppetserver you should see a message like puppet systemd[1]: Started puppetserver Service. That's it puppet master is up and running.
Now press q to come out of window. 2. Steps for Puppet Agent
Step 2.1 First edit the hosts file on the puppet agent by modifying /etc/hosts sudo nano /etc/hosts # Please add Puppet Master server IP address and space and enter puppet puppet_master_ip_addresspuppet
(please do not use public DNS name, use only private IP address)
Press Ctrl O for saving and then enter Press Ctrl X for exit after saving.
Step 3 - Signing certificates on Puppet Master The
first time you run the Puppet agent, it generates an SSL certificate
and sends a signing request to the Puppet master. After the Puppet
master signs the agent's certificate, it will be able to communicate
with and control the agent node.
First list the unsigned certificates on puppet master EC2 instance
sudo /opt/puppetlabs/bin/puppetserver ca list
The above command will list agent ip address. "your_puppet_Agent_Ec2_private_dns_name" (SHA256) 46:19:79:3F:70:19:0A:FB:DA:3D:C8:74:47:EF:C8:B0:05:8A:06:50:2B:40:B3:B9:26:35:F6:96:17:85:5E:7C
Now sign the Puppet agent IP address. sudo /opt/puppetlabs/bin/puppetserver ca sign --certname "your_puppet_Agent_Ec2_private_dns_name" Note: (this is NOT required) To sign the certificates all, execute the below command. sudo /opt/puppetlabs/bin/puppetserver ca sign —all
Revoke Certificates (NOT required) sudo /opt/puppetlabs/bin/puppetserver ca clean hostname
Step 4 - Verifying installation by creating Manifests in Puppet Master The puppet manifest file is the actual file which contains the configuration details for the agents. This file is centrally stored at Puppet Master. sudo nano /etc/puppetlabs/code/environments/production/manifests/site.pp #copy the below yellow lines in the above file file {'/tmp/puppet_test.txt': # resource type file and filename ensure => present, # make sure it exists mode => '0644', # file permissions content => "Hello from Puppet master to agent on ${ipaddress_eth0}!\n", # Print the eth0 IP fact }
Press Ctrl O for saving and then enter Press Ctrl X for exit after saving.
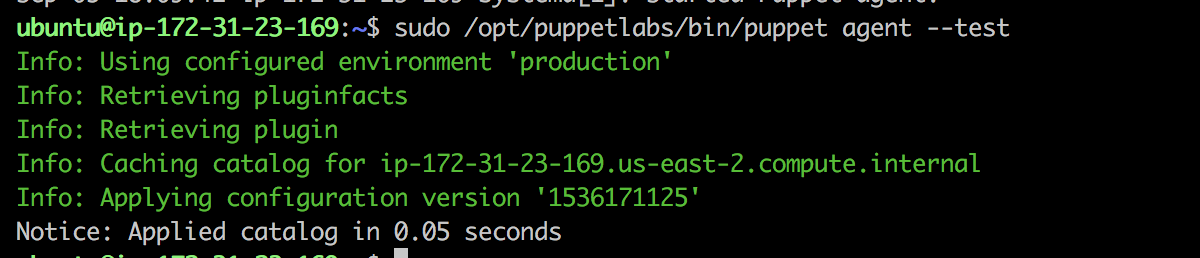
Step 5 - Apply Manifests in Puppet Agent apply the changes in puppet agent by executing below command: sudo /opt/puppetlabs/bin/puppet agent --test
You should see a file being modified in /tmp/puppet_works.txt in agent(node). You can confirm by typing this command on puppet node
sudo cat /tmp/puppet_test.txt Hello from Puppet master to agent on IP_address!!
That's it! you have set up Puppet Master and configured agent on the target node successfully!
Jenkins has powerful feature of master slave architecture which enables distributed builds. This article we will learn how to establish Jenkins Master and slave nodes on Ubuntu machines.
This lab demo is available on YouTube:
Few info on Jenkins master and slave setup:
Jenkins Master
Your main Jenkins server is the Master. The Master’s job is to handle:
Scheduling build jobs.
Dispatching builds to the slaves for the actual execution.
Monitor the slaves (possibly taking them online and offline as required).
Recording and presenting the build results.
A Master instance of Jenkins can also execute build jobs directly.
Jenkins Slave
A Slave is a Java executable that runs on a remote machine. Following are the characteristics of Jenkins Slaves:
It hears requests from the Jenkins Master instance.
Slaves can run on a variety of operating systems.
The job of a Slave is to do as they are told to, which involves executing build jobs dispatched by the Master.
You
can configure a project to always run on a particular Slave machine, or
a particular type of Slave machine, or simply let Jenkins pick the next
available Slave.
Lets see how to configure both Jenkins master and slave nodes on Ubuntu EC2.
Step 1 - Jenkins master node configuration
(If you have already Jenkins up and running, this step # 1 is not required, Go to next step # 2, slave node configuration)
Install first Java by following below steps. Make sure port 8080 is opened in security group.
wget -q -O - https://pkg.jenkins.io/debian/jenkins.io.key | sudo apt-key add - echo deb http://pkg.jenkins.io/debian-stable binary/ | sudo tee /etc/apt/sources.list.d/jenkins.list sudo apt-get update sudo apt-get install jenkins -y
now to go to browser --> http://server_ip_address:8080/
Copy the password from this location
By entering
sudo cat /var/lib/jenkins/secrets/initialAdminPassword
Paste the password and click on install suggested plug-ins.
Create SSH keys in master node by executing below command:
ssh-keygen (no need to enter any password, just enter three times)
Step # 2 Slave node configuration(you need new micro Ubuntu 18.0.4 instance for this slave) only port 22 needs to be open
Add SSH Keys from Master to Slave Execute the below command in Jenkins master Ec2 to print the ssh keys. sudo cat ~/.ssh/id_rsa.pub
If you do not have keys, create using ssh-keygen command.
Copy the output of the above command:
Now go to Slave node and execute the below command
sudo -u jenkins vi /home/jenkins/.ssh/authorized_keys
This will be empty file, now copy the public keys from master into above file.
Once you pasted the public keys in the above file in Slave, come out of the file by entering wq!
Now go into master node
ssh jenkins@slave_node_ip
this is to make sure master is able to connect slave node. once you are successfully logged into slave, type exit to come out of slave.
Now copy the SSH keys into /var/lib/jenkins/.ssh by executing below command in master(make sure you exited from slave by typing exit command:
sudo cp ~/.ssh/known_hosts /var/lib/jenkins/.ssh
Because jenkins master will look keys from the above folder.
Step # 3 Register slave node in Jenkins:
Now to go Jenkins Master, manage jenkins, manage nodes.
Click on new node. give name and check permanent agent. Click Ok to create the slave node.
in the next screen
give name and no of executors as 1. enter /home/jenkins as remote directory.
select launch method as Launch slaves nodes via SSH.
enter Slave node ip address as Host.
click on credentials. Enter user name as jenkins. Make jenkins lowercase as it is shown.
Kind as SSH username with private key. enter private key of master node directly by executing below command:
sudo cat ~/.ssh/id_rsa (Make sure you copy the whole key including the below without missing anything)
-----BEGIN RSA PRIVATE KEY-----