Saturday, April 20, 2024

Fix for Jenkins slowness when Running in AWS EC2 instance | Jenkins Very Slow Upon Starting EC2 Instance after Stopping

Let's say that you have configured Jenkins in AWS EC2 instance and you are using AWS free tier and you are NOT using Elastic IP, so when ever you start EC2 instance after stopping, you would have noticed Jenkins UI is taking a lot of time to come up. You try to access any page in Jenkins, it will be really slow.

What is the root cause of the issue?

Because EC2 configured in AWS free tier account would have new IP after every restart, Jenkins was trying to use old IP address when you are trying to start Jenkins. Due to this issue, Jenkins will be very slow.

Pre-requisites:

  • Jenkins is setup in AWS cloud using free-tier account.

There are two ways you can fix this issue:

First option using command line

Make changes in the xml file by logging into EC2 instance through command line using Git bash or any SSH tool.

Connect to Jenkins EC2 instance using Git bash or iTerm:

Navigate to Jenkins installation directory:

cd /var/lib/jenkins/

Modify jenkins.model.JenkinsLocationConfiguration.xml file by executing below command:

sudo nano jenkins.model.JenkinsLocationConfiguration.xml

Make sure you provide Jenkins current URL in below location and restart Jenkins.

sudo service jenkins restart

Now try accessing Jenkins through UI, it will be really performing well.

Second option us using Jenkins UI

Change public URL under Manage Jenkins->System

Change Jenkins URL to current Jenkins URL:

Click on Apply-> Save.

that's it. You will notice Jenkins is performing well now.

Watch steps in YouTube channel: 

GitHub Actions CICD Pipeline to Deploy Java WebApp into Azure App Service | Integration GitHub Actions with Azure App Service


Pre-requisites:

  • Make sure Java web app is setup in GitHub
  • Azure subscription to create web app
What are we going to do in this lab?
1. Create a Web App in Azure Cloud
2. Configure WebApp to Deploy using gitHub Actions
3. Create workflow yaml
4. Add steps/tasks in the yaml file
5. Run the workflow yaml
6. Check if Java Web App is deployed in Azure App Service

How to Create WebApp in Azure Portal?

1. Login portal.azure.com
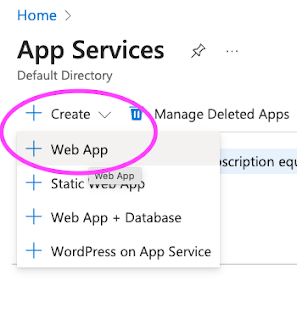
2. Click on App services


3.Click on + Add or click on Create app service


Click on Web App. Choose your Azure subscription, usually Pay as you Go or Free trial subscription
Create a new resource group or you can use existing resource group)


Enter App service name(it should be unique)
Publish as Code
Run time stack as Java 17
Java Web Server stack --> Tomcat 10.0
Operating System as Linux
Region as Central US or where ever you are based at

Enter LinuxPlan name
Choose pricing plan

Now go to Deployment tab:
Enable basic authentication
and enable Continuous Deployment 


Click on GitHub account, Authorize.
Authorize AzureappService
now select organization, repo, branch


You can also click on preview file to get pipeline YAML code 

Click on Review and Create


Create Web App
Now make sure AzureAppService_PublishProfile secret is automatically created in GitHub repo you selected.


Create GitHub Actions CICD workflow yaml:

name: Build and deploy WAR app to Azure Web App
on:
  push:
    branches:
      - main
  workflow_dispatch:
jobs:
  build:
    runs-on: ubuntu-latest
    steps:
      - uses: actions/checkout@v4
      - name: Set up Java version
        uses: actions/setup-java@v2
        with:
          java-version: '11'
          distribution: 'adopt'
      - name: Build with Maven
        run: mvn clean install -f MyWebApp/pom.xml
      - name: Upload artifact for deployment job
        uses: actions/upload-artifact@v3
        with:
          name: MyWebApp
          path: '${{ github.workspace }}'
  deploy:
    runs-on: ubuntu-latest
    needs: build
    environment:
      name: 'Production'
      url: ${{ steps.deploy-to-webapp.outputs.webapp-url }}
    steps:
      - name: Download artifact from build job
        uses: actions/download-artifact@v3
        with:
          name: MyWebApp
      - name: Deploy to Azure Web App
        id: deploy-to-webapp
        uses: azure/webapps-deploy@v2
        with:
          app-name: 'spingbootwebapp'
          slot-name: 'Production'
          publish-profile: ${{ secrets.AZUREAPPSERVICE_PUBLISHPROFILE_76B948D486E54ED7B06775D572207D40 }}
          package: '*.war'


Check the output after running the pipeline:


Verify if WebApp has been deployed into Azure App Service by browsing Web App url.

https://mysuperjavaapp.azurewebsites.net/MyWebApp/

Watch here all the steps in YouTube channel:

Saturday, April 6, 2024

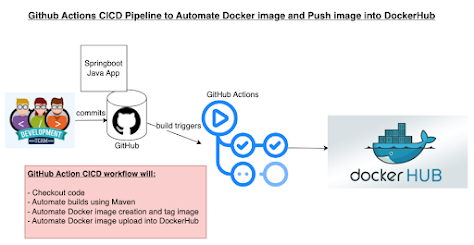
GitHub Actions Pipeline to Create Docker Image and Push Docker Image into DockerHub | GitHub Actions Integration with DockerHub

 Please find steps for integrating DockerHub with GitHub Actions:


Implementation steps:

  • Create access token in DockerHub
  • Add access token, docker hub user name as secrets in GitHub Actions
  • Create GitHub Actions workflow yaml in your repo
  • Add tasks for Maven build, docker image creation, tagging and docker push 
  • Run the workflow/build in GitHub hosted runner(e.g. Ubuntu)
  • Verify docker image have been uploaded into DockerHub

Pre-requisites:

Steps below to create access token in DockerHub:

Click on new access token:
    Copy on Generate


Add Docker Hub user name and token as Secrets in GitHub Actions

Go to your GitHub Repo --> Settings --> 

Click on Secrets and Variables under Security in left nav 
Click new Repository Secret


Enter DOCKERHUB_USERNAME as secret name and 
Enter your docker hub user name


Enter DOCKERHUB_TOKEN as secret name and 
Enter your token as secret


Create GitHub Actions CICD workflow yaml:

Go to GitHub repo where your Java project is, create a new file:

.github/workflows/cicd.yml


The below file have four steps(tasks) 
    - Checkout
    - Install Java on runner
    - Build using Maven
    - Build docker image and tag it
    - Upload docker image into DockerHub

Copy below YAML code:

name: cicd-workflow to create docker image and upload into Dockerhub
on:
  push:
    branches: [ "master" ]
jobs:
  job1:
    runs-on: ubuntu-latest
    steps:
    - uses: actions/checkout@v3
    - name: Set up JDK 17
      uses: actions/setup-java@v2
      with:
        distribution: 'adopt'
        java-version: '17'
    - name: Build with Maven
      run: mvn clean install
    - name: Login to Docker Hub
      uses: docker/login-action@v3
      with:
        username: ${{ secrets.DOCKERHUB_USERNAME }}
        password: ${{ secrets.DOCKERHUB_TOKEN }}
    - name: Build and push Docker image
      env:
        IMAGE_TAG: ${{ github.sha }}
      run: |
        docker build -t ${{ secrets.DOCKERHUB_USERNAME }}/myspringbootapp:${IMAGE_TAG} .
        docker push ${{ secrets.DOCKERHUB_USERNAME }}/myspringbootapp:${IMAGE_TAG}


Commit the file.

As soon as you commit, build will run immediately in GitHub Actions. 
Now you can see the output of build in Actions tab.


Login to DockerHub to verify if docker image have been uploaded successfully.


Watch steps in YouTube channel:

Friday, March 22, 2024

How to Setup Self-Hosted Linux Docker Build Agent in Azure DevOps | How to configure Self-Hosted Linux Docker Agents in Azure Pipelines | Create Custom Build Agents in Azure DevOps

 Let us learn how to configure a self-hosted agent using Docker in Azure DevOps pipelines.

What is an Agent?

An agent is computing infrastructure with installed agent software that runs one job at a time.To build your code or deploy your software using Azure Pipelines, you need at least one agent. As you add more code and people, you'll eventually need more.

When your pipeline runs, the system begins one or more jobs. 


In Azure pipelines, there are two types of build agents:

  1. Microsoft-hosted agents - This is a service totally managed by Microsoft and it's cleared on every execution of the pipeline (on each pipeline execution, you have a fresh new environment).
  2. Self-hosted agents - This is a service that you can to set up and manage by yourself. This can be a custom virtual machine on Azure or a custom on-premise machine inside your infrastructure. In a self-hosted agent, you can install all the software you need for your builds, and this is persisted on every pipeline execution. A self-hosted agent can be on Windows, Linux, macOS, or in a Docker container.

You can set up a self-hosted agent in Azure Pipelines to run inside a Windows Server Core (for Windows hosts), or Ubuntu container (for Linux hosts) with Docker. We will learn in this article on how to host Ubuntu Docker container on Linux machines.

Pre-requisites:
How to configure Self-hosted docker build agent?

1. Go to Azure DevOps dashboard - https://dev.azure.com/
2. Select your project dashboard
3. Go to your project settings
4. Click on Agent pools


Create a new Agent pool name

Enter name as myAgentPool or any name
Make sure you select Grant access permission to all pipelines


Login to Azure VM where the docker build agents will be running.

Step #1 - Install Docker CLI so we can build docker image

sudo apt update && sudo apt install docker.io -y

Step #2 - Add logged in user to docker group
sudo usermod -a -G docker $USER

Step #3 - Clone repo which has Dockerfile

git clone https://github.com/akannan1087/ado-docker-agent-repo.git

Sample dockerfile is here.. please feel free to add any software in the docker agent.
FROM ubuntu:22.04

RUN apt update -y && apt upgrade -y && apt install curl git jq libicu70 maven -y

# Also can be "linux-arm", "linux-arm64".
ENV TARGETARCH="linux-x64"

WORKDIR /azp/

COPY ./start.sh ./
RUN chmod +x ./start.sh

# Create agent user and set up home directory
RUN useradd -m -d /home/agent agent
RUN chown -R agent:agent /azp /home/agent

USER agent
# Another option is to run the agent as root.
# ENV AGENT_ALLOW_RUNASROOT="true"

ENTRYPOINT ./start.sh

Step #4 - change directory
cd ado-docker-agent-repo/azp-agent-in-docker/

Step #5 - Build the Docker image
sudo docker build --tag "azp-agent:linux" --file Dockerfile .

Step #6: Run the agent as a container
Run the below command:

sudo docker run -e AZP_URL="https://dev.azure.com/your_org_name" -e AZP_TOKEN="XXXX" -e AZP_POOL=myAgentPool -e AZP_AGENT_NAME="myLinuxDockerBuildAgent" --name "azp-agent" azp-agent:linux

that's it, docker agent is successfully started.

Step #7: Verify if docker agent is running or not
Run the below command:
sudo docker ps


Check the status of build Agent
Click on agentPool name, click on Agents

This confirms that Build agent is successfully configured in Azure DevOps and is available to run builds.

How to use the Docker build agent in your pipelines?

Please use the docker agent in the classic pipeline like below: select the agentPool


run the job. now you can see the jobs under myAgentPool--> Jobs
 

Here is the sample pipeline YAML code for automating Maven build for a Java project:

trigger:
- main
pool:
name: myAgentPool
stages:
- stage: Build
displayName: Build stage
jobs:
- job: MavenPackageAndPublishArtifacts
displayName: Maven Package and Publish Artifacts
steps:
- task: Maven@3
displayName: 'Maven Package'
inputs:
mavenPomFile: 'MyWebApp/pom.xml'

References:

Watch steps in YouTube channel:

Thursday, March 14, 2024

How to Create Quality Gate in SonarQube and integrate with GitHub Actions | SonarQube Integration with GitHub Actions | Automate Code Scan using SonarQube In GitHub Actions and Force build to Fail or Pass


Pre-requisites:

How to Create Quality gate in SonarQube and integrate with GitHub Actions?

Make sure SonarQube is up and running and integrated with GitHub Actions. Please click here if you would like to setup SonarQube and integrate with GitHub Actions.

We will be executing below steps:
  • Login to SonarQube
  • Create Quality Gate in SonarQube
  • Add conditions in Quality Gate
  • Make quality gate as Default
  • Create GitHub Actions CICD workflow yaml
  • Add tasks for Maven build and Sonar Scan
  • Add tasks for integrating Quality gate 
  • pass/fail the builds in SonarQube

What is Quality gate?

In SonarQube a quality gate is a set of conditions that must be met in order for a project to be marked as passed.

Create Quality Gate

Login to SonarQube, Click on Quality gate, enter some name

Once you create the quality gate. Click on Add condition. 

Select new issues from the drop down and enter 2 


Select new bugs from the drop down and enter 1 as error


Setup a Default Gate


Create GitHub Actions CICD workflow yaml:

Go to GitHub repo where your Java project is, create a new file:

.github/workflows/cicd.yml


The below file have four steps(tasks) 
    - Checkout
    - Install Java on runner
    - Build using Maven
    - run Sonar Scan (this task need to have projectKey defined, otherwise build will fail)
    - run quality gate check
    - pass/fail the build

Copy the the whole yellow color marked content from below:

name: CI/CD workflow for Maven Build, Sonar Code scan and Quality gate check
on:
  push:
    branches:
      - main
  workflow_dispatch:
jobs:
  build:
    runs-on: ubuntu-latest
    steps:
    - name: Checkout code
      uses: actions/checkout@v3
    - name: Set up JDK 11
      uses: actions/setup-java@v2
      with:
        distribution: 'adopt'
        java-version: '11'
    - name: Build with Maven
      run: mvn install -f MyWebApp/pom.xml
    - name: SonarQube Scan
      uses: sonarsource/sonarqube-scan-action@master
      with:
        projectBaseDir: .
        args: >
          -Dsonar.organization=my-org
          -Dsonar.projectKey=my-Java-web-app
      env:
        SONAR_TOKEN: ${{ secrets.SONAR_TOKEN }}
        SONAR_HOST_URL: ${{ secrets.SONAR_HOST_URL }}
    # Check the Quality Gate status.
    - name: SonarQube Quality Gate check
      id: sonarqube-quality-gate-check
      uses: sonarsource/sonarqube-quality-gate-action@master
      # Force to fail step after specific time.
      timeout-minutes: 5
      env:
       SONAR_TOKEN: ${{ secrets.SONAR_TOKEN }}
       SONAR_HOST_URL: ${{ secrets.SONAR_HOST_URL }} #OPTIONAL
    # Show the output from the Quality Gate.
    # The possible outputs of the `quality-gate-status` variable are `PASSED`, `WARN` or `FAILED`.
    - name: "Here is SonarQube Quality Gate Status value.."
      run: echo "The Quality Gate status is ${{ steps.sonarqube-quality-gate-check.outputs.quality-gate-status }}"


Commit the file.

As soon as you commit, build will run immediately in GitHub Actions. 
Now you can see the output of build in Actions tab.


Now login to SonarQube to see the Scan report


If your code have any defects, you can see some build fails.

SonarQube Quality gate failed:

Watch Steps in YouTube channel:

Thursday, March 7, 2024

How to Integrate Slack with GitHub Actions | Slack Integration with GitHub Actions| Send Push notifications to Slack GitHub Actions

Integrating Slack with GitHub Actions for sending Notifications


Pre-requisites:

How to integrate Slack with GitHub Actions

We will be using slack GitHub Action Slack integration action for posting messages to Slack channel from GitHub Actions.

We will be following below steps:

1. Create a new App in https://api.slack.com/apps
2. Select workspace in the app
3.Select incoming webhooks
4. Activate incoming webhook
5. Add new webhook integration
6. Select channel, Allow
7. Copy the webhook url

Create App from scratch


Enter App name and pick a workspace
Click on incoming webhooks
Activate incoming webhooks, click on Add new webhook to workspace

Select the channel where you want to send notfications

Copy webhook url


Add Slack Webhook URL as Secret in GitHub Actions
Go to your GitHub Repo --> Settings --> 

Click on Secrets and Variables under Security in left nav 
Click new Repository Secret
Add SLACK_WEBHOOK_URL with value


Create GitHub Actions CICD workflow yaml:

Go to GitHub repo where your Java project is, create a new file:

.github/workflows/cicd.yml


name: cicd-workflow with slack integration
on:
  push:
    branches: [ "master" ]
jobs:
  job1:
    runs-on: ubuntu-latest
    env:
      SLACK_WEBHOOK_URL: ${{ secrets.SLACK_WEBHOOK_URL }}
    steps:
    - uses: act10ns/slack@v2
      with:
        status: starting
        channel: '#mar-2024-weekend-batch'
        message: Starting Docker Build image...
      if: always()
    - uses: actions/checkout@v3
    - name: Build Docker image
      run: |
        docker build -t my-docker-repo .
    - uses: act10ns/slack@v2
      with:
        channel: '#mar-2024-weekday-batch'
        status: ${{ job.status }}
        steps: ${{ toJson(steps) }}
      if: always()


Watch Steps in YouTube channel: